Monday, September 27, 2010
Decorated Sugar Cookies - Daring Bakers Style
The September 2010 Daring Bakers’ challenge was hosted by Mandy of "What the Fruitcake?!" Mandy challenged everyone to make Decorated Sugar Cookies based on recipes from Peggy Porschen and The Joy of Baking.
Who doesn't love sugar cookies?!? I sure do. Not only are they delcious, they are a great way to spend time with the kids. Our challenge this month was to decorate cookies in a "September" theme. Well, to me September means back to school. I didn't have any "school" specifc cookies cutters tho and I didn't feel like buying new ones so I improvised. The schoool bus is really a tombstone cookie cutter, the school is a "haunted house" cutter and the apple is really a "pumpkin" cutter! Enjoy.
Basic Sugar Cookies:
Makes approximately 36 x 10cm / 4 inch cookies
200g / 7oz / ½ cup + 6 Tbsp Unsalted Butter, at room temperature
400g / 14oz / 3 cups + 3 Tbsp All Purpose / Plain Flour
200g / 7oz / 1 cup Caster Sugar / Superfine Sugar
1 Large Egg, lightly beaten
5ml / 1 tsp Vanilla Extract / Or seeds from 1 vanilla bean
Directions:
Cream together the butter, sugar and any flavourings you’re using. Beat until just becoming creamy in texture.
Tip: Don’t over mix otherwise you’ll incorporate too much air and the cookies will spread during baking, losing their shape.
Beat in the egg until well combined, make sure to scrape down the sides of the bowl.
Add the sifted flour and mix on low until a non sticky dough forms.
Knead into a ball and divide into 2 or 3 pieces.
Roll out each portion between parchment paper to a thickness of about 5mm/0.25 inch
Refrigerate for a minimum of 30 minutes.
Tip: Recipes commonly just wrap the whole ball of dough in clingwrap and then refrigerate it for an hour or overnight, but by rolling the dough between parchment, this shortens the chilling time and then it’s also been rolled out while still soft making it easier and quicker.
Once chilled, peel off parchment and place dough on a lightly floured surface.
Cut out shapes with cookie cutters or a sharp knife.
Arrange shapes on parchment lined baking sheets and refrigerate for another 30 minutes to an hour.
Tip: It’s very important you chill them again otherwise they’ll spread while baking.
Re-roll scraps and follow the above process until all scraps are used up.
Preheat oven to 180°C / 350°F / Gas Mark 4.
Bake until golden around the edges, about 8-15mins depending on the size of the cookies.
Tip: Bake same sized cookies together otherwise mixing smaller with larger cookies could result in some cookies being baked before others are done.
Leave to cool on cooling racks.
Once completely cooled, decorate as desired.
Tip: If wrapped in tinfoil/cling wrap or kept in airtight containers in a cool place, un-decorated cookies can last up to a month.
Icing Tip
I buy pre-made Royal Icing Powder form my local cake decorating store. All I have to do is add water to my desired consistency and then I add colour gels to the icing. I prefer to put the icing in little plastic decorating bottles - I find it easier to use than my decorating bags. It is also easier to store left over in the fridge when it is in bottles vs bags.
Sunday, September 19, 2010
Quinoa Chocolate Cake
I saw this recipe in a local paper a few weeks paper and it looked interesting. Noone in our family is gluten intolerant so I rarely make gluten free desserts. But the creators of this recipe, Patricia Green and Carolyn Hemming, insist noone will guess this is made with quinoa. I'm always up for a challenge so let's find out if it's true!
Recipe adapted from Quinoa 365 (Whitecap, 2010), Patricia Green and Carolyn Hemming
Quinoa (pronounced KEEN-wah) is often mistakenly believed to be a grain. In fact, it's the fruit of a broadleaf plant meaning it's in the same family as spinach and beets! According to Wikipedia, it originated in the Andean region of South America, where it has been an important food for over 6,000 years.
Did you Know?
Quinoa is:
- A complete protein
- Gluten-free
- Contains all eight essential amino acids
- Rich in vitamins E, B2 and B6, folic acid, biotin, calcium, potassium, iron, copper, magnesium, manganese and chloride
Makes two 8-inch round cakes.
Ingredients:
2/3 cup quinoa
1 1/3 cups water
1/3 cup milk
4 large eggs
1 tsp pure vanilla extract
3/4 cup butter, melted and cooled to room temperature
1 1/2 cups white sugar
1 cup unsweetened cocoa powder
1 packet or teaspoon of Starbucks Via instant coffee (optional)
1 1/2 tsp baking powder
1/2 tsp baking soda
1/2 tsp salt
What to do:
Bring the water and quinoa to a boil in a medium saucepan. Cover, reduce to a simmer and cook for 10 minutes. Turn off the heat and leave the covered saucepan on the stove for another 10 minutes. Fluff with a fork and allow the quinoa to cool.
Preheat the oven to 350°F (180°C). Lightly grease two 8-inch round cake pans. Line the bottoms of the pans with a piece of parchment paper or grease and flour it.
Combine the eggs, milk and vanilla in a blender. Add 2 cups of cooked quinoa and the butter and continue to blend until smooth.
Combine the sugar, cocoa, coffee, baking powder, baking soda and salt in a large bowl. Add the wet mixture and combine well. Divide the batter into the 2 pans and bake for 40-45 minutes or until a toothpick inserted in the center comes out clean. Switch pans half way through time to ensure even baking.
Cool completely. Enjoy!
Store in a sealed container in the refrigerator for up to one week or freeze for up to a month.
Verdict: Well, the cake is good, really good...but (there's always a but) I'm not sure everyone who tastes it would think it's a regular flour cake. They may not know it's quinoa (which is technically what the authors said) but there was a slightly crunchy texture to the cake on the day it was baked. However, by day three the quinoa had definitely softened and tasted much closer in everyway to a regular flour cake.
Overall, the cake is delicious and I will make it again and DEFINITELY make it for anyone who can't tolerate flour.
PS - perhaps if I had blended the quinoa mixture more before baking or hadn't let it cool in the fridge for a few hours before making the recipe the exture would have been different. I'll let you know if the results are different next time I bake it.
pps I added the instant coffee to bump up the chocolate but it was not in the original recipe!
Saturday, September 18, 2010
A little Canadian blog... please and thank you
Note: I have entered “Project Food Blog”. Project Food Blog is the first-ever interactive competition where thousands of bloggers are competing in a series of culinary blogging challenges for the chance to advance and a shot at the ultimate prize: $10,000 and a special feature on Foodbuzz.com for one year.
The first Project Food Blog Challenge is to define yourself as a blogger and discuss why I deserve to be the next food blog star.
Challenge #1
This is truly a challenge because like the typical Canadian, I have been taught to never profess to be the best at anything. Boasting, bragging, putting oneself before others is not very Canadian. After all, we always say please and thank you and even “sorry” when it’s clearly not our fault. We are nice. I’m not sure telling the world I am the blogger that deserves this title is really a “nice” thing to do. So I apologize now if this hurt’s your feelings. I think you and your blog are great too.
Slam Poet, Shane Koyczan, has many great lines in his “We Are More” poem which tries to define Canada, and in many ways Canadians (you may have heard it during the 2010 Olympics opening ceremony). My favorite is that Canada is “an idea in the process of being realized...an experiment going right for a change.” And that is exactly how I would define this little Canadian blog. It is an idea in the process of being realized. My idea. My realization. One that took courage to start – what if no one read it? What if no one liked my recipes or my photography or my stories? Eventually I realized it didn’t matter what others thought (though of course I want readers to like it). What matters is that I like it and that I am proud of what I put on this blog. And I am.
This blog is a personal experiment that I believe is “going right” – I love sharing old recipes from my family, new recipes I have either created or tried to duplicate (with varying degrees of success!) from others. Even more, there are fellow bloggers and food lovers around the world that seem to enjoy what I am sharing. It can’t get better than that!
I believe when food is made with love and enthusiasm and then shared with those close to you that love can be tasted and savoured in every bite. I hope this blog conveys the love I have for food and for those in my life with whom I share my kitchen.... and that includes all of you.
I am Canadian.
I am a blogger.
Whispering so as not to offend or hurt the feelings of any great bloggers out there....I am ... yes, I really am, worthy of the title “Next Blog Star”. I hope you agree and take the time to vote for me once voting starts nex week...please, thank you and sorry to have taken up so much of your time.
And in case you are wondering how to define Canada listen to this:
“We are More” by Slam Poet Shane Koyczan. It is truly brilliant.
The first Project Food Blog Challenge is to define yourself as a blogger and discuss why I deserve to be the next food blog star.
Challenge #1
Canada in the winter :) |
Slam Poet, Shane Koyczan, has many great lines in his “We Are More” poem which tries to define Canada, and in many ways Canadians (you may have heard it during the 2010 Olympics opening ceremony). My favorite is that Canada is “an idea in the process of being realized...an experiment going right for a change.” And that is exactly how I would define this little Canadian blog. It is an idea in the process of being realized. My idea. My realization. One that took courage to start – what if no one read it? What if no one liked my recipes or my photography or my stories? Eventually I realized it didn’t matter what others thought (though of course I want readers to like it). What matters is that I like it and that I am proud of what I put on this blog. And I am.
Very Canadian - nanaimo bars. |
I believe when food is made with love and enthusiasm and then shared with those close to you that love can be tasted and savoured in every bite. I hope this blog conveys the love I have for food and for those in my life with whom I share my kitchen.... and that includes all of you.
I am Canadian.
I am a blogger.
Whispering so as not to offend or hurt the feelings of any great bloggers out there....I am ... yes, I really am, worthy of the title “Next Blog Star”. I hope you agree and take the time to vote for me once voting starts nex week...please, thank you and sorry to have taken up so much of your time.
And in case you are wondering how to define Canada listen to this:
“We are More” by Slam Poet Shane Koyczan. It is truly brilliant.
Homemade Low Fat Croutons
I had quite a bit of leftover bread from a spinach dip I made the other night. Not wanting to waste it, I made homemade croutons to go with our salad tonight. This recipe is super quick and you can throw in whatever spices or cheese you have on hand. The best part, other than their great taste, is that they are low fat and have no icky preservatives like the store bought versions!
Ingredients
4 cups fresh bread cubed or pulled apart in 1 inch pieces
1 teaspoon garlic powder
1 teaspoon thyme
1 teaspoon smoked paprika
1 teaspoon onion powder
2 tablespoons grated parmesan cheese
oil spray such as Pam
What to do
1. Preheat oven to 30 degrees
2. Spread bread on baking sheet in single layer and spray with oil.
3. Pour spice sand cheese into large ziploc bag and shake to mix.
4. Add bread to bag and shake again to coat bread.
5. Place bread in single layer again on baking sheet.
6. Bake for 10 - 15 minutes until golden brown.
7. Cool and enjoy.
Note: I like them best on the day they are made.
Wednesday, September 15, 2010
Blueberry Coffee Cake
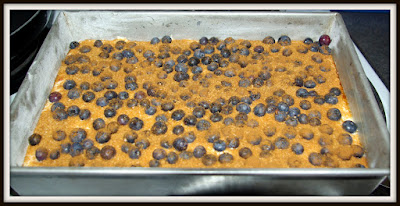
I have to be honest, I don’t like plain blueberries. Plain blueberries just don’t work for me. I don’t like the texture. But when blueberries are added to a pie, or a muffin, or a cake they turn into a delicious, mouth-watering treat!
This recipe is incredibly easy and mess free! Everything gets dumped into a big bowl and mixed up (a great recipe when kids want to play sous chef!). Sprinkle some blueberries, cinnamon and sugar on top and you get a delicious coffee cake that your friends, guests and family will love.
Adapted from : “Marie Nightingale’s Favourite Recipes”
Ingredients
Batter:
2 cups flour
1½ cups sugar
½ teaspoon salt
2 teaspoons baking powder
2 eggs
2/3 cup butter, room temperature
1 cup milk
Topping:
1 cup blueberries (fresh or frozen)
¼ cup granulated sugar
1/3 teaspoon cinnamon
What to do:
1. Preheat oven to 350 degrees.
2. In large bowl, mix 1st six ingredients. Blend them at a low speed until just moistened and then mix at medium speed for 3-4 minutes.
3. Pour mixture into a 9 x 13 greased pan.
4. Sprinkle blueberries on top.
5. Combine the sugar and cinnamon and sprinkle over berries.
6. Bake for 40 – 50 minutes.
7. Cool and enjoy!
Subscribe to:
Posts (Atom)