Friday, November 30, 2012

Foodie pen pals reveal - November 2012

Everything was delicious!


My second month of Foodie pen pals and I still love it :) this month my pen pal is Julia. Julia is a Film Production student from Toronto, studying in Montreal. I LOVE Montreal! I used to take the train with my Dad and sister to Montreal from Halifax once a year or so when I  was a kid but sadly haven't been there since my university days :( I'd love to go back someday.


Julia sent a great package filled with amazing treats! Peanut butter with white chocolate (um...YUM), a Lara bar, dried fruit that my son ate before I tasted even one piece, an amazing speculoos Belgium chocolate bar, wasabi peas (I mentioned how much I love them), a granola like bar and some great oat crackers. Thanks so much Julia!

For December Lindsay is trying something different and very generous. Instead of the pen pal pair up she is asking pen pals to instead donate what they would normally spend on treats to victims of hurricane Sandy. What a great idea! Please click here to find out more!

Tuesday, November 27, 2012

Lebkuchen Cookies - Daring Bakers November


The Daring Baking Challenge this month was Christmas Cookies. Holiday season is the time for sharing and Peta of Peta Eats is sharing a dozen cookies, some classics and some of her own, from all over the world with us.

Sadly, the only recipe I had time to try was Lebkuchen. It is a holiday baked treat from Germany that has a long history. This recipe is adapted from The Pink Whisk. Although I was sad to only try one of the many recipes Peta offered I was happy that I chose this one! They are delicious. This Lebkuchen recipe produces a soft cookie that tastes like spiced gingerbread. The flavour improves as the days go by! I didn't have dark brown sugar, only light, so I added a tablespoon of molasses to the recipe. I also added almond flavouring to the glaze. Yum! 

Ingredients:

6 tbsp  honey
½ c dark brown sugar
2 tbsp butter
1 c plain flour, sifted
1 tsp cinnamon
1/2 tsp ground ginger
1/4 tsp ground nutmeg
1/4 tsp baking soda
1 large egg, beaten
3 tbsp ground almonds

To ice:
¼ c  icing sugar sifted
1 tsp water
1 - 2 tsp almond flavouring (depending on how strong you’d like it)

Makes about 36 cookies depending on cookie cutter size.

Directions:

1.   In a medium bowl, whisk together the flour, spices and baking soda.
2.   Beat the egg in a small dish.
3.   In a medium sauce pot, over low heat, add the honey, sugar and butter. Stir until the butter and sugar have melted. Remove from the heat.
4.   Add half of the flour mixture and half of the egg to the pan and stir to combine. Repeat.
5.   Stir in the ground almonds until combined. The dough will be sticky.
6.   Place the the dough in a large Ziploc or container  and refrigerate for at least 3 hours but up to 24 hours!
7.  Preheat the oven to 350 degrees F.
8.   On a lightly floured surface, roll the dough to ¼ inch thickness and cut into desired shapes. I used small 1 to 1-1/2 inch cookies cutters.
9.   Place on a tray covered with parchment paper or a silpat leaving about an inch or so between cookies.
10. Bake in the oven for 8-9 minutes until golden brown.  Ccool for five minutes on the baking sheet before carefully transferring to a cooling rack.

Glaze: 
Combine sifted icing sugar, water and flavouring. You want it to be quite thin. Line up the lebkuchen on a wire rack (place wax paper underneath for easy clean up) and use a pastry brush to lightly glaze the cookies. If desired, add a second coat. 

Thursday, November 22, 2012

Quick and Easy Jam Muffins


I love quick and easy recipes. I love them even more when they are a bit healthier than everyday varieties of the same thing. 

This muffin recipe is made with whole wheat pastry flour and flax seed to boost the fiber content and has less oil than other similar recipes. Despite this healthier version there is still lots of flavour! I use my own home made raspberry-lime jam but any variety will do. If you don't have turbinado sugar substitute regular granulated (same amount).
Healthier and more flavour than store bought!

Makes 12 muffins.

Ingredients

2 c whole wheat pastry flour
1/2 c turbinado sugar
1 tbsp baking powder
1/2 tsp salt
1 tsp cinnamon
2 tbsp ground flax seed (optional)
1 tsp vanilla
1 egg
3/4 c milk
1/4 c vegetable oil
1 c jam


Directions

  1. Preheat oven to 350 degrees F.
  2. Spray 12 muffin tins with baking spray.
  3. In medium sized mixing bowl, whisk together flour, sugar, baking powder, flax, salt and cinnamon.
  4. In another bowl, lightly whisk egg, milk,and  oil.
  5. Make a well in the dry ingredients and add the egg mixture. Stir just to combine.
  6. Add jam and stir to combine (as little stirring as possible to prevent tough muffins!)
  7. Divide among muffin tins (about 2/3 full).
  8. Bake for 22-25 minutes.

I love the colour of the batter before baking!


Leave off the butter for fewer calories!

Friday, November 16, 2012

Chocolate Chip Chocolate Cookie Recipe

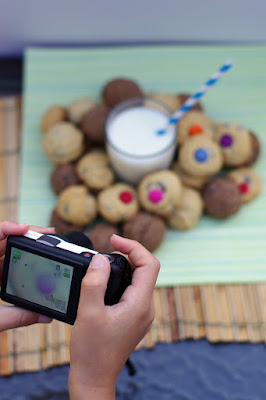
This is my go to chocolate chip cookie recipe. In fact I've posted it before on the blog. The difference this time (other than putting smarties on the top) was turning the dough into a chocolate base rather than leaving it plain. By taking out a little flour and adding cocoa you, my dear baker, will get a sinful double batch of chocolate with every bite! And who could say no more chocolate??!!?!?

If, for some crazy reason, you want to try the non-chocolate version just omit the cocoa and add 2 tbsp more flour. Oh and grab a box of smarties to add to the top :)
What's better than milk and cookies???? NOTHING!


Makes 4-5 dozen cookies (depending on how small you make them and how much dough gets eaten before they make it into the oven!)


Ingredients:
1 c unsalted butter, at room temperature
1 c tightly-packed brown sugar
1/2 c granulated sugar
2 large eggs
2 tsp pure vanilla extract
3 c all-purpose flour
½ c cocoa powder
1 tsp baking soda
1/2 tsp salt
1 tsp instant coffee (optional)
16 oz. good quality dark chocolate chips (I use two full bags of chips)

Directions:

  1. Preheat oven to 350 degrees. Line two baking sheets with parchment paper or silpats.
  2. In large bowl, cream sugars and butter until light and fluffy - about 3-4 minutes if using stand mixer.
  3. Add eggs, one at a time and beat until each is incorporated (30 seconds)
  4. In small bowl, dissolve coffee into vanilla.
  5. Add vanilla into egg and butter mix and beat for another 30 seconds. Scrape down sides.
  6. In another bowl whisk the flour, cocoa, salt, baking soda until combined.
  7. Add the dry ingredients to the butter mixture. Mix until just combined.
  8. Add the chips.
  9. Using hands (make size of walnut) or preferably small 1 or 1-1/2 inch ice cream scoop place cookies on sheets.
  10. Bake approximately 12 minutes. They should be golden and not too firm.
  11. Cool 5 minutes and remove to racks to continue cooling.
  12. Enjoy!

My 8 yr old daughter loves getting in on the photo shoot!

Thursday, November 8, 2012

Jalapeno and Cheese Cornbread


I'm no cornbread expert but I love this recipe! It's a little spicy and the cheese  adds great flavour. It's even better the next day. We ate it with home made baked beans but the next day it was also great along side a spinach salad. If there were any left over my plan was to make them into croutons....maybe next time.
You know it's good when they can't wait for the photo shoot to end!

Ingredients:

2 cups cornmeal
2 1/2 cups milk
1-1/2 cups all-purpose flour
1 tablespoon baking powder
1 teaspoon salt
1/2 cup white sugar
2 eggs
1/2 cup butter, melted
2 large jalapeƱos
1 c grated sharp cheddar
1/3 c grated Parmesan


Directions:

  1. Preheat oven to 375 degrees F.
  2. Grease a 9x13 inch baking pan.
  3. In a bowl, combine cornmeal and milk; let stand for 10 minutes. Stir after 5 minutes. 
  4. In a large bowl, whisk together flour, baking powder, salt and sugar. 
  5. Add the cornmeal mixture, eggs and melted butter into the dry ingredients. Beat on medium speed for 5 minutes.
  6. Stir in jalapeƱos and cheeses.
  7. Pour batter into prepared pan.
  8. Bake in preheated oven for 30 to 35 minutes, or until a knife inserted into the center of the cornbread comes out clean.

Friday, November 2, 2012

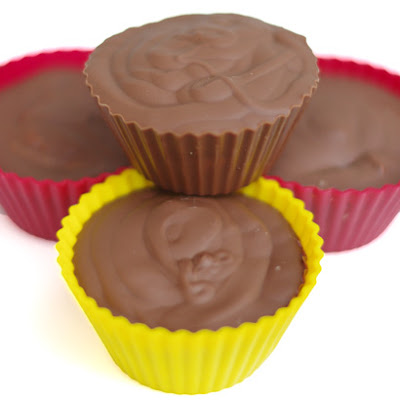
Bite Me Peanut Butter Cups Recipe


Peanut butter cups are one of my favorite chocolate treats. The salty sweetness of the peanut butter cream enrobed in chocolate is taste bud heaven. 

As much as I live the manufactured version I've always wanted to try making them at home. When I read Michael Smith's version in his cookbook, Chef Michael Smith's Kitchen - 100 of my Favorite Easy Recipes, I decided to go for it!

I made them with in two batches - one Callebaut milk chocolate and the other Callebaut dark. I recommend going with the dark version as the milk chocolate was just too sweet with the inside mixture. Also, his version has waaay too much nutmeg. Below I suggest using just 1/8 tsp or leave it out altogether. It's not listed below but I also recommend trying adding some chopped peanuts for added texture - about 1/3 cup.

The recipe below includes all of my changes I used in my version. They are delicious and get better after a day or two in the fridge so they when you want to prepare dessert ahead of time!

Ingredients

20 ounces (625 grams) dark chocolate, chopped – the best quality you can afford
1 cup peanut butter
1 cup cream cheese
¼ cup icing sugar, sifted
2 tablespoon honey
2 tablespoon vanilla
1/8 teaspoon freshly grated nutmeg - optional

What to do

  • Using silicone muffin liners – these work better than paper or foil but they can be used if silicone is not available. If using paper or foil muffin liners place in muffin pans for stability.
  • Using a double boiler, or a bowl that fits snugly over a pot, place the chocolate over – not in – barely simmering water. Stir until melted and smooth. This will ensure that the chocolate doesn’t burn! Turn off the heat.
  • Use a small pastry brush paint the inside of each muffin liner with a tablespoon or so of the chocolate.  If using standard size liners, only paint half way up or so. The coating should be thick enough to harden into a strong shell and certainly not see through.
  • Please note that you will need to leave a third of the chocolate in the bowl in order to have enough to cover the cups!
  • Refrigerate the shells until the chocolate sets and hardens. (about 15 minutes).
  • While shells set, put the peanut butter, sugar and cream cheese in your food processor and process until smooth or use a mixer. Scrape down the bowl. Add the honey, vanilla and nutmeg. Mix until smooth.
  • Spoon 2-3 tablespoons of the peanut butter mixture into each hardened shell. Level them a bit with the back of a spoon and make sure you leave a ¼ to 1/8 of an inch or so of visible shell so the top will stick. Refrigerate until the filling is chilled (about 15 minutes).
  • Return the remaining chocolate once again over simmering water and stir until smooth. Spoon a thick layer of the melted chocolate over each of the cups to seal the edges completely. Refrigerate until firm, then pop out from the silicone liners or peel away the paper ones.