Thursday, February 28, 2013

Foodie Pen Pals - February!

What an amazing Foodie Pen Pal package!!!


Foodie PenPals. Have you heard of it? It's a great program run by Lindsay over at the Lean Green Bean. She started it in September 2011 with 30 participants and it has grown to over 1300! Now that's success! In a nutshell each participant receives a foodie pen pal to send a little foodie related package that shouldn't cost more than $15 (not including shipping). It can be home made goods, local  food items, or other foodie related treats. Then each person sending a package also receives a similar package (though not from the person they sent one too). Organizing it must take a lot of dedication and effort and Lindsay does a great job of pulling everything together!

My fourth month of Foodie pen pals and I still love it :) this month my pen pal is Ashleigh from Ontario. 

This is Ashleigh's first month in the program and I have to say she knocked it out of the park!! Everything Ashley sent was a home run. She even shared her own stash of Frazzles - bacon flavoured crisps from Scotland! She also sent Simply Protein Chips - chili flavoured snacks that I must find here in Vancouver! The kids claimed the mint chocolate cookies and ginger snaps and loved them. The chilli and salt chocolate bar I shared with my husband (well just a square of it but still counts as sharing!). I loved that the heat from the chilies are subtle and you  don't notice it until after the chocolate has been swallowed. The chili sauce is amazing and definitely spicy! We had it with some BBQed sausages and were instant fans!   The only thing left to try  is the Mayan hot chocolate from Soma...but trust me I'll be trying it soon. Thanks Ashleigh!


And now it's time for some details about Foodie Penpals.  In case you’re a new reader, here’s a reminder of what the program is all about:

-On the 5th of every month, you will receive your penpal pairing via email. It will be your responsibility to contact your penpal and get their mailing address and any other information you might need like allergies or dietary restrictions.

-You will have until the 15th of the month to put your box of goodies in the mail. On the last day of the month, you will post about the goodies you received from your penpal! 

-The boxes are to be filled with fun foodie things, local food items or even homemade treats! The spending limit is $15. The box must also include something written. This can be anything from a note explaining what’s in the box, to a fun recipe…use your imagination!

-You are responsible for figuring out the best way to ship your items depending on their size and how fragile they are. (Don’t forget about flat rate boxes!)

-Foodie Penpals is open to blog readers as well as bloggers. If you’re a reader and you get paired with a blogger, you are to write a short guest post for your penpal to post on their blog about what you received. If two readers are paired together, neither needs to worry about writing a post for that month. 

-Foodie Penpals is open to US, Canadian & European residents.  Please note, Canadian Residents will be paired with other Canadians only. Same with Europeans. We've determined things might get too slow and backed up if we're trying to send foods through customs across the border from US to Canada and vice versa. 

If you’re from the US or Canada and are in participating for November, please CLICK HERE (www.theleangreenbean.com/foodie-penpals/) to fill out the participation form and read the terms and conditions. 
You must submit your information by March 4th as pairings will be emailed on February 5th!

*If you're from Europe, please CLICK HERE (www.thisisrocksalt.com/foodie-penpals/) to signup. 


Wednesday, February 27, 2013

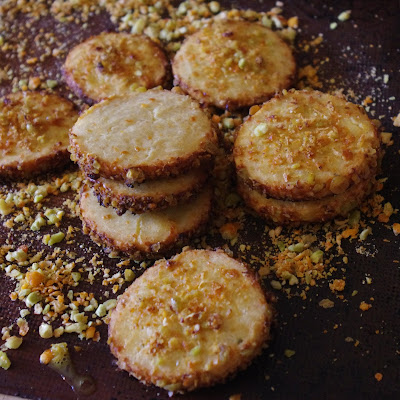
Spicy Sriracha Shortbread Crackers


Sarah from All Our Fingers in the Pie was our February 2013 Daring Bakers’ host and she challenged us to use our creativity in making Crisp Flatbreads and Crackers!

I chose this recipe because a friend saw it in the paper and asked that I make it! I added the sriracha pea crust - I love sriracha! It's a purée of fresh red jalapeños, garlic powder, sugar, salt and vinegar that is very popular in Canada and the United States. I found the sriracha peas at Target - not sure how easily available they are but wasabi peas would work too. For added zing you could also brush some sriracha sauce on the tops of the crackers before baking!
Roll the chilled dough in crushed sriracha peas.
These really are savory short bread cookies. I wouldn't put anything on top on them but they make a great appetizer.

Adapted from Ina Garten


Ingredients
2 cups all-purpose flour
1 teaspoon salt
1/8 tsp baking powder
5 ounces aged cheddar, grated
14 tbsp (1-3/4 sticks) cold unsalted butter, diced in ½ -inch pieces 
½  minced seeded jalapeño pepper 
¼  teaspoon chipotle chili powder
3 tablespoons ice water
1 egg beaten with 1 tablespoon milk, for egg wash
Fleur de sel or sea salt
½  c Sriracha peas, crushed (or wasabi peas)

Instructions
  1. Place the flour, chipotle chili powder, kosher salt, and baking powder in a food processor fitted with the steel blade and pulse to combine. 
  2. Add the butter in pieces and continue to pulse until the flour mixture looks like coarse sand. 
  3. Add the cheddar, jalapeño and pulse again. 
  4. With the processor running, add the water in one dump. 
  5. Continue pulsing until the mixture just comes together into a ball. 
  6. Place dough on a lightly floured surface and with your hands roll it into a a 14-inch log. Wrap in plastic, and refrigerate for at least 1 hour or overnight.
  7. When ready to bake, preheat the oven to 400 degrees F. 
  8. Line a sheet pan with parchment paper or silpat.
  9. Roll the dough log in the crushed sriracha peas. Press peas into the log to ensure they stick.
  10. Cut the dough in 3/8-inch-thick slices (3/4 of a cm). 
  11. Place the crackers on the pan with at least an inch between cookies, brush with the egg wash, and sprinkle with the salt. 
  12. Bake for 12 to 15 minutes, until golden brown. 
  13. Serve slightly warm or at room temperature. 

Notes:
If you don't have a food processor, whisk the dry ingredients together in a mixing bowl and then cut in the butter using two knives or a pastry blender tool. Add the cheese and jalapeño and mix with a fork (don't over work the dough). Add the water and mix until dough forms. Proceed as above.

Serving Size
Makes 32 to 34 crackers


Friday, February 22, 2013

Simply Perfect Mashed Potatoes


A big bowl of creamy and buttery mashed potatoes are one of my favorite comfort foods. Depending on my mood I can whip up a pot of garlicky mashed potatoes with skins on, or a casserole dish of super cheesy twice baked yukons or even just salted and slightly smashed fingerlings. The recipe below produces a creamy and smooth mashed potato that almost feels healthy if you use reduced fat cream cheese and just a pat of butter. Using some of the potato water adds back flavour and adds to the fluffiness of the potatoes.What's your favorite way to make mashed potatoes?

Ingredients

3 lbs Yukon gold potatoes, cut into 2-3 inch cubes
4 cloves garlic, skinned and chopped
1/2 - 2/3 cup low fat cream cheese or full fat but NOT no-fat 
1/2 - 3/4 cup potato water 
1 tbsp butter 
Salt and pepper to taste


Instructions 

  • Place potatoes in large pot and cover with cold, salted water.
  • Add garlic. 
  • Bring to boil. 
  • Boil until tender enough to easily price with fork. 
  • Remove 1 cup potato water. 
  • Drain rest of remaining water from pot. 
  • Add 1/2 cup reserved water and cream cheese. 
  • Mash until smooth. Add extra water if necessary. 
  • Season with salt and pepper. 
  • Add butter on top, if using.

Friday, February 15, 2013

Chocolate Caramel Obsession Cookies


These are decadent cookies. I used white Callebaut chocolate and chopped it into big chunks but any white chips will do. The disappeared in less than a day so they defintiely got the family seal of approval!

Ingredients

2 c flour
1/2 c cocoa
3/4 tsp baking soda
1/2 tsp salt
1-1/2 c white chocolate chips, or chopped white chocolate
1 c toffee bits (like Skor (tm) bits)

1 cup butter, room temperature
3/4 c white sugar
3/4 c brown sugar
2 eggs, large (at room temperature)
1 tsp vanilla

Instructions

Makes about 3 dozen cookies.

  • Preheat oven to 350 degrees F.
  • In a medium bowl, whisk together the flour, cocoa, baking soda and salt. Set aside.
  • In a large bowl, cream butter and sugars until light and creamy - about 5 minutes.
  • Add eggs, one at a time. Mix well.
  • Add vanilla and mix well.
  • Add the flour mixture into the butter mixture and lightly stir until barely combined. Add the chocolate and toffee bits. Again mix until just combined. A light touch when mixing the dry ingredients into the wet will result in beautiful, light tasting cookies.
  • Using a teaspoon or 1 inch cookie scoop, place cookies on ungreased cookie pan. Bake for 8-10 minutes. Cool 5 minutes and remove to cooling rack. Great cooled and amazing warm!


Friday, February 8, 2013

Mars Bar Brownies


We STILL have Halloween candy sitting in our pantry! The kids usually forget about it about two weeks after Halloween and if it's hidden so do I. Every once in awhile we dig in to satisfy a sweet tooth but the kids had such a big haul this year that there's still a lot left.  

I didn't want to throw it out but didn't want it to go bad either so I decided to bake with it! This is my go to brownie recipe - super fudgy and rich! And let me tell you that when you add 32 chopped up mini Mars bars it even more rich and fudgy PLUS caramelly (hmmm is that even a word?). If you eat them warm they will barely hold together and the caramel drips over your fingers...mmmm. If you can wait until they cool they definitely hold together  better and taste just as good (except no warm caramel). 

In case you haven't realized it yet...they are in no way healthy and your waist line will expand just chopping the chocolate but your taste buds will be dancing all over your tongue!

Mini Mars Bar heaven.


Chop them up!


Spread them out.


Top with brownie batter.


Speechless!


Adapted from a recipe by Michael Smith.


Ingredients:
  • 8 oz of good quality dark chocolate
  • 1 cup butter
  • 1 cup flour
  • 1/2 cup cocoa
  • 1 tsp baking powder
  • 1/4 tsp salt
  • 4 eggs
  • 2 cups brown sugar
  • 1 tbsp vanilla extract (preferably pure)
  • 32 mini Mars bars, chopped into smaller pieces

Instructions:
  • Preheat oven to 350 degrees.
  • Grease and flour a 9 x 13 inch pan. Note: I use extra cocoa instead of flour so there is no white flour color on the brownies when baked.
  • Melt butter and chocolate over low heat. Stir until smooth and remove from heat to cool.
  • Sift flour, cocoa, baking powder, and salt together in a large bowl.
  • Once melted chocolate mixture has a cooled a bit, add sugar, eggs and vanilla. Stir well.
  • Add the chocolate mixture to the flour bowl and mix until incorporated.
  • Spread 1/2 of the batter into the pan.
  • Sprinkle mini Mars bars over batter.
  • Dollop remaining batter over bars and spread as evenly as possible (doesn't have to be perfect.)
  • Bake for 25 minutes.
  • Cool.
  • Enjoy!
A heart cookie cutter and a few pink decorations
gives you an adorable Valentine's Day treat!

Friday, February 1, 2013

Homemade Corn Tortillas


Warning: Once you make homemade corn tortillas, store bought will never again be an acceptable substitute!

We've only been making fresh corn tortillas for a year or so. You see, I love kitchen gadgets - avocado slicer, honey spoons, banana slicer, lemon squeezer, 1000 cookie cutters,  crinkle carrot cutter, citrus skin peeler thingy and even a slap chop! So when I saw a tortilla press, obviously, I had to give it a good home! The funny thing is, I actually use this... a lot! It's also the one gadget my husband wouldn't like me to return.

I'm no expert when it comes to tortilla making but in my limited experience I have found that I get the best tortillas when I use my cast iron skillet. Also, don't press the tortillas paper thin or you won't be able to peel them off the plastic wrap.

These are perfect for my tortilla casserole - they stay firmer than store bought tortillas so left overs taste great!

Ingredients

2/3 cup of lukewarm water
1-1/2 cups masa flour
pinch of salt


Instructions

In a medium size bowl, stir together flour and salt. Add the lukewarm water and gently mix with your hand until the dough forms into a ball that holds together but is not sticky. Divide the dough into 8-10 pieces and roll each one into a ball (each one will be about the size of a golf ball).

Heat your cast iron pan over medium high heat. NO need for oil. 

Place a medium sized ziploc bag (with two long sides cut) or plastic wrap on your open tortilla press in such a way that the dough ball can be placed between the plastic pieces. Press until flat. Gently remove from plastic.

Place tortilla in pan and cook for 20-30 seconds. You know it is done when the edges begin to dry and lift slightly from your pan. Flip the tortilla. Cook for another 20-30 seconds. The dough may begin to puff up in a couple of spots. It will also be speckled with brown/black spots.

Repeat with remaining tortillas. Keep cooked ones under a kitchen towel or in a tortilla warmer until ready to serve.