Monday, September 21, 2015

Harry Potter Birthday Party: The Great Hall and Honeydukes #4


So much candy!
This week I'm sharing the 4th post in my Harry Potter Birthday Party series. Today we're focusing on the Great Hall and Honeydukes - both of which were in our dining room!

If you missed the other posts, check them out:


The Great Hall

Not true to the movie but more inspired by it, we used beautiful gold tablecloths, silver and gold paper plates as well as cheap plastic goblets. I found the goblets at the local Dollarama and the cloth and plates on sale at an art store.

The glow sticks looked waaaaay better in person! The kids loved them...and they lasted for over 10 hours!
I wanted to make the candles hang from the ceiling but I didn't have a tonne of time. Instead, I bought glow sticks and hooks to hang them from the ceiling. I also hung tulle to make it more magical. I have to say the glow stick were the amazing. They looked great during the party even though it was daylight. That night my daughter had three of her best friends sleep over for a Harry Potter movie marathon, and the glow sticks were even more AWESOME.


The Great Feast

The food itself wasn't really food from the books or movies. We had grilled chicken wings, pizza pops, veggies and fruit. We did, however, give them Harry Potterish names like wicked wings, pizza pasties, fleur de la coeur fruit and herbology bites (veggies).

We served 'pumpkin juice' which was really orange-mango juice!

Gold disposable table cloth, gold and silver plates & napkins and plastic goblets completed the Great Hall Feast.


The kids devoured these wings!


Honeydukes

Our dining room side buffet became Honeydukes!

We picked up some Martha Stewart chalk board signs and easels to write out the candy names.
These containers had chalk board sticker already attached and ready to go.


We also bought cheap tongs so the kids could get their candy without sticking their hands in the jars!


For the candy shop, I bought a bunch of cute and cheap glass containers from the dollar store and lots of candy from them too. The candy went into the containers. From Michaels and Dollarama, I bought funky labels (on sale) and we gave the candy HP names including:

  • acid pops (lollipops)
  • gringott gold bars (caramels)
  • exploding rockets
  • laughing taffy
  • love potion necklaces
  • life preservers
  • every flavour beans
  • golden snitch snacks
  • chocolate frogs
  • jelly slugs
  • forbidden forest bears

Chocolate Frogs


We made our own chocolate frogs. They are simple to make if you have the frog mold. I ordered one (two would have been better as it would have allowed me to make more at once) from amazon.com. The molds make quite a big frog! I melted about 2/3 of a bag of melting candy from Wilton and filled each cavity half full. I then sprinkled rice cereal in the middle and topped it off with more chocolate. I then threw them in the fridge for about 30 minutes to set. I started the process over again until I had about 24 frogs.

I also printed out Honeydukes labels and placed them on some resealable bags so the kids could 'shop' at the store and take their favourites home as part of their loot bag.

Do you love my daughter's Gryffindor coloured nails?!

They look better than this - bad lighting! Lumos!

Loot Bags


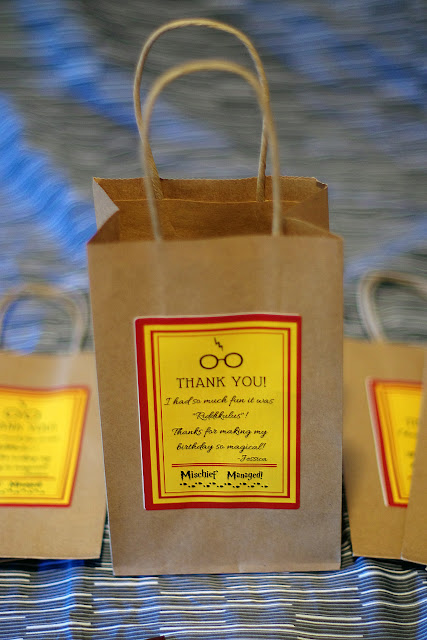
What else was in the loot bags? Glad you asked! I found the cutest owl pens at a local art store and Harry Potter magnets at our local toy shop. These with the candy bag went into our loot bags. The bags were simply brown paper bags with a customized thank you sticker attached. Adorable, don't you think?


Thanks for reading! Our next and last Harry Potter birthday party post will be all about the cake!


Monday, September 14, 2015

REESE Peanut Butter Chocolate Eclairs


www.withinthekitchen.blogspot.com


Chocolate and peanut butter - is there anything better? This combo makes my mouth water just thinking about it. And Reese does it perfectly. Whether it's their famous peanut butter cup or their candies, I can't say no when they're offered up (or when I pass them in the grocery store).


www.withinthekitchen.blogspot.com
I picked up my first jar REESE peanut butter and chocolate spread while I was down in Washington State last year - as soon as I tasted it (yes, on a spoon...don't judge), I wish I had bought a few more jars. It quickly disappeared and I tried to forget about it until my next US trip.

Well, now I'm happy to say that you can buy this delectable thick, creamy spread, which is full of finely crushed pieces of peanuts to give it the texture of the famous REESE peanut butter cup, in your local Canadian grocery store!
www.withinthekitchen.blogspot.com

And when asked by Hershey to create a recipe featuring this spread, of course, I said yes!

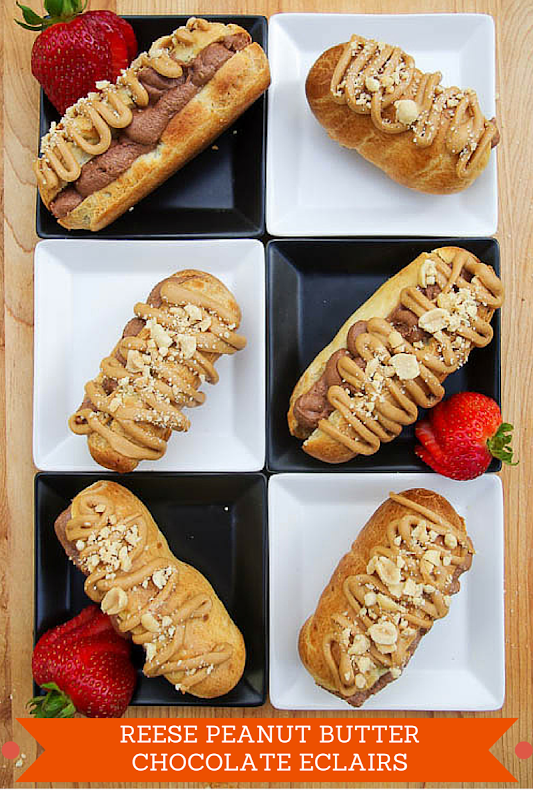
After much thought and input from the family and a few test recipes, we all decided this REESE peanut butter chocolate eclair was the unequivocal winner. The kids have already asked that it be part of  our Thanksgiving and Christmas dinner menus!
www.withinthekitchen.blogspot.com
Eclair pastry sometimes intimidates people - don't let it! It really isn't that difficult. Make sure you use a strong spoon when you are stirring the dough - one wooden spoon was harmed in the making of this dessert! The handle broke - make sure yours is sturdy!


Pastry Dough

Ingredients

1 cup milk
1/8 tsp salt
1 tsp sugar
1 cup flour
4 large eggs + 1 egg


Directions

  1. Place milk, salt and sugar in a sauce pan over medium high heat.
  2. Bring to a boil and immediately remove from heat.
  3. Quickly add flour in one dump and stir until dough is formed. It should be glossy and come together in a ball that comes away from the sides of the pan easily.
  4. Place back on medium heat and stir continuously until a milky white film forms on the bottom of the pan.
  5. Remove from heat and let sit for 5 minutes (you don't want to cook the eggs).
  6. Break 4 eggs into liquid measuring cup.
  7. Pour one egg at a time into dough and stir until incorporated.
  8. Repeat with each egg, one at a time.
  9. The dough will look like a thick and shiny paste. If it is too dry, beat the remaining egg and add half of it. Set aside the other half.
  10. If you have one, place a half inch decorating tip inside a pastry bag and then add the dough. If you don't have one, simply place the dough into plastic resealable bag and cut half an inch off one of the bottom tips of the bag.
  11. Place a silicone mat on baking sheet (you may need two sheets).
  12. Starting about half inch above the baking sheet, pipe a 3-4 inch strip of pastry. Leave 2-1/2 inches between pipings.
  13. Depending on size, 12-16 eclair should be piped.
  14. If you haven't already, beat one egg. Brush each eclair lightly with egg. With the brush, gently push any dough tips back into the dough.
  15. Bake for 30-35 minutes, switch pans half way through baking if using two pans. You want the pastry to be completely dry or it will collapse. (you can take one out and open it to check if dry).
  16. Once golden brown, turn off oven but DO NOT remove pastry. Open oven door two inches and let the pastry sit for 30 minutes. This will help dry the pastry out so it's not soggy in the middle later.
  17. Remove from oven and cool completely.


Filling

Ingredients

2/3 cup Reese  peanut butter spread
1/4 c heavy or whipping cream
2 tbsp unsalted butter


Directions

  1. Mix all ingredients at medium-high speed for one  minute until incorporated and slightly lighter in color.
Putting filling in eclairs

  1. Cut each eclair length wise put do not cut through (like a hot dog bun).
  2. Place filling in a pastry bag or strong resealable plastic bag with the end snipped off.
  3. Pipe the filling into sliced pastries. 

Topping

Ingredients

1 cup Reese peanut butter chips
1 cup salted, roasted peanuts, chopped


Directions

  1. I find it easiest to melt the chips in 1/4 cup batches in the microwave (about 45 second should do it).
  2. Place each batch in a pastry bag with a very small 1/4 inch opening and drizzle on top of the eclairs.
  3. Top each eclair with a sprinkle of crushed peanuts.
  4. Let set until the melted chips have set again (about 15 minutes).


Note:
The pastries are best on the same day they are made but will last a few days in an airtight container.


www.withinthekitchen.blogspot.com


Want more amazing recipes using Hershey's Reese peanut butter chocolate spread? Of course you do! Find them by following the #doyouspoon hashtag on Facebook, Twitter and Instagram! 


Disclosure: I received free product samples and was compensated for this post by Hershey's Canada. The opinions expressed are, as always, my own. 

Thursday, September 10, 2015

Back to School Lunchs and Snacks Ideas

I've been thinking about lunch and snacks for the kids now that school is back in session. I'm sharing a few of my thoughts  below.
  • There are some incredibly talented parents out there that can create amazing bento box lunches. I'm not one of them - no time, no talent. I want healthy, easy to prepare food that my kids will actually EAT - not just a bite. I want it gone. Let me tell you, it doesn't happen often. Having said that, I do find that my kids often like little bits and bites of things for lunch - a few veggies sticks, a few crackers, a couple pieces of meat and a piece of fruit often sees great results. But of course, they go through phases - sandwiches and only sandwiches, absolutely no sandwiches, only hot dishes, o ly cold dishes...blah blah blah. If they make it themselves, they can go for it. If I make it..well, sometimes they get what they want and sometimes they don't.
  • Don't forget that left overs are some of your best friends! Any casserole can make a hot lunch the next day. BBQ chicken (or most other meats) can be transformed into a pasta salad, sandwich or fried rice for a relatively easy next day lunch.
  • Kids usually eat fast...they want to get out and play. Keep it simple, easy to eat. Most importantly give them things they will actually eat - who loves finding a lunch full of uneaten food??? If they are coming home with 1/2 of it eaten - give them less for a week and see if they are satisfied.
  • Try to have things they can choose from - feeling they have control over what goes in their lunch box may decrease the amount of uneaten food that comes back home.
  • This will also free up a bit of time for you in the morning - and who doesn't need a couple of extra minutes! Of course this depends on the age of your children and their level of maturity.


  • I'm always on the look out for new products the kids might enjoy. Over the summer, I was fortunate enough to be sent Litehouse's new Opadipity dips to try. They come in sweet and savory flavours including creamy ranch, cucumber dill, spinach parmesan, creamy cheesecake, strawberry delight and vanilla almond. We love them - they are also gluten free and have no preservatives! 
  • If you're kids like to dip fruits and veggies, I recommend giving them a try. I portion the dips out into small containers so the kids can pick their favorite dip, precut veggies/fruit or breadsticks for a school snack or lunch.


I'm always looking for new lunch and snack ideas, here are a few of mine:


  • Peanut free ideas - look here.
  • no nut granola
  • hard boiled eggs
  • homemade muffins
  • cereal and yogurt (separate containers)
  • Fruit - our favorites
    • canteloupe
    • apples
    • apple sauce
    • grapes (cut if required)
    • strawberries
  • Veggies - our favorites
    • carrots
    • celery
    • fennel
    • peppers
    • broccoli
    • cauliflower
  • chicken
  • tuna
  • salmon
  • hardboiled eggs
  • rice
  • seaweed
  • leftovers including cold pizza and pasta
  • pita
  • bagels
  • breadsticks
  • cheesesticks
  • pre portioned dips
  • granola bars
  • wagon wheels
  • fish crackers
  • homemade rice krispies