Tuesday, November 25, 2014

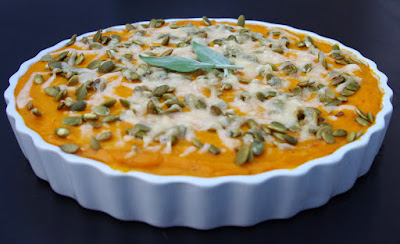
Gluten-free Cheesy Garlic Butternut Squash

www.withinthekitchen.blogspot.com
Christmas Menu - Are you including healthy, gluten-free recipes?

The holidays are just around the corner! I bet, like me, you are thinking about your Christmas menu. We'll have traditional turkey, of course, but the side dishes are where you can get a bit creative. I look for sides that can be prepared ahead of time and then just thrown in the oven when the turkey is pulled out of the oven.

Are you or any of your guests following a gluten-free diet? If so, you may have to think a bit harder and scrutinize labels for gluten in the ingredients. Of course, sensitivity to gluten means things like wheat, rye and barley are off limits. Avoiding it can be tricky as wheat is often used in many processed foods and items you may not think of as containing gluten such as most soy sauces!

Gluten-free foods include:

  • meats
  • eggs
  • most dairy products
  • beans
  • fish
  • veggies
  • fruits
  • natural seeds, nuts 

Luckily, gluten-free products are getting easier to find on grocery store shelves. A great gluten-free product is Hidden Valley Ranch dressings - original, spicy and cheese are all gluten-free!

I created this gluten-free, cheesy, garlicky and delicious side dish using gluten-free ingredients including Hidden Valley Ranch Cheese dressing. Not only does it add great flavour and some zip to salads and dips, it is also an easy way to add quick and easy flavor to this creamy vegetable side dish.

I love this dish pureed but you could mash it for a chunkier consistency. Be careful with how much sage you use -it's powerful stuff that can easily take over the flavor. Roasted garlic on the other hand is quite mellow so you can use a whole head of it without fear!


www.withinthekitchen.blogspot.com
Pick butternut squashes that are heavy for their size.

www.withinthekitchen.blogspot.com
Cut in half and scoop out seeds.

www.withinthekitchen.blogspot.com
Lightly coat with olive oil, and sprinkle with spices & herbs.

www.withinthekitchen.blogspot.com
Roast squash for about 40-45 minutes.

www.withinthekitchen.blogspot.com
Puree squash with butter, gluten-free Hidden Valley Ranch cheese dressing,
garlic, ginger, salt and pepper.

www.withinthekitchen.blogspot.com
Place your puree in a baking dish and sprinkle with Parmesan and pumpkin seeds.

www.withinthekitchen.blogspot.com
Bake until heated through.

www.withinthekitchen.blogspot.com
Broil for a minute or two until cheese bubbles.

www.withinthekitchen.blogspot.com

www.withinthekitchen.blogspot.com

www.withinthekitchen.blogspot.com

www.withinthekitchen.blogspot.com

www.withinthekitchen.blogspot.com
Your guests will love it!


Ingredients

2 medium to large butternut squash (about 6-7 cups)
1 tbsp olive oil
1 head garlic, separated and peeled
1 tsp salt, divided in half
pepper
4 fresh sage leaves
8 sprigs fresh thyme
1/2 cup Parmesan-reggiano, shredded, divided (2 tbsp for the puree and the rest sprinkled on top)
1/2 cup Hidden Valley Ranch Cheese dressing
1/3 cup unsalted and toasted pumpkin seeds
2 tbsp butter

Instructions

  1. Preheat oven to 375 degrees F.
  2. Cut two butternut squashes in half lengthwise.
  3. Scoop out seeds and discard.
  4. Rub the olive oil over the cut flesh and skin of squash. 
  5. Sprinkle cut flesh with salt and pepper. In the scooped out hole of the squash place a sage leaf, 2 twigs of thyme, and equally distribute the peeled garlic cloves.
  6. Carefully, place the squash cut side down on a large baking sheet.
  7. Roast in oven for approximately 45 minutes, until the thickest part of squashes are tender.
  8. Let rest for 15 minutes to cool slightly.
  9. Reduce oven temperature to 350 degrees F.
  10. Remove thyme but place sage, and garlic in blender or large bowl.
  11. Scoop out squash and place in blender.
  12. Add butter, Cheese Hidden Valley Ranch Dressing, 2 tbsp Parmesan and 1/4 tsp pepper and 1/2 tsp salt.
  13. Puree mixture until smooth.
  14. Place mixture in 9 or 10 inch baking dish with low sides.
  15. Smooth squash and sprinkle with pumpkin seeds and remaining Parmesan.
  16. Bake at 350 degrees for 20 minutes until cheese is melted and squash is warmed through.
  17. Serve.

Hidden Valley Ranch products and other promotional consideration were received in exchange for providing the above recipe as part of a submission in a contest sponsored by Hidden Valley Ranch.


Hidden Valley Ranch Dressings are gluten-free.

Saturday, November 22, 2014

cranberry orange antioxidant smoothie

www.withinthekitchen.blogspot.com

With the Holiday season just around the corner, my mind and recipe book is turning to seasonal dishes and ingredients. Cranberries always come to mind this time of year - sauces, dessert, and treats abound but today I'm sharing this orange cranberry smoothie with a hint of vanilla. This smoothie is tart but still more sweet than not. If you like it more tart go ahead and add up to another 1/4 cup of cranberries.

Makes 2 servings.

Ingredients

2 small oranges
1/2 cup frozen cranberries
1/2 cup yogurt
1 cup milk
1/2 tsp vanilla

Instructions

Throw everything into nutrininja or blender.
Blend 1 minute.

Monday, November 17, 2014

Roasted Carrot and Fennel Soup - Ninja Blender Auto iQ Review

www.withinthekitchen.blogspot.com

What I had

I've been using a NutriBullet by Magic Bullet for about a year. Unfortunately, for the last 3 or 4 months the noise it produces is so loud it hurts my ears. Additionally, the underneath of the blade mechanism is full of rust. Too bad really as I was fairly happy with its performance. Knowing I had to replace it, I started doing some research. Sure, I'd love a Vitamix but I just couldn't justify the price and it would be too big to sit out on my counter for easy access to morning smoothies. The Nutriblender has a 900 watt model out but I wasn't convinced as I have read mixed reviews about its performance. My other option was a Nutri Ninja.

Fate

That's when fate intervened! As regular readers know, I attended IFBC in Seattle this past September. One of the sponsors was Nutri Kitchen. They sponsored one of the lunch sessions so I was able to learn about their products, including their new Auto iQ line. The new line has preset configurations for time and pulsing so you don't have to stop, take off the jar or blender and stir, shake or otherwise get annoyed!

I left the conference armed with information and recipe ideas and thought I'd make my final decision within a couple of weeks. Then I received an email from Ninja asking if I'd like to review the Ninja Blender DUO with Auto-iQ! Heck ya! So they sent me the 1300 Watt system to test drive!

Nutri Blender with Auto iQ

This system comes with the blender, iQ base with 5 programmed settings, two Nutri Ninja cups, crushing blades, extractor blades, recipe inspiration guide.

Testing

A) Set up was quick and easy. Before long we had our green goddess smoothie ready for blending. Simply pressing the NutriNinja "ultra blend" button starts the process. It pulses a couple of times to get things going and then blends until perfectly smooth - a total of 60 seconds. There is even a count down timer so you know exactly how long until it's done! The smoothie was, well, smooth - I would say it is smoother than my old nutriblender (though that was 600 watts vs 1300 watts for the Ninja). The cups with lids make smoothie making easy and convenient. This model comes with two large cups. A smaller cup would be great - especially when making smoothies for the kids.  If this is important to you, other models come with an extra smaller cup.

B) To test the blender, we threw in a bunch of ice and crushed it - it came out just like snow! In fact, there may have been a snowball or two made! All we and to do was press "frozen drinks" button  - 70 seconds was all we needed to have perfect crushed ice.

C) With the cold fall weather rolling in, we have lots of soup bubbling in our kitchen. We decided to make a roasted carrot and fennel soup using the blender attachment. It did a great job - very silky smooth, very easy, and clean up was a breeze. I loved that the large capacity blender held everything in one go. I ran it a few times on the puree mode. Once pureed, I placed the soup in individual serving containers and froze them.

Overall Impression

So far I love the Ninja Blender DUO with Auto-iQ! It's simple to set up, simple to use and simple to clean up. I do appreciate that the containers and blades are dishwasher safe and bpa free. However, it's not whisper quiet - in fact it's loud but quite a bit quieter than my NutriBullet. Overall, I recommend it to anyone in the market for this kind of appliance. You will use it to make delicious smoothies, silky soups, slushy margaritas and many other fantastic creations!

Below you'll find the recipe for our roasted carrot soup!

www.withinthekitchen.blogspot.com
Roasted Carrot and Fennel Soup
www.withinthekitchen.blogspot.com


www.withinthekitchen.blogspot.com
Roasted veggies go into blender.

www.withinthekitchen.blogspot.com
It holds quite a bit!

www.withinthekitchen.blogspot.com

www.withinthekitchen.blogspot.com
Don't forget the orange!

www.withinthekitchen.blogspot.com
Blending!


www.withinthekitchen.blogspot.com

Roasted Carrot and Fennel Soup

Ingredients

1 lb carrots
2 medium bulbs of fennel
1 head garlic, separated into cloves but do not peel cloves
2 tbsp olive oil
2-3 inch piece of ginger
1 orange, peeled
1 litre vegetable broth
salt/pepper

Instructions

  1. Preheat oven to 375 degrees
  2. Cut carrots in half length wise and quarter if thick.
  3. Cut fennel into 1/2 inch thick slices.
  4. Place carrots, fennel, and garlic (leave skin on) on one or two baking sheets.
  5. Drizzle olive oil over veggies and garlic and mix a little with your hands to make sure oil covers.
  6. Sprinkle with salt and pepper.
  7. Roast for approximately 30 minutes, turning vegetables once half way through. Roast untilsoft and slightly carmelized.
  8. Julienne or grate ginger.
  9. Place carrots, fennel, orange and ginger in blender.
  10. Squish garlic out of skins and into blender.
  11. Add vegetable broth.
  12. Blend on puree setting.
  13. Do it again if you want it ultra silky.
  14. Add salt and pepper to taste.
  15. You can place in in sauce pan and heat or place in containers without heating and freeze or refrigerate for future use.
PS - even though I was sent this system, my opinions, as always, are my own.

Tuesday, November 11, 2014

Peanut Butter Cup Brownie Bites and Cook Book Review - Dessert Mashups


www.withinthekitchen.blogspot.com


Do you have an intense sweet tooth? Or perhaps you're looking for a Christmas gift for someone who has one? Then you should buy a copy of Dessert Mash-ups by Dorothy Kern who blogs at Crazy for Crust. It puts together wonderful two in one combos or mashups of sweet treats!

When my daughter saw the book on our dining room table, her eyes almost jumped out of her head and she immediately picked it up and started earmarking the recipes she thought we should try (pretty much all of them!).
www.withinthekitchen.blogspot.com

There are 52 recipes to try in the book. Recipes include mashups like lemon bar cheesecake, white chocolate coconut pie fudge and pecan pie cinnamon rolls! Many of these recipes would be great for the upcoming Holiday season, cookie swaps and school events.


www.withinthekitchen.blogspot.com
Tonight we tried the peanut butter brownie bites. Mmmm - chocolate, peanut butter, brownie all in one mashup! It was a hit. Decadent, rich, worth every minute in the gym you'll need to work it off because you won't be able to stop at one! The peanut butter mixture was my favorite - sweet but not overly so and the brownies were fudgier than a Judy Blume book.

I was given permission by Ulysses Press to share this recipe with you. If you don't have the patience to dip the bites in the chocolate, just drizzle some on top. I had to use an 8 x 8 pan so the brownies were thicker and cooking time was 23 minutes. Note: My 10 year old did most of this by herself so it's a great recipe to make with the kids.
www.withinthekitchen.blogspot.com
Peanut Butter Cup Brownie Bites

Yield 32 bites
Prep Time 1 hour
Bake Time 18 to 25 minutes
Chill Time 1 hour, plus cooling time

If I had to choose only one flavor combination to eat for the rest of my life, it would be peanut butter and chocolate. These bites are what happens when a peanut butter cup and a brownie get married and have babies: A layer of brownie is topped with a soft peanut butter mixture and then the whole thing takes a bath in chocolate. These are too easy to eat, so be sure to wrap some in a pretty box and give them to your neighbors . . . if you have the strength to share them!

Brownies
1⁄2 cup (1 stick) unsalted butter, melted
1 cup granulated sugar
2⁄3 cup unsweetened cocoa powder
2 large eggs
2 teaspoons vanilla extract
1 tablespoon brewed coffee (or water)
1⁄4 teaspoon salt
1⁄2 cup all-purpose flour

Peanut Butter Mixture
1 cup creamy peanut butter
1⁄3 cup packed brown sugar
1 cup powdered sugar

1 teaspoon vanilla extract
16 to 24 ounces melting chocolate or semisweet baking chocolate
Sprinkles (optional)

Make the Brownies

1. Preheat the oven to 350°F. Spray a 9 x 9-inch pan with cooking spray or line with foil and spray with cooking spray for easy cleanup.

2. In a large bowl, stir together the melted butter, sugar, and cocoa. Stir in the eggs, vanilla, coffee (the coffee just adds a richness to the brownies, but you can use water if you prefer), and salt. Carefully stir in the flour. Spread in the prepared pan.

3. Bake for 18 to 25 minutes, until a toothpick inserted about 2 inches from the edge of the pan comes out with only crumbs sticking to it. Let cool completely in pan before continuing. You can chill them to speed up this process.

Make the Peanut Butter Mixture

1. Combine the peanut butter, brown sugar, and powdered sugar in a large bowl. Mix with a hand mixer (or a stand mixer fitted with the paddle attachment) until crumbly. Add the vanilla, then continue to mix until the mixture is smooth and almost comes together. Press it together with your hands to form a smooth ball.

2. Place the peanut butter ball on a sheet of waxed paper. Press or roll it into a square that’s about the size of your brownie pan. Place the peanut butter square on top of the brownies and press to adhere it. Press and adjust the edges so that it completely covers the brownies in the pan. Refrigerate for 30 minutes to 1 hour.

3. When you’re ready to dip the brownies, melt half of the candy according to the package directions and line a cookie sheet with waxed paper. Remove the brownies from the pan and carefully discard the foil. Set the brownies on a cutting board and cut the square in half. Place one half back in the refrigerator until finished with the first half.

4. Cut the half sheet of brownies into 32 squares (4 rows by 8 columns). Dip each square carefully into the chocolate (see Candy Dipping Tips, page 30), tap off any excess, and place on the prepared cookie sheet. Repeat with the remaining brownies, melting additional chocolate as needed.

5. Refrigerate until set. If desired, place any remaining chocolate in a plastic baggie or small squirt bottle and drizzle chocolate on top of the truffles. You can also cover them with sprinkles or leave them plain. These can be kept at room temperature or in the refrigerator in an airtight container, or can be frozen. The truffles will keep for up to 5 days in the refrigerator.

Tip: Use white candy coating for a fun new twist!

PS this is how it looks in the book...even more yummy!

Photo from Dessert MashUps (used with permission from publisher).

Tuesday, November 4, 2014

Cookbook Review - Anupy Singla's Indian for Everyone


We loved this North Indian Chicken  Curry!
As you can see we added brown rice, broccoli and salad of onion, tomato and cucumber.

Indian for Everyone!

Do you love going out for Indian food? Would you love to make it at home but are intimidated by the thought of it? Then you should purchase a copy of Anupy Singla's new cookbook out called Indian for Everyone: The Homecook's Guide to Traditional Favorites. 

It's aimed at people just like you, who love cooking, love Indian food and flavors but are not sure where to start when it comes to making it at home. Like her previous books, it is full of easy to follow recipes but even more importantly pages are filled with easy to read information about Indian spices, friendly descriptions of her own experiences and her family's thoughts about her dishes.


If you live in a big city or have a large Indian community, like Vancouver, you will have no problem finding all of the spices you need for these recipes but I think readers in smaller cities and towns may have a harder time finding them. The search is worth it though. I will soon be making my own big batches of garam masala and other spices blends Anupy shares with us in her book.

Want to meet Anupy?


If you are lucky enough to live in or near Vancouver on November 16th you can meet Anupy as she discusses her new book and demonstrates one of her new recipes from Indian for Everyone at Barbara Jo's Books to Cooks. You will even receive an autographed copy of the book (which would make a fantastic Christmas present!).

Trying the Recipes


The kids and I spent a fun morning shopping for the ingredients we needed to make North Indian Chicken Curry - a thick and earthy yogurt based curry dish. The kids loved learning about the spices, smelling them and creating this dish with me. It was also easy - make the marinade, throw in the chicken the night before and the rest comes together in little time or fuss at dinner time..

I have to say that I've tried three recipes so far and all are quite spicy (and I love spicy)! We now cut out any serrano peppers that are listed and often cut the powdered chilis to just a 1/2 tsp or less....this way the kids will enjoy these great recipes and your guests won't be sweating by the end of the meal!

North Indian Chicken Curry

Tools: You’ll need a food processor; a large and a small mixing bowl; a whisk; a fork; a heavy-bottomed, 6-quart / 6-L sauté pan with a lid; tongs; and a large plate.
Yield: 8–10 servings

Ingredients:

1 medium yellow or red onion, roughly chopped
1 (4-inch / 10-cm) piece ginger, peeled and roughly chopped
10 cloves garlic, peeled
2 cups / 470 mL plain, unsweetened yogurt (whole, lowfat, or nonfat)
1 tablespoon plus 1 teaspoon plus
1 pinch salt, divided
1 tablespoon turmeric powder
1 tablespoon Garam Masala
1 tablespoon red chile powder or cayenne pepper
2 teaspoons ground coriander
2 teaspoons roasted cumin, ground
1/3 cup / 10 g kasoori methi (dried fenugreek leaves), lightly hand crushed to release flavor
4 pounds / 1.81 g skinless whole bone-in chicken, cut into 8–10 pieces (including cutting each breast in ½), or 2 pounds / 910 g boneless chicken
6 tablespoons / 90 mL ghee or vegetable oil, divided
1 teaspoon cumin seeds
2 (3-inch / 8-cm) sticks cinnamon
5 whole cloves
5 green cardamom pods, lightly crushed
2 black cardamom pods
1 large yellow or red onion, thinly sliced
3 large tomatoes, diced
2–4 fresh Thai, serrano, or cayenne chiles, stems removed and thinly sliced
2 heaping tablespoons chopped fresh cilantro, for garnish
Brown or white basmati rice, Roti, or Naan for serving


Directions:


  1. In the bowl of a food processor, grind the chopped onion, the ginger, and the garlic into a smooth paste. Transfer to a large mixing bowl and add the yogurt, the 1 tablespoon plus 1 teaspoon of the salt, the turmeric, the Garam Masala, the red chile powder, the coriander, the cumin, and the kasoori methi. Whisk until well blended. Kasoori methi can be found in Indian grocery stores. Omit if you cannot find it. Do not use fresh leaves or fenugreek seeds, as they will alter the taste.
  2. Prepare the chicken by poking holes in it with a fork to help it absorb the yogurt marinade. Carefully add the pieces of chicken to the large mixing bowl and gently stir until all the pieces are evenly coated. Cover and refrigerate for 2 hours to overnight.
  3. In a heavy-bottomed, 6-quart / 6-L sauté pan over medium–high heat, warm 3 tablespoons / 45 mL of the ghee. Using tongs, carefully transfer the pieces of chicken to the sauté pan, reserving the marinade for later use. Cook, turning once to ensure even cooking, for a total of 4 minutes. Transfer to a large plate, and transfer the remaining liquid in the pan to a small mixing bowl for later use.
  4. Return the sauté pan to medium–high heat and warm the remaining 3 tablespoons / 45 mL of ghee. Add the cumin seeds, cinnamon, cloves, and green and black cardamom and cook for 2 minutes. Add the sliced onion and the remaining pinch of salt and cook, stirring constantly and scraping the pan to prevent burning, for 3 minutes, until the onion is slightly browned.
  5. Add the tomatoes to the sauté pan and cook, uncovered and stirring occasionally (breaking down the tomatoes with the back of the spoon), for 11 minutes, until they are fairly smooth. Add the reserved marinade and cooking liquid from Step 3 and the fresh chiles to the sauté pan and cook for 2 minutes.
  6. Reduce the heat to medium–low and slowly, carefully return the chicken to the sauté pan. Partially cover the pan and cook, stirring occasionally to ensure even cooking, for 35 to 40 minutes (20 minutes if using boneless chicken), until the chicken is cooked through. Be sure not to overcook the chicken. Remove from the heat.
  7. Transfer to a serving bowl. Garnish with the cilantro and serve with the brown or white basmati rice, Roti, or Naan.

Reprinted with permission from Indian for Everyone by Anupy Singla, Agate Surrey, October 2014.

Please note: I received a review copy of this book but opinions, as always, are my own.