Showing posts with label easy. Show all posts

Saturday, July 23, 2016

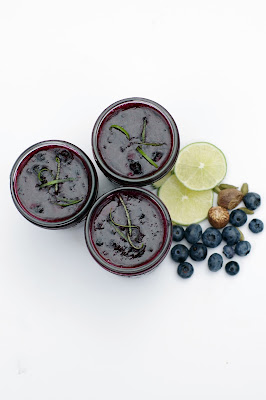
Easy Blueberry Freezer Jam

withinthekitchen.blogspot.com

Anyone with a free 20 minutes can make freezer jam. What's so great about freezer jam?
- quick
- easy
- tastes fresher and fruity than regular jam
- freezes well
- makes great gifts
- less sugar than traditional jam
- great activity for kids

Right now is blueberry season in Vancouver - I picked up 20lbs (that's right 20lbs!) of these plump and delicious berries last week. We froze a few pounds for winter smoothies and then went into cook/bake mode - sweet fruity, and buttery aromas were filling our kitchen thanks to hours of making  jams, crumbles, pies and cakes.

Today, I'm sharing the freezer jam the kids and I mixed up. Normally, I don't cook the fruit I use in freezer jam but in the case of blueberries a little bit of cooking softens the berry skins and brightens the flavour of the blueberries. Luckily, it only adds a few minutes to the process. 

If you don't like the spices I used or even the lime, just leave them out and you'll have pure, unadulterated blueberry flavour. The jams will last in the fridge for 3 or 4 weeks or place them in the freezer for up to a year.

To crush the berries, I pulse them a few times in my food processor - you want them chunky but broken down a bit.

Special equipment: 4 - 1 cup glass or plastic jars.

Ingredients

4 cups crushed blueberries (about 4-1/2 cups before crushing)
1 package freezer pectin (I use Bernadin pectin)
1-1/2 cup granulated sugar
zest of half a lime
juice of half a lime
1/2 teaspoon cardamom
1/2 teaspoon nutmeg

Instructions

  1. Place berries in pan over medium heat.
  2. Bring to a boil and remove from heat.
  3. In a large bowl, mix together pectin, sugar and spices.
  4. Add berries and lime juice and zest and stir for 3 minutes.
  5. Divide among containers and let sit for 30 minutes to thicken.
  6. Cover and refrigerate or freeze.

withinthekitchen.blogspot.com

withinthekitchen.blogspot.com

Wednesday, March 16, 2016

Kefir Rye Soda Bread Recipe

www.withinthekitchen.blogspot.com

With St Patrick's Day just around the corner, I thought I'd share this easy, no yeast recipe for soda bread. It will go perfectly with Guiness Irish Stew or, heck, with a slab of butter and jam! If you don't have kefir, buttermilk can be substituted.

Ingredients

1-3/4 cups whole wheat flour
1 cup rye flour
1/2 cup rolled oats
1 tsp baking soda
1 tsp salt
1 egg
1 1/4 cup plain kefir

Instructions

  1. Preheat oven to 375 degrees F.
  2. In a large bowl, stir together flours, oats, baking soda and salt.
  3. In another bowl or large measuring cup, mix kefir and egg.
  4. With a fork, stir wet into dry ingredients. Do not over mix.
  5. Flour hands and shape the dough into a flat, round loaf.
  6. Place on floured or corn meal sprinkled baking sheet.
  7. Flatten into a disc that is approximately 4-5 cm high.
  8. Score a cross into the dough with 1 cm deep cuts.
  9. Bake for 40-45 minutes until it sounds hollow when tapped.
  10. Transfer to a wire rack and cover with a tea towel (keeps it soft).

Monday, March 7, 2016

Brown Sugar- Spice Cookies Recipe

www.withinthekitchen.blogspot.com


These cookies are simple, crispy yet chewy, buttery, and sweet - perfect in a lunch for the kids, or as a treat with your afternoon coffee. They also make great ice cream sandwich cookies.

Adapted from a recipe by Serious Eats. I like to add my favorite spices to this - cinnamon, nutmeg and cardamom. I also will often use 1 cup of whole wheat pastry flour and 1 cup all purpose flour. It adds a bit of fiber and I like the texture of the cookie with the pastry flour. 

Leave some room around each cookie as they do spread. This recipe makes two pans of cookies (12 on each pan) so I refrigerate the second pan while the first bakes. It helps ensure the second batch doesn't spread too much.

Quantity: about 24 cookies

Ingredients
  • ¾ cup plus 2 tablespoons unsalted butter, melted (7 ounces; 200 grams)
  • 1 1/2 cups packed dark brown sugar, divided (10.5 ounces; 300 grams)
  • 3/4 teaspoon salt (3g)
  • 1 large egg (50g)
  • 2 teaspoons vanilla extract (10ml)
  • 2 cups (10 ounces) all-purpose flour (285g) or 1 cup whole wheat pastry flour plus 1 cup all-purpose flour
  • 1 teaspoon baking powder (4g)
  • 1/2 teaspoon baking soda (2g)
  • 1 teaspoon cinnamon
  • 1 teaspoon nutmeg
  • ¾ teaspoon ground cardamom
 Instructions
  1. Preheat oven to 350°F. Line two baking sheets with parchment paper or silpats.
  2. Mix butter, brown sugar, and salt in a large bowl.
  3. Add in egg and vanilla and stir.
  4. Add to the bowl, flour, baking powder, baking soda, cinnamon, nutmeg, and cardamom and gently mix until combined.
  5. Pour 1 cup raw or turbinado sugar into a separate bowl.
  6. Scoop dough using a 1 inch cookie scoop, or about the size of a walnut sized and gently roll in sugar. 
  7. Place on cookie sheet and press down slightly to ½ inch thickness. Place 12 on each pan.
  8. Bake about 10 minutes - until golden edges appear and the tops have puffed and crinkled a bit.
  9. Let cookies cool on pans for 5 minutes, then transfer to wire rack to cool completely.

Friday, August 14, 2015

Quick and Easy Chicken Pot Pie


www.withinthekitchen.blogspot.com


As much as I enjoy making my own stock, pie crusts from scratch and fresh farmers market veggies, there are times when I just don't have the time...or motivation, or time or desire or time to make a pot pie from scratch! This is especially true in the heat of the summer. 

So when my daughter asked for chicken pot pie for dinner, I wanted to say no, how about ... pretty much anything else. Instead, I went the quick and easy route - store bought rotisserie chicken, store bought pie crust, some fresh and some frozen veggies, and even gravy from a package. I know, some of you stopped reading at "store bought" but for the rest of you who don't mind the easy way out on occasion (and seriously, who hasn't earned an easy night now and then), you'll love how this pot pie reminds you of the ones your mom made when you were a kid (or the frozen ones she threw in the oven). They don't call it comfort food for nothin'.

Ingredients

1 rotisserie chicken (3-4 c chicken)
1 tbsp butter
2 packs instant gravy powder (or 2 cups gravy)
2 c water
2 c chicken stock
2 carrots, diced
3 celery stalks, diced
1 medium onion, diced
2 tbsp tomato paste
3 cloves garlic, crushed
1 tsp smoked paprika
1/4 tsp cayenne
1/2 tsp chipotle powder
1/2 c grated cheese
1 c frozen corn
1 c frozen peas
1  double pie crust, store bought

Directions


  1. Pull apart chicken into small chunks.
  2. Set aside.
  3. Melt butter in large sauté pan over medium high heat.
  4. Add onions and stir . Cook for 3 minutes.
  5. Add garlic. Stir for one minute.
  6. Add spices. Stir for another minute.
  7. Add tomato paste. Stir for 1 minute.
  8. In large bowl or 4 cup measuring cup, whisk together gravy powder, water and stock.
  9. Add to sauté pan.
  10. Add chicken. Stir.
  11. Bring to a boil. Reduce heat to medium and simmer for 5-10 minutes until mixture starts to thicken.
  12. Remove from heat,
  13. Add cheese.
  14. Stir.
  15. Add peas and corn. Stir.
  16. Let sit while you roll out pie crusts.
  17. Line 9 inch pie plate with bottom pie crust.
  18. Pour in chicken mixture.
  19. Quickly top with remaining pie crust.
  20. Cut in vent holes in the top crust.
  21. You may want to wrap a bit of foil around the edges to prevent over browning (but take it off after the first 20 minutes of baking).
  22. Place in oven for approximately 40-45 minutes until golden brown.
www.withinthekitchen.blogspot.com


Tuesday, March 24, 2015

Easy No Bake Cheesecake Cups

www.withinthekitchen.blogspot.com
Shaved chocolate and a cool martini glass finishes off this easy dessert!


As much as I love creating desserts from scratch, there are times when I don't have time to make a complicated dessert...you know, when you are making a big dinner for family or perhaps making so many other dishes you don't have oven space for a dessert. And of course, sometimes you just want a sweet bite of something that doesn't take much time!

www.withinthekitchen.blogspot.com
Layers!

This dessert is perfect anytime you don't have the desire to bake or the time! It may not be "gourmet" but it's delicious! Kids love helping create with this dessert so put them to work!

www.withinthekitchen.blogspot.com
The chocolate version above has Cool Whip mixed into the cheesecake mixture but the berry version doesn't. It's up to you whether you want to use it...I find it gives a little bit lighter feel and taste. Also, in the chocolate version I just used chocolate condensed milk - that way I don't have to add the additional step of melting chocolate. And in the berry versions, I just split the mixture in half and added my favorite jams to flavour and colour.
www.withinthekitchen.blogspot.com
Use a pastry bag and icing tip to pipe cheesecake mixture and cool whip for a neater dessert.
If desired you could make one big dessert in a pie plate or baking dish, but I like making individual desserts and layering the cheesecake mixture, cool whip and graham crumbs!


www.withinthekitchen.blogspot.com
Blueberries top this blueberry jam version.

Makes about 8 (but depends how big your dishes are!)

Ingredients

1 can condensed milk (14 oz)- plain, chocolate or even caramel flavoured
1 bar cream cheese (8oz), room temperature
2 tbsp jam, your favorite flavour
juice of one lemon (for berry flavours) or 2 tbsp strong coffee (if making chocolate mocha flavor)

1-1/2 cups graham cracker crumbs
2-3 tbsp melted butter

2 cups cool whip if adding to mixture
2 cups cool whip for layers and topping

Instructions


  1. Add condensed milk and cream cheese to large mixing bowl and beat until smooth, about 5 minutes.
  2. Add lemon juice (or coffee) and mix.
  3. Add jam and mix. (if using more than one type jam, divide mixture first)
  4. If using cool whip, add 2 cups and gently fold into mixture.
  5. In another bowl, combine melted butter and graham crumbs.


Set 8 smaller sized ramekins or cute glasses on work station. Add layers of graham crumbs, cool whip and cheesecake. You could add in other fun stuff - caramel sauce marshmallows, chocolate chips... whatever you have on hand.

www.withinthekitchen.blogspot.com
Caramel, graham cracker crumbs, chocolate cheesecake mix and marshmallows
make this a pumped up s'more version of dessert!


Saturday, October 18, 2014

Smoky Three Bean Beef Chili

withinthekitchen.blogspot.com

Fall is here. This weekend we're in Whistler, BC. My favorite seasons to visit Whistler are summer and fall. Obviously, I'm not a skiier - I took a few snow boarding lessons but they weren't money well spent! I'll stick to running. Anyways, Whistler in fall is beautiful - a full palate of colours are awaiting outside my door. Walking through and around the village is always time well spent.

withinthekitchen.blogspot.com
Whistler, BC. Snow will be here soon.
With fall comes cooler temperatures and cravings of warmer comfort foods. Chili, like this three bean beef chili, is perfect for cool days, and even cooler evenings. Add some warm, fresh bread and you've got a perfect meal to enjoy the colors of fall as the sun sets over the mountain.

Ingredients

1.5 lb ground beef
1 can (15.5 oz) black beans, drained and rinsed
1 can (15.5 oz) kidney beans, drained and rinsed
1 can (15.5 oz) white cannelloni beans, drained and rinsed
2 tbsp tomato paste
1 large onion
6-8 cloves garlic, crushed
1 tbsp liquid smoke
1 tbsp chipotle powder
2 tsp smoked paprika
1 tbsp ground cumin
1 28 oz can tomato sauce
2 cups tomato puree or beef broth
2 cups shredded cheese to garnish
green onions to garnish

Instructions

  1. Over medium high heat, brown beef in large, heavy bottom pot.
  2. Remove beef to a bowl and leave fat in pan. Add onions.
  3. Saute for 3 minutes.
  4. Add garlic and saute another minute.
  5. Add tomato paste and stir for 2 minutes.
  6. Add beef and stir. 
  7. Add sauce and puree or stock.
  8. Add all beans.
  9. Add chipotle, cumin, liquid smoke, paprika.
  10. Stir and simmer for at 1 hour over medium low heat.
  11. Serve with cheese, and green onions if desired.

Saturday, June 14, 2014

Easy Strawberry Vanilla Freezer Jam

withinthekitchen.blogspot.com
Don't fill your jars this high! Leave about an inch of space at the top of your jars.

Strawberry season is here in British Columbia! I haven't been to a u-pick strawberry field in years but would love to take the kids to one this year...I think it should be a rite of passage for every child :) And then, of course, I'd put them to work making freezer jam! As I've said before I prefer freezer jam over traditional jam making because the boiling, sealing etc etc scares me ... though I have friends that insist it's not that hard. I'm sure they're right but freezer jam is sooooo easy - crush, mix, pour, repeat! And it take less than 45 minutes to finish the whole process.

Last weekend we made this strawberry vanilla freezer jam but I could have just as easily called it strawberry lemon freezer jam. The vanilla isn't really discernible but it does add an almost secret layer of flavour to the strawberries. The lemon zest on the other-hand is absolutely noticeable! The combination of strawberries and citrus is perfect and makes for jam that tastes incredibly fresh, light and flavourful. My son said this is the best jam he's ever had and asked if he could skip the toast and just drink the jam! Yes, it's that good.

Ingredients

4 c strawberries, crushed (pulse in a food processor)
1-1/2 c sugar
1 package (45 g) freezer pectin
zest of 1 large lemon (2-3 tsp)
1 tsp pure vanilla

What to do

  1. Stir sugar, zest and pectin in a large bowl.
  2. Add crushed strawberries and vanilla.
  3. Stir for 3 minutes.
  4. Spoon into 5 250ml preserving jars stopping about an inch from the top of the jar.
  5. Wipe clean and add lid and ring. Close tightly.
  6. Let sit for 30 minutes so it thickens.

Refrigerate - will last up to 3 weeks otherwise freeze for longer storage.


Try these other easy freezer jams!


Monday, April 14, 2014

Millionaire Bars

withinthekitchen.blogspot.com
If your family is anything like ours, your family calendar is bursting at the seams - between all the kids' activities like  play-dates, soccer, swimming, homework, homework and more homework, violin practice, track and field,  not to mention the occasional workout for yourself, work, appointments etc etc - there is not always time for family dinners! And family dinners that are relaxed, homemade and without pressure to get somewhere else are even more rare.

To combat all this craziness, we try to have a bit more of an old school family dinner on Saturday or Sunday. Each week dessert duty goes to a different family member. The rules are it has to be homemade - no store bought cake/cookies etc. This idea has been a true hit with the kids! My 7 and 9 year olds love planning what they are going to create, shopping for the ingredients and the actual baking of their masterpiece dessert. It's also a good opportunity to spend some one-on-one time with the kids since adult supervision is still needed at their age.

Last week, my daughter made these absolutely fabulous millionaire bars or homemade Twix bars. This dessert looks more complicated than it really is so it's perfect for little hands. And let's face it - chocolate, caramel and shortbread? It's a trifecta of goodness!
withinthekitchen.blogspot.com
Adapted from a King Arthur Flour recipe. The bars can be cut in any size desired so you can easily get anywhere from 12 huge bars to 50 small bars.


Ingredients

1 cup butter, unsalted, at room temperature
1 cup icing sugar
1 tsp vanilla
2 cups all purpose flour
pinch of salt

2 cups caramels
4 tbsp whipping cream

3 1/2 cups milk chocolate chips

Instructions

Preheat oven to 300 degrees F.
Prepare pan by cutting a 9 x 15 inch piece of parchment.
Place it so the extra over hangs.
Spray with baking spray and set aside.

Crust

  1. Using a stand mixer, beat butter, salt and icing sugar at medium speed until well combined. 
  2. Add vanilla and combine. 
  3. Add flour on low speed until it starts to come together.
  4. Increase speed to medium and continue to mix until dough comes together and is smooth.
  5. Gently spread dough into the pan and pat with fingers to get it into the corners.
  6. Prick the batter base multiple times with a fork.
  7. Bake for 30 - 40 minutes until edges are golden.
  8. Place on cooling rack.
  9. Set side to cool completely.

Caramel Layer

  1. On low heat, melt the caramels and cream.
  2. Pour over cooled base.
  3. Place in fridge for 15 minutes to set slightly.

Chocolate Layer

  1. Over very low heat, stir constantly and melt the chocolate chips in a medium sauce pan.
  2. Pour over caramel layer.
  3. Return to fridge to cool and set for 4 hours or overnight.

To serve

  1. Run a knife around the edges of the pan.
  2. Carefully pull the dessert out by lifting it out by the parchment over hang.
  3. Cut into desired sizes. 

Sunday, March 2, 2014

The Refresher Smoothie

withinthekitchen.blogspot.com
I'm not a big fan of kale - unless it's in a smoothie. I thought the kale and strawberries would shine in this smoothie but I was wrong! The ginger is the star of the show here. Even though you don't use much its flavour and refreshing nature gets top billing.

Speaking of top billing, are you watching the Oscars tonight? I am but have to admit that I haven't watched many of the nominated shows this year (except the animation ones - thanks kids!). Oh well, my favorite part is the pre-show red carpet reports - who will be the best dressed?? My money is on Lupita Nyong'o!
withinthekitchen.blogspot.com
Makes 2 smoothies.

Ingredients

handful of frozen sliced strawberries
1/2 ripe avocado
1 cup chopped frozen kale
1 inch piece of peeled ginger, chopped
2 tsp ginger syrup (optional)
1.5 cups low fat milk
water to cover (if needed)

Instructions

Blend everything in Nutribullet or blender until smooth and desired consistency is reached.

Saturday, February 22, 2014

Orange Strawberry Pineapple Smoothie aka the Strawberry Citrus Squeeze

www.withinthekitchen.blogspot.com
We woke up to snow this morning! Snow! Now, I know many of you are wondering what the big deal is but come on, this is Vancouver in late February...it doesn't snow in late February in Vancouver. The last time I remember it snowing this late in February was three years ago.Of course, it won't last long before the rain asserts its dominance because this is Vancouver after all!
This smoothie is so simple but it is truly one of my favorite smoothies. Just strawberries, an orange, pineapple and water aka the Strawberry Citrus Squeeze. It is so refreshing and light tasting! To me, it's summer in a glass...if only I could find my sun glasses...and the sun....and it would stop snowing!

Makes 1 large smoothie.

Ingredients

4 strawberries
1/2 cup pineapple
1 medium orange, peeled
1 cup ice cold water

Instructions

Throw in blender or Nutribullet and blend until smooth.


Other smoothies you should try:
Green Goodness
Avocado Strawberry Smoothie
Blueberry Mango Smoothie
Blueberry Banana Tofu Smoothie
Pomegranate and Kale Smoothie
Strawberry Muesli Smoothie
Detox Lemon Spinach Smoothie
Avocado Chocolate Smoothie

Monday, February 17, 2014

Mango Lassi Smoothie

Mango Lassi Smoothie withinthekitchen.blogspot.com

This is a simple smoothie that has just enough spice to make drinkers take notice. Cardamom is one of my favorite baking spices and I also love it with mangos so it's perfect in this drink. Mango Lassis are great on hot summer days ... yes, I know that most of us are living in a deep freeze right now but winter can't last forever, can it???!!

Mango Lassi Smoothie withinthekitchen.blogspot.com

Ingredients

1 cup frozen mango
1/2 cup yogourt
1-1/2 cups milk
pinch or two of ground cardamom

Instructions

Mix everything in your blender or Nutribullet until blended smooth and no big pieces of mango remain.

Other smoothies you should try:
Green Goodness
Avocado Strawberry Smoothie
Blueberry Mango Smoothie
Blueberry Banana Tofu Smoothie
Pomegranate and Kale Smoothie
Strawberry Muesli Smoothie
Detox Lemon Spinach Smoothie
Avocado Chocolate Smoothie


Monday, October 21, 2013

Homemade Almond Butter

Easy almond butter - one ingredient! withinthekitchen.blogspot.com
Easy almond butter - one ingredient!


Who knew it was so easy to make almond butter? Not me, that's who!

We had a bag of almonds that tasted a bit stale to me so I was going to through them out...but it was a whole pound of nuts. Since I didn't want to waste them I decided to use them in my first attempt at making almond butter - if I totally screwed it up then no biggie since I was going to throw them out anyways.

I basically roasted them for twelve minutes in the oven. This actually made them taste much better!

I then threw them in my Nutribullet. If you don't have one a food processor will do the job - it just might take a bit longer or be a bit grainier than my results.

I didn't add anything else - no salt, no sugar, no nothing.

My husband says this almond butter is better than any type we have bought before! It's also creamier and doesn't seem to go as clumpy once in the fridge. It's delicious on apples, bread, yogourt, smoothies, oatmeal...well pretty much anything!

Ingredients


1 lb almonds (raw or roasted, skin on)

Instructions


  1. If using raw almonds, toast them in a 350 degree oven for 10 to 12 minutes.
  2. Cool.
  3. Throw into food processor or Nutribullet.
  4. Turn it on. It will quickly look like sand and you may think this is not gonna work. It will.
  5. If you have to, stop it and stir or shake it. Turn on again. Repeat as needed.
  6. Eventually (5-10 minutes) you will see it start to look more like almond butter. Keep going so it become really smooth. (another 3-5 minutes)
  7. I was multitasking the day I made this so I turned off the Nutribullet for 10 minutes while I did other things and then put it on again to ensure it was as smooth as possible.

Makes about a cup of almond butter.
Yum!


Monday, July 22, 2013

Farro Vegetable Salad

Farro Summer Vegetable Salad | Within the Kitchen

Farro Vegetable Salad Recipe

This is the first time I have tasted farro. Farro is a complicated grain. There is confusion and debate over what it really is - some say it is spelt ...it isn't. Others call it emmer which it is. Whatever you call this wheat grain, it is delicious as far as whole grains go. It is slightly sweet, nutty and when cooked properly, slightly chewy.

I have to admit that although super popular, quinoa has not been an ingredient I like. I now sub out quinoa and replace it with farro in salads. It is not gluten free as it is a member of the wheat family but is lower in gluten than some other wheat varieties.

This wonderful summer salad is really versatile. Throw in whatever veggies you have on hand - tomatoes, squash, cucumber, onion....you get the idea. Also, if you don't want to do the extra work of roasting peppers just throw them in raw. You could also leave out the maple syrup but I like the added hint of sweetness. It's perfect for potlucks and picnics.

If you have a Trader Joe's near you, try their 10 minute farro to cut down on prep time! 

Serves 6.

Ingredients


1/4 cup olive oil
1/4 cup sherry vinegar
1 tbsp dijon mustard
2 tbsp maple syrup
squeeze of 1/2 a lime
10 oz uncooked farro (probably about 1-1/4 cups dry grains)
3 roasted peppers, chopped
2 cups sugar snap peas, chopped roughly
1/2 cup Parmesan cheese
3 large carrots, shredded
1 yellow zucchini, diced


Instructions

1. Whisk together oil, vinegar, maple syrup and lime juice. Set aside.
2. Cook farro according to package directions. Cool.
3. To roast peppers

  • Take washed bell peppers, and place on hot grill.
  • Grill until skin blisters and peppers soften – rotate peppers so skin chars all over (7-10 minutes depending on grill). I like to basically char the top skin.
  •  Remove from grill and place in bowl.
  •  Cover bowl with plastic wrap and place to the side so they rest for 20 minutes or so. The peppers will steam inside the bowl which will loosen the charred skin, making it easier to remove them later.)
  • Remove peppers from bowl and carefully remove charred skins.
  • Cut peppers into one inch pieces or long strips.
  • Cool
4. Place farro and all veggies into a large bowl.
5. Gently toss in dressing.
6. Season with salt and pepper.
7. Sprinkle Parmesan on top.
8. Serve

Farro Summer Vegetable Salad | Within the Kitchen


Farro Summer Vegetable Salad | Within the Kitchen


Farro Summer Vegetable Salad | Within the Kitchen

Thursday, April 11, 2013

Curried Coconut Milk Prawns

Curried Coconut Milk Prawns - an easy week night meal
This recipe is great on its own or served over either rice or Israeli couscous. You could also add a tablespoon of your favorite curry paste instead of the curry powder. It also works with chicken or pork.

Serves 4ish.


Ingredients


2 cans (13½ ounces/400 ml) of coconut milk
2 tablespoons (30 ml) or so of medium curry powder
1 ½   teaspoons (5 ml) of soy sauce
1 inch piece of ginger, grated
3 cloves garlic, crushed
1 medium onion, chopped
2 large carrots, peeled and grated
2 cups frozen peas or edamame
3 cups fresh spinach
1 cup chopped pineapple (preferably fresh)
1 pound (450 g) of fresh or thawed frozen medium prawns, shells off but tails can be left on if desired (see pic), deveined

Instructions

  1. Over medium heat sauté onions and curry powder until onions are translucent. 
  2. Add garlic and ginger and sauté for another minute.
  3. Add spinach and pineapple and continue to sauté until spinach is just beginning to wilt.  
  4. If your pan is big, add the coconut milk, otherwise transfer the mixture to a large pot and add the coconut milk. Bring it to a simmer over medium heat. 
  5. Add soy sauce. 
  6. Stir in the peas and prawns. Lower the heat until it is barely simmering. Continue stirring until the prawns are cooked through (curled and red - about 5 minutes).
  7. Serve or its own or over rice/couscous.
Israeli couscous

Wednesday, March 13, 2013

Easy Mini Caramel Cheesecakes


I make these mini cheesecakes when I want to serve a variety of desserts. I last made these at Christmas along with mini lemon tarts, and mini spice cupcakes with eggnog icing. By making  mini desserts after a large meal like Christmas or Thanksgiving your guests are more likely to try a small treat ... or three :) 


If you can't find dulche de leche condensed milk you can use regular..or learn to make your own here.


Preheat To: 300º F (150ºC)

Serving: 36 mini cheesecakes

Ingredients:
1¼ cups (300 mL) graham cracker crumbs
2 tbsp (30 mL) sugar
1/4 cup (50 mL) unsalted butter, melted
Or
36 1-inch premade cookies (I like these with homemade ginger cookies)

2 pkgs (250 g each) regular or light cream cheese, softened
1 can (300 mL) Dulche de Leche Eagle Brand® sweetened condensed milk
2 large eggs
2 tsp (10 mL) vanilla extract

¾ c Caramel sauce or another can of dulche de leche to spoon on top (optional)

Instructions:
  1. Place about 36 mini foil or paper baking cups in muffin tins. 
  2. Combine graham cracker crumbs, sugar and butter; press firmly onto bottoms or simply place one pre-made cookie in each cup.
  3. In large bowl, beat cream cheese until fluffy - about 4 minutes. 
  4. Beat in sweetened condensed milk until smooth. 
  5. Add eggs one at a time and mix well. 
  6. Mix in vanilla. 
  7. Spoon equal amounts of mixture into prepared cups.
  8. Bake for 14-18 minutes or until cheesecakes spring back when lightly touched. Cool thoroughly then refrigerate at least 2 hours.
  9. Top with a small spoonful of caramel sauce before serving. 
  10. Store leftovers covered in refrigerator.

Friday, February 1, 2013

Homemade Corn Tortillas


Warning: Once you make homemade corn tortillas, store bought will never again be an acceptable substitute!

We've only been making fresh corn tortillas for a year or so. You see, I love kitchen gadgets - avocado slicer, honey spoons, banana slicer, lemon squeezer, 1000 cookie cutters,  crinkle carrot cutter, citrus skin peeler thingy and even a slap chop! So when I saw a tortilla press, obviously, I had to give it a good home! The funny thing is, I actually use this... a lot! It's also the one gadget my husband wouldn't like me to return.

I'm no expert when it comes to tortilla making but in my limited experience I have found that I get the best tortillas when I use my cast iron skillet. Also, don't press the tortillas paper thin or you won't be able to peel them off the plastic wrap.

These are perfect for my tortilla casserole - they stay firmer than store bought tortillas so left overs taste great!

Ingredients

2/3 cup of lukewarm water
1-1/2 cups masa flour
pinch of salt


Instructions

In a medium size bowl, stir together flour and salt. Add the lukewarm water and gently mix with your hand until the dough forms into a ball that holds together but is not sticky. Divide the dough into 8-10 pieces and roll each one into a ball (each one will be about the size of a golf ball).

Heat your cast iron pan over medium high heat. NO need for oil. 

Place a medium sized ziploc bag (with two long sides cut) or plastic wrap on your open tortilla press in such a way that the dough ball can be placed between the plastic pieces. Press until flat. Gently remove from plastic.

Place tortilla in pan and cook for 20-30 seconds. You know it is done when the edges begin to dry and lift slightly from your pan. Flip the tortilla. Cook for another 20-30 seconds. The dough may begin to puff up in a couple of spots. It will also be speckled with brown/black spots.

Repeat with remaining tortillas. Keep cooked ones under a kitchen towel or in a tortilla warmer until ready to serve.


Saturday, March 31, 2012

Extreme Caffeine-Chocolate Shortbread Cookies


These are, without a word of a lie, my favorite cookies ever! Buttery, chocolatey, and a double hit of coffee flavour makes this shortbread recipe a must have in any baker's repertoire. Every time I share these cookies, someone asks for the recipe. I wish I could take credit for the idea but Dorie Greenspan is the original baker and Smitten Kitchen thankfully featured it for my eyes and taste buds to discover.

I've made them with just chocolate chips, a combo of chocolate chips and skor bits and now this version with cappuccino chips and mini chocolate chips. All of them will make your taste buds stand up and cheer!

I also like the use of a Ziploc bake to roll out the dough - it makes kitchen life super easy.

Let me know what you think of these little pieces of caffeine heaven!

Adapted from Smitten Kitchen who adapted it from Baking: From My Home to Yours


Makes about 35 cookies

Ingredients


1 tablespoon instant espresso powder
1 tablespoon boiling water
1 cup unsalted butter, at room temperature
2/3 cup confectioners’ or powdered sugar, sifted
1 teaspoon pure vanilla extract
2 cups all-purpose flour
1/2 c cappuccino flavoured chips, chopped or whirred in a food processor a few times (I use Guittard brand chips)
1/2 c mini chocolate chips


What to do
  • Dissolve the espresso powder in very hot water, let cool to room temperature.
  • Cream the butter and sugar together on medium speed for about 4 minutes. You want the mixture to be light in colour and completely smooth.
  • Add the vanilla and espresso, then reduce the mixer speed to low.
  • On your lowest setting, add the flour. To prevent your cookies from being to brittle and dry mix in the flour just until it is combined. Don't over do it!
  • Gently stir in the chips.
  • Spoon the dough into a large Ziploc bag .
  • Gently roll the dough so it becomes the size of the bag and is about 1/4 inch or 1/2 cm thick.
  • Close the bag and refrigerate for 2 hours or overnight.
  • Preheat oven to 325 degrees F.
  • Line a large cookie sheet with a silpat or parchment paper.
  • Cut or slice the bag open so that the top side of the bag is removed.
  • Using a knife or a pizza cutter cut the dough into 1-1/2 - 2 inch squares.
  • 13. Move the cookies onto the sheet. They don't spread much so you don't need too much space between them.
  • Bake for 15- 20 minutes (depends on your oven - Mine take 18 minutes.)
  • Transfer cookies to a wire rack to cool.
  • I recommend baking them 24 hours ahead of time - their flavour improves.

Tuesday, August 16, 2011

Mango-Nectarine Shrimp Noodle Salad


Sometimes it's just waaaay to hot to cook or even eat something hot! On those days this is a perfect recipe that uses fresh fruit, shrimp and a bright vinegary dressing that will satisfy your taste buds and keep you cool!
 
Adapted from a recipe at http://www.epicurious.com/

Ingredients

  • 8 ounces very thin cellophane noodles
  • 1 pound cooked, peeled, and deveined medium or large shrimp
  • 1 medium mango, peeled and cut into 1/2-inch cubes
  • 2 large nectarines, cut into 1/2-inch cubes
  • 6 green onions or scallions, thinly sliced crosswise
  • 1/2 cup coarsely chopped fresh basil
  • 1 chopped fresh jalapeño chile, including seeds, or to taste
  • 2/3 cup rice vinegar (not seasoned)
  • 1/4 cup sugar
  • 2 tsp salt


What to do
  • Cover noodles with boiling-hot water in a large bowl and let stand 8 minutes.
  • Drain noodles in a colander and rinse with cold running water. Drain again.
  • Place back in bowl and add shrimp, mango, nectarines, green onions, basil, and jalapeno.
  • In a small bowl, stir together vinegar, sugar, and salt until sugar is dissolved.
  • Toss with noodles and shrimp.
  • Enjoy!

Sunday, January 16, 2011

How to Make Ricotta Cheese


I love ricotta cheese - on bread, mixed with chocolate, sprinkled with herbs, in lasagna, in a lemon tart...ricotta is so versatile and delicious. But for most of us ricotta comes from a tub that we buy in our local grocery store. Some of us are lucky enough to buy fresh ricotta from specialty stores. But have you ever thought to make your own fresh ricotta at home? Why not? It's easy, fast and your taste buds will thank you.

You will need cheesecloth and colander.

Ingredients
4 cups 1% milk (or 2% or whole)
2 cups whipping or heavy cream
1/2 tsp salt
3 tbsp white wine vinegar

What to do
  1. Dampen cheesecloth and line a colander with it.
  2. Place colander over a large bowl.
  3. In a large sauce pan, bring the milk, cream and salt to a boil over medium heat. Stirring often to prevent burning.
  4. Take off heat and add vinegar.
  5. Let rest 2 minutes while mixture separates.
  6. Pour mixture into colander.
  7. Wait 30 minutes while liquid drains into bowl. You may want to run a spoon through it a couple of times to let the liquid escape.
  8. Use immediately or place in air tight container and refrigerate for up to 3 days.

Monday, December 27, 2010

Smokin' Turkey Chili

Those of us with left over turkey, please raise your hand!!!

We roasted a 19lb gobbler and I was worried it might not be enough for our table of 12. In the end, there was no need to worry as there was enough for  2nds and a few 3rds. There was also more than enough for leftovers.

To make sure none of the turkey went to waste, I decided to make turkey chili and freeze it for lunches in the New Year. And although gluttony is a definite Christmas tradition, the New Year will bring renewed thoughts of a healthy eating so little added fat and lots of added fibre make this a delicious and healthy left over dish!

This recipe also reminds me of the thanksgiving back in university that I made a big pot of turkey chili for a group of friends....it wasn't until we were almost done eating that I realized I forgot to put turkey in it!!!! Lol.

Ingredients:
  • 2-3 cups of diced, cooked turkey
  • 2 large cans of diced tomatoes
  • 1 can (14 oz) white beans, rinsed
  • 1-2 cans (14oz) black beans, rinsed
  • 1 jalepeno, diced (keep seeds in if you like it on the hot side)
  • 1-1/2 teaspoons cumin
  • 1 cup ketchup
  • 1 teaspoon hot sauce (I like chipotle sauce)
  • 2 tablespoons honey
  • 2 large onions, chopped
  • 1 large red sweet pepper, chopped
  • 3 cloves garlic, diced
  • 1 teaspoon liquid hickory smoke

What to do:
  1. Until transparent, saute over medium heat onions, red pepper, and jalepeno in pan lightly coated with cooking spray. (about 5 minutes).
  2. In large pot, add all ingredients including sauteed vegetables.
  3. Simmer over medium heat until heated through and bubbling.
  4. Serve or place into smaller containers and freeze for future use.