Showing posts with label kid approved. Show all posts

Saturday, July 23, 2016

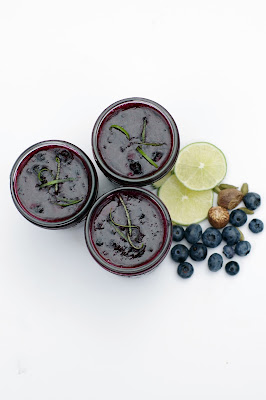
Easy Blueberry Freezer Jam

withinthekitchen.blogspot.com

Anyone with a free 20 minutes can make freezer jam. What's so great about freezer jam?
- quick
- easy
- tastes fresher and fruity than regular jam
- freezes well
- makes great gifts
- less sugar than traditional jam
- great activity for kids

Right now is blueberry season in Vancouver - I picked up 20lbs (that's right 20lbs!) of these plump and delicious berries last week. We froze a few pounds for winter smoothies and then went into cook/bake mode - sweet fruity, and buttery aromas were filling our kitchen thanks to hours of making  jams, crumbles, pies and cakes.

Today, I'm sharing the freezer jam the kids and I mixed up. Normally, I don't cook the fruit I use in freezer jam but in the case of blueberries a little bit of cooking softens the berry skins and brightens the flavour of the blueberries. Luckily, it only adds a few minutes to the process. 

If you don't like the spices I used or even the lime, just leave them out and you'll have pure, unadulterated blueberry flavour. The jams will last in the fridge for 3 or 4 weeks or place them in the freezer for up to a year.

To crush the berries, I pulse them a few times in my food processor - you want them chunky but broken down a bit.

Special equipment: 4 - 1 cup glass or plastic jars.

Ingredients

4 cups crushed blueberries (about 4-1/2 cups before crushing)
1 package freezer pectin (I use Bernadin pectin)
1-1/2 cup granulated sugar
zest of half a lime
juice of half a lime
1/2 teaspoon cardamom
1/2 teaspoon nutmeg

Instructions

  1. Place berries in pan over medium heat.
  2. Bring to a boil and remove from heat.
  3. In a large bowl, mix together pectin, sugar and spices.
  4. Add berries and lime juice and zest and stir for 3 minutes.
  5. Divide among containers and let sit for 30 minutes to thicken.
  6. Cover and refrigerate or freeze.

withinthekitchen.blogspot.com

withinthekitchen.blogspot.com

Monday, March 7, 2016

Brown Sugar- Spice Cookies Recipe

www.withinthekitchen.blogspot.com


These cookies are simple, crispy yet chewy, buttery, and sweet - perfect in a lunch for the kids, or as a treat with your afternoon coffee. They also make great ice cream sandwich cookies.

Adapted from a recipe by Serious Eats. I like to add my favorite spices to this - cinnamon, nutmeg and cardamom. I also will often use 1 cup of whole wheat pastry flour and 1 cup all purpose flour. It adds a bit of fiber and I like the texture of the cookie with the pastry flour. 

Leave some room around each cookie as they do spread. This recipe makes two pans of cookies (12 on each pan) so I refrigerate the second pan while the first bakes. It helps ensure the second batch doesn't spread too much.

Quantity: about 24 cookies

Ingredients
  • ¾ cup plus 2 tablespoons unsalted butter, melted (7 ounces; 200 grams)
  • 1 1/2 cups packed dark brown sugar, divided (10.5 ounces; 300 grams)
  • 3/4 teaspoon salt (3g)
  • 1 large egg (50g)
  • 2 teaspoons vanilla extract (10ml)
  • 2 cups (10 ounces) all-purpose flour (285g) or 1 cup whole wheat pastry flour plus 1 cup all-purpose flour
  • 1 teaspoon baking powder (4g)
  • 1/2 teaspoon baking soda (2g)
  • 1 teaspoon cinnamon
  • 1 teaspoon nutmeg
  • ¾ teaspoon ground cardamom
 Instructions
  1. Preheat oven to 350°F. Line two baking sheets with parchment paper or silpats.
  2. Mix butter, brown sugar, and salt in a large bowl.
  3. Add in egg and vanilla and stir.
  4. Add to the bowl, flour, baking powder, baking soda, cinnamon, nutmeg, and cardamom and gently mix until combined.
  5. Pour 1 cup raw or turbinado sugar into a separate bowl.
  6. Scoop dough using a 1 inch cookie scoop, or about the size of a walnut sized and gently roll in sugar. 
  7. Place on cookie sheet and press down slightly to ½ inch thickness. Place 12 on each pan.
  8. Bake about 10 minutes - until golden edges appear and the tops have puffed and crinkled a bit.
  9. Let cookies cool on pans for 5 minutes, then transfer to wire rack to cool completely.

Wednesday, February 24, 2016

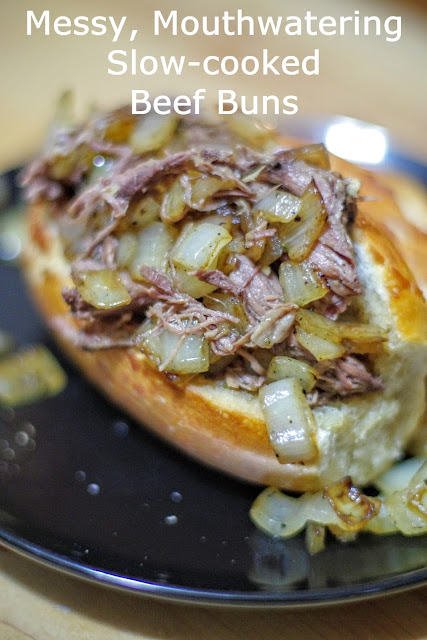
Messy, Mouthwatering Drippy Beef Buns

withinthekitchen.blogspot.com

This messy, drippy beefy sandwich is great on any rainy, cold day...or any other day for that matter.

We've had lots of beef dips before but never with peperoncini peppers until today - you can thank Ree Drummond for that! If anyone in your house doesn't like the peppers (they are quite mild) they are easy to pull out.

Based on a recipe from Pioneer Woman.

Ingredients


2 tbsp butter
2 tbsp vegetable oil
3 lb blade pot roast
1 tsp salt
1 tsp ground pepper
2 cups beef stock
1-1/2 cups water
1 tbsp ground rosemary
2 cloves of garlic, thinly sliced or crushed
1 375 ml jar of pickled peperoncini peppers (12 ounces)
dash of Worcestershire sauce (optional)
2 drops liquid smoke (optional)

2 medium onions, diced
1 tbsp butter
1/2 tsp salt

8 crusty buns

Instructions

  1. Preheat oven to 300 degrees F or 150 degrees C.
  2. Season the roast by sprinkling salt and pepper evenly over it.
  3. Add the butter and oil, over high heat, to a medium sized dutch oven or oven proof pot.
  4. When the pot is very hot (almost smoking), seer the beef on all sides. You want a beautifully brown, caramelized colour on all sides.
  5. Once seared, remove beef from pot and remove left over oil/butter. You don't have to clean the pot, just get rid of the extra fat.
  6. Add back the beef, beef broth, water, rosemary and garlic.
  7. Remove the stems, if desired, from the peppers (I usually just pull them off) and add them and all the juice from the bottle into the pot.
  8. If desired, add a dash of Worcestershire sauce and liquid smoke.
  9. Bring to a simmer over medium high heat.
  10. Turn off heat, cover and place in the oven for 3-1/2 to 4 hours. To test: The beef should easily pull apart with a fork when done.
  11. You can remove the beef to another bowl to pull apart or shred the beef (if your roast was held together by string - remove it!) with two forks or just keep it in the cooking liquid.
  12. Heat saute pan over medium heat and add butter.
  13. Add onions and salt.
  14. Saute until golden brown, approximately 10 minutes.
  15. Slice buns (you may want to take out some of the bread so you have room for more meat!) and pile with meat and onions. Add some extra beef cooking liquid to make a moist, drippy, beautiful mess of a sandwich!

If you want to make this the day ahead of time, complete step #10. Take out the peppers, cool and refrigerate overnight (beef and peppers separately). The next day, use a spoon to remove the layer of fat that congeals on top and discard it. Add the peppers back into the pan and reheat on stove top over medium heat. Go to step #11.

You can also toast your buns before loading them with meat - this is a good tip if your buns are really soft.

Enjoy!

Fresh rosemary.
Ground rosemary.
Spicy but not super hot.
Mouthwatering, right?
Practically falls apart.


Saturday, January 16, 2016

Mango Blueberry No Nut Granola Recipe

www.withinthekitchen.blogspot.com


Every few months I make a batch of granola. The kids eat it with yogurt or milk. They also love taking it to school as a snack at recess. For this reason, I make it nut free.

This time I used coconut oil. At room temperature, it is solid but as soon as it hits 76 degrees it will begin to liquefy. By heating the oils and the spices, the spices bloom and their flavors and aromas are released. Your kitchen will smell great!
www.withinthekitchen.blogspot.com

This makes a big batch of granola so I usually distribute half of it into small snack bags so they are ready for lunch boxes or snacking at anytime. The other half of the batch goes into a big container that we keep on the counter for easy kid-access!

Note about coconuts from this Health Canada site: A coconut is a seed of a fruit and nutmeg is obtained from the seeds of a tropical tree. Coconut and nutmeg are not considered tree nuts for the purposed of food allergen labeling in Canada and are not usually restricted from the diet of someone allergic to tree nuts. However, some people have reacted to coconut and nutmeg. If you are worried, consult your allergist before trying coconut or nutmeg products. 

I also make sure anyone who eats it knows there is coconut oil in it.


Ingredients

1/4 cup canola oil
3/4 cup coconut oil
1 c maple syrup
2 tsp vanilla
1 tbsp cinnamon
1 tsp ground nutmeg
1 tsp cardamon
1 tsp salt
8 cups rolled oats
1 cup wheat germ
1 cup wheat bran
1 cup milled flax
3/4 cup dried blueberries
1 cup dried mango, chopped

Optional
1/2 tsp fleur de sel

Instructions

  1. Preheat oven to 325 degrees F.
  2. In medium sized pot combine oils, maple syrup,vanilla, cinnamon, nutmeg, and cardamom.
  3. Stir over medium-low heat until just simmering and remove from heat. Watch carefully and be careful not to burn yourself.
  4. Combine oats, wheat germ, bran and flax with salt.
  5. Pour oil mixture over oats and stir until well combined.
  6. Spread granola on two large cookie sheets.
  7. Bake for 30-40 minutes until golden. While baking, stir granola every ten minutes to ensure even baking.
  8. Remove from oven.
  9. If desired, add sprinkle of 1/2 tsp fleur de sel. 
  10. Cool completely.
  11. Place in large bowl.
  12. Add dried fruits and combine.
  13. Store in air tight containers.
www.withinthekitchen.blogspot.com

www.withinthekitchen.blogspot.com
Enjoy!

Sunday, January 10, 2016

Grandma's Easy Date Squares Recipe


www.withinthekitchen.blogspot.com


Date squares? Have you ever had one? Is it a dessert you associate with your great aunt Agnes? Date squares seem to have become something of an "old-fashioned" dessert. Date squares or matrimonial squares (some say because they were made with so many "dates". Get it? You gotta go on a lotta dates to get married???) as they are known in some parts of Western Canada have been around since at least the 1930s.

www.withinthekitchen.blogspot.com
They are made from a layer of sweet, gooey dates that is sandwiched between two layers of buttery golden oats.

www.withinthekitchen.blogspot.com
My mom used to make them when I was a kid but I hadn't thought much about them since then. That is, until my 9 year old son saw a bag of dates at the grocery store. He wanted to try them. They were on sale so I bought two bags since my brain flickered with the idea of date squares. Turns out my son didn't like dates straight out of the bag (no surprise). That left me with two bags of dates and the brain flicker turned into a brighter light (luckily I didn't have the urge to walk into it).

I knew the kids would love the oat mixture - it's pretty much a crumble topping but I wasn't sure about the dates in the middle. Would the texture be appealing? In a word. YES. Yes, it would . Granted the dates are mixed with enough sugar to make them sweet and delicious and taste bud friendly to almost anyone.

I think date squares deserve a new minute in the sun, another 15 seconds of fame and it starts right here. Try this recipe. Let me know what you think of them. I know you'll love them (so will your great aunt Agnes so be sure to share)!


Ingredients

2 cups dates
3/4 cup water
1/4 cup orange juice
1/2 tsp baking soda
1/4 cup brown sugar (can reduce or increase this amount to suit tastes)

1-1/2 cups large flake oats
1-1/4 cup flour
1 cup brown sugar
3/4 cup unsalted butter, softened
1/2 tsp baking powder
1/2 tsp salt
1 tbsp cinnamon

Instructions


Fruit Mixture:

  1. Place dates, water, juice, baking soda and sugar in sauce pan.
  2. Bring to a boil.
  3. Reduce heat and simmer for approximately 10 minutes.
  4. Remove from heat.
  5. Using a fork or potato masher, squish the date mixture a bit to form a coarse paste.
  6. Cool.

Oat Mixture:

  1. In large mixing bowl, add flour, sugar, oats, salt, baking powder and cinnamon.
  2. Mix with hands,
  3. Cut butter into 1 inch pieces and add to bowl.
  4. Using your hands, rub and mix butter and other ingredients together until you have a  crumbly mixture that will hold together if squeezed.

Making the squares:

  1. Preheat oven to 350 degrees F.
  2. Spray an 8x8 baking dish with non stick spray.
  3. If desired, line with parchment or nonstick foil, letting it hang over edges for easier removal later. 
  4. Place half of oat mixture in bottom of dish and use your hands to firmly press mixture evenly over bottom.
  5. Add all of the cooled date mixture on top of crumble and spread evenly (I use an offset spatula).
  6. Add rest of oat mixture over dates.
  7. Gently press down to cover fruit.
  8. Bake for approximately 30-35 minutes, until top is golden brown.
  9. Remove from oven and cool completely.
  10. Either cut in pan or remove by pulling overhanging foil.
  11. Cut into desired number of squares.

Saturday, October 24, 2015

Harry Potter Birthday Party Part 5: The Cake

www.withinthekitchen.blogspot.com


If you missed our other Harry Potter Birthday Party post, check them out:


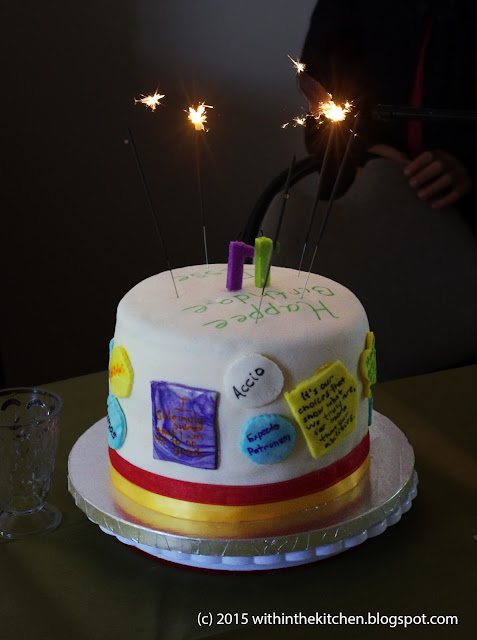
Such a simple cake but the kids loved it!

It's a simple five layered chocolate and vanilla cake with vanilla frosting.

It's covered with marshmallow fondant. Let me be clear, I dislike regular fondant and try to avoid it like the plague! It tastes awful. When I use it, I make figurines (e.g. on our Plants vs Zombie cake) but would never cover a cake in it. But I had heard rumours that marshmallow fondant is not only easy to work with but also tastes waaaay better. So what the heck, I thought, let's try it.

It doesn't taste like marshmallows but it is sweet and pleasant tasting. More importantly all the kids (and my husband) ate it and liked it - not one peeled it off the cake! That says something!

It was easy to work with. Even though I rolled it a bit too thin, it still adhered to the cake well and it was easy to smooth out.  The ribbons on the bottom of the cake hid a bit of messiness around the edges of the cake!

After it was covered, I added a bit of color gels to pieces of extra fondant. After rolling them out and cutting them into shapes (you can use whatever cookie cutters you have on hand or even cut them free style with a knife), I wrote on them with edible ink. The kids gave me their favorite spells and quotes from the Harry Potter books and movies and I just copied them onto individual fondant pieces. If you rub a tiny bit of water on the cake or the back of the fondant piece it will be easy to adhere it to the cake!

Note: Make sure you make the fondant a day or so in advance - it makes it much easier to work with.

Here are the sites I referred to when making our marshmallow fondant:
Great Video by My Cupcake Addiction: https://www.youtube.com/watch?v=GaKqSND8sPc


www.withinthekitchen.blogspot.com


www.withinthekitchen.blogspot.com

www.withinthekitchen.blogspot.com


www.withinthekitchen.blogspot.com


www.withinthekitchen.blogspot.com

www.withnthekitchen.blogspot.com

www.withinthekitchen.blogspot.com


Sunday, October 4, 2015

Grammie's Ginger Snaps


Only nine ingredients and a little bit of time stands between you and these spicy, sweet ginger snaps. These are so easy to pull together. My kids love rolling them in the sugar and placing them on the baking sheet. I prefer to use raw sugar to roll the cookies in - it's crunchier than regular granulated so it adds a great texture element.

The video below was made by my 11 year old - I think she did a great job - don't you?


Ingredients

3/4 cup butter
1 cup white sugar
1 egg
1/2 cup molasses
2.5 cups flour
2 tsp baking soda
2 tsp ginger
1 tsp cinnamon
3/4 tsp salt

1 cup extra granulated sugar or raw sugar in bowl for dipping cookies

Instructions

  1. Cream butter and 1 cup sugar well.
  2. Beat in egg.
  3. Mix in molasses.
  4. In another bowl, stir together flour, baking soda, ginger, cinnamon, and salt.
  5. Add to the creamed mixture and mix well.
  6. Shape into 1 inch balls.
  7. Roll in sugar and on baking sheet.
  8. Bake at 350 degrees for 10 minutes.
  9. Cool on pan for 5 minutes and then transer to wire racks to cool completely.

Makes about 4 dozen cookies.

Monday, September 14, 2015

REESE Peanut Butter Chocolate Eclairs


www.withinthekitchen.blogspot.com


Chocolate and peanut butter - is there anything better? This combo makes my mouth water just thinking about it. And Reese does it perfectly. Whether it's their famous peanut butter cup or their candies, I can't say no when they're offered up (or when I pass them in the grocery store).


www.withinthekitchen.blogspot.com
I picked up my first jar REESE peanut butter and chocolate spread while I was down in Washington State last year - as soon as I tasted it (yes, on a spoon...don't judge), I wish I had bought a few more jars. It quickly disappeared and I tried to forget about it until my next US trip.

Well, now I'm happy to say that you can buy this delectable thick, creamy spread, which is full of finely crushed pieces of peanuts to give it the texture of the famous REESE peanut butter cup, in your local Canadian grocery store!
www.withinthekitchen.blogspot.com

And when asked by Hershey to create a recipe featuring this spread, of course, I said yes!

After much thought and input from the family and a few test recipes, we all decided this REESE peanut butter chocolate eclair was the unequivocal winner. The kids have already asked that it be part of  our Thanksgiving and Christmas dinner menus!
www.withinthekitchen.blogspot.com
Eclair pastry sometimes intimidates people - don't let it! It really isn't that difficult. Make sure you use a strong spoon when you are stirring the dough - one wooden spoon was harmed in the making of this dessert! The handle broke - make sure yours is sturdy!


Pastry Dough

Ingredients

1 cup milk
1/8 tsp salt
1 tsp sugar
1 cup flour
4 large eggs + 1 egg


Directions

  1. Place milk, salt and sugar in a sauce pan over medium high heat.
  2. Bring to a boil and immediately remove from heat.
  3. Quickly add flour in one dump and stir until dough is formed. It should be glossy and come together in a ball that comes away from the sides of the pan easily.
  4. Place back on medium heat and stir continuously until a milky white film forms on the bottom of the pan.
  5. Remove from heat and let sit for 5 minutes (you don't want to cook the eggs).
  6. Break 4 eggs into liquid measuring cup.
  7. Pour one egg at a time into dough and stir until incorporated.
  8. Repeat with each egg, one at a time.
  9. The dough will look like a thick and shiny paste. If it is too dry, beat the remaining egg and add half of it. Set aside the other half.
  10. If you have one, place a half inch decorating tip inside a pastry bag and then add the dough. If you don't have one, simply place the dough into plastic resealable bag and cut half an inch off one of the bottom tips of the bag.
  11. Place a silicone mat on baking sheet (you may need two sheets).
  12. Starting about half inch above the baking sheet, pipe a 3-4 inch strip of pastry. Leave 2-1/2 inches between pipings.
  13. Depending on size, 12-16 eclair should be piped.
  14. If you haven't already, beat one egg. Brush each eclair lightly with egg. With the brush, gently push any dough tips back into the dough.
  15. Bake for 30-35 minutes, switch pans half way through baking if using two pans. You want the pastry to be completely dry or it will collapse. (you can take one out and open it to check if dry).
  16. Once golden brown, turn off oven but DO NOT remove pastry. Open oven door two inches and let the pastry sit for 30 minutes. This will help dry the pastry out so it's not soggy in the middle later.
  17. Remove from oven and cool completely.


Filling

Ingredients

2/3 cup Reese  peanut butter spread
1/4 c heavy or whipping cream
2 tbsp unsalted butter


Directions

  1. Mix all ingredients at medium-high speed for one  minute until incorporated and slightly lighter in color.
Putting filling in eclairs

  1. Cut each eclair length wise put do not cut through (like a hot dog bun).
  2. Place filling in a pastry bag or strong resealable plastic bag with the end snipped off.
  3. Pipe the filling into sliced pastries. 

Topping

Ingredients

1 cup Reese peanut butter chips
1 cup salted, roasted peanuts, chopped


Directions

  1. I find it easiest to melt the chips in 1/4 cup batches in the microwave (about 45 second should do it).
  2. Place each batch in a pastry bag with a very small 1/4 inch opening and drizzle on top of the eclairs.
  3. Top each eclair with a sprinkle of crushed peanuts.
  4. Let set until the melted chips have set again (about 15 minutes).


Note:
The pastries are best on the same day they are made but will last a few days in an airtight container.


www.withinthekitchen.blogspot.com


Want more amazing recipes using Hershey's Reese peanut butter chocolate spread? Of course you do! Find them by following the #doyouspoon hashtag on Facebook, Twitter and Instagram! 


Disclosure: I received free product samples and was compensated for this post by Hershey's Canada. The opinions expressed are, as always, my own. 

Wednesday, July 29, 2015

Harry Potter Kids Party: Invitations (#1)

Harry Potter Party for Kids

www.withinthekitchen.blogspot.com

I love planning my birthday kids parties. The decorations, games, cake, food, and loot bags all get detailed attention. See our son's Plants vs Zombies party as one example and our daughter's Hawaiian party as another example of fun times! This year my daughter is turning 11 and she is also a huge Harry Potter fan. As any Harry Potter fan knows, Harry was 11 when he received his acceptance letter to Hogwarts School of Witchcraft and Wizardry. She was desperately hoping for the same! All I could do was give her a HP birthday party and hope that would be enough!


I fully admit I go overboard with planning my kids parties. Take my advice and plan exactly what you will need...that way you won't end up with enough candy to open a real Honeydukes or wonder what you're gonna do with thirteen 'quidditch' brooms lol. Now, I'm not saying everything I do for the party was totally authentic by any means but everything was in the spirit of Harry Potter.


When planning a Harry Potter party my advice is to use what's already out there! Lots of people have had great parties and are willing to share what worked and what didn't. You can easily find Harry Potter inspired invitations, decorations, food and other ideas on the Internet.

Over my next few posts, I'll take you through some of the things we did including:


We'll start at the beginning with our invites.


Invitations


www.withinthekitchen.blogspot.com

There are many great invites made by other party planners out there. I borrowed ideas, words and ideas from a few and came up with ours. I printed them on blank cards from Michael's that came with envelopes.

Here's the invite wording:

Dear Miss (name here),

We are pleased to inform you that you have been invited to attend the Hogwarts School of Witchcraft and Wizardry, where we will be having a special birthday celebration for (birthday name here).

Term begins (insert time). Please make your way to (address here) in a Muggle mode of transportation and in Muggle attire to avoid suspicion. You will find your ticket attached. Please present it at time of boarding. 


We await your owl post response by no later than (insert date)

If you have trouble acquiring an owl, you may respond by Muggle phone or email.

Sincerely,

Minerva McGonagall, Deputy Headmistress

P.S. Term will end at approximately (insert time here).


You can find Minerva's signature here.  

www.withinthekitchen.blogspot.com

Inserted into each envelope was a ticket for the Hogwarts Express. You can find them here.

Originally, we were going to deliver them attached to owl balloons but we ran out of time. Instead we placed a puffy owl sticker on each one.

The kids loved the invitations and most even remembered to bring their tickets!

Wednesday, July 22, 2015

Peach Cinnamon Ginger Freezer jam

www.withinthekitchen.blogspot.com


I'm on a bit of a freezer jam kick! When I think of homemade jam I think of berries - raspberry, blueberry and strawberry. But every once in awhile I crave something different, like this peach freezer jam with cinnamon and ginger.
Chop the peaches quite small but don't completely puree - you can use your food processor for this or a knife.

My kids love this with yogurt for breakfast and with ice cream for dessert!


Ingredients

4 cups well chopped peaches (about 6 large peaches)
1 package freezer pectin
1 tsp cinnamon
1/2 tsp ginger powder
1-1/2 cups sugar

Instructions


In a large bowl, whisk sugar, zest and pectin.
Add pureed peaches and stir for 3 minutes.
Divide among five 1-cup jars.
Let sit for thirty minutes to thicken.
Cover and refrigerate (3 weeks) or freeze (up to a year).

Here are some of my favorite freezer jams you can find on Within the Kitchen:

And my most popular jam recipe:

www.withinthekitchen.blogspot.com

Tuesday, July 14, 2015

Strawberry Freezer Jam


Homemade freezer jam is so easy. More importantly, it tastes so much better than store bought jam. The zest in this jam really brightens the strawberries. It's great with peanut butter sandwiches, or fresh buttermilk biscuits. It also makes a fantastic ice cream sundae topping!!

Ingredients

2 lbs strawberries
1 package freezer pectin
zest of one large lemon
1-1/2 cups sugar

Instructions

Rinse and hull strawberries.
Place in food processor and pulse until crushed.
In another bowl, whisk sugar, zest and pectin.
Add strawberries and stir for 3 minutes.
Divide among five 1-cup jars.
Let sit for thirty minutes to thicken.
Cover and refrigerate or freeze.

Here are some of my favorite freezer jams you can find on Within the Kitchen:
Strawberry Rhubarb Freezer Jam
Strawberry Vanilla Freezer jam

And my most popular jam recipe:
Raspberry Lime Freezer jam

Sunday, May 17, 2015

Old Fashioned Banana Bread


www.withinthekitchen.blogspot.com
There are lots of fancy modern banana breads out there. I'm sure they are all delicious but sometimes you just want something that reminds you of an afternoon spent in the kitchen with your Mom or Grandma or maybe those special care packages your family would send you when you went off to college. I'm guessing they weren't the fancy banana breads but just plain, basic stuff with the occasional chocolate chip thrown in. If you are yearning for a slice of THAT banana bread, try this. It's delicious, simple and will take you back to the excitement of opening those care packages or your Grandma's kitchen.

I can never wait for it to cool! So good with butter!

Ingredients

4 cups all purpose flour (preferably unbleached)
2 tablespoons baking powder
1 tablespoon ground cinnamon
1 teaspoon baking soda
1 teaspoon salt
2 eggs, room temperature
1 cup packed brown sugar
1 cup milk
1/2 cup sour cream, room temperature
3/4 cup unsalted butter, melted
3 cups mashed overripe bananas
2 teaspoons vanilla

Instructions


  1. Grease two 9x5 loaf pans and set aside.
  2. Preheat oven to 350 degrees F.
  3. In a very large bowl, whisk together flour, baking powder, baking soda, salt, and cinnamon.
  4. In another bowl, combine eggs, milk, sour cream, sugar, butter, vanilla and bananas.
  5. Add liquid to dry ingredients and stir until JUST combined.
  6. Place half (4 cups) in each loaf pan.
  7. Bake for 65 to 70 minutes until nicely brown and toothpick comes out clean.

Tuesday, March 24, 2015

Easy No Bake Cheesecake Cups

www.withinthekitchen.blogspot.com
Shaved chocolate and a cool martini glass finishes off this easy dessert!


As much as I love creating desserts from scratch, there are times when I don't have time to make a complicated dessert...you know, when you are making a big dinner for family or perhaps making so many other dishes you don't have oven space for a dessert. And of course, sometimes you just want a sweet bite of something that doesn't take much time!

www.withinthekitchen.blogspot.com
Layers!

This dessert is perfect anytime you don't have the desire to bake or the time! It may not be "gourmet" but it's delicious! Kids love helping create with this dessert so put them to work!

www.withinthekitchen.blogspot.com
The chocolate version above has Cool Whip mixed into the cheesecake mixture but the berry version doesn't. It's up to you whether you want to use it...I find it gives a little bit lighter feel and taste. Also, in the chocolate version I just used chocolate condensed milk - that way I don't have to add the additional step of melting chocolate. And in the berry versions, I just split the mixture in half and added my favorite jams to flavour and colour.
www.withinthekitchen.blogspot.com
Use a pastry bag and icing tip to pipe cheesecake mixture and cool whip for a neater dessert.
If desired you could make one big dessert in a pie plate or baking dish, but I like making individual desserts and layering the cheesecake mixture, cool whip and graham crumbs!


www.withinthekitchen.blogspot.com
Blueberries top this blueberry jam version.

Makes about 8 (but depends how big your dishes are!)

Ingredients

1 can condensed milk (14 oz)- plain, chocolate or even caramel flavoured
1 bar cream cheese (8oz), room temperature
2 tbsp jam, your favorite flavour
juice of one lemon (for berry flavours) or 2 tbsp strong coffee (if making chocolate mocha flavor)

1-1/2 cups graham cracker crumbs
2-3 tbsp melted butter

2 cups cool whip if adding to mixture
2 cups cool whip for layers and topping

Instructions


  1. Add condensed milk and cream cheese to large mixing bowl and beat until smooth, about 5 minutes.
  2. Add lemon juice (or coffee) and mix.
  3. Add jam and mix. (if using more than one type jam, divide mixture first)
  4. If using cool whip, add 2 cups and gently fold into mixture.
  5. In another bowl, combine melted butter and graham crumbs.


Set 8 smaller sized ramekins or cute glasses on work station. Add layers of graham crumbs, cool whip and cheesecake. You could add in other fun stuff - caramel sauce marshmallows, chocolate chips... whatever you have on hand.

www.withinthekitchen.blogspot.com
Caramel, graham cracker crumbs, chocolate cheesecake mix and marshmallows
make this a pumped up s'more version of dessert!