Showing posts with label kids. Show all posts

Monday, March 7, 2016

Brown Sugar- Spice Cookies Recipe

www.withinthekitchen.blogspot.com


These cookies are simple, crispy yet chewy, buttery, and sweet - perfect in a lunch for the kids, or as a treat with your afternoon coffee. They also make great ice cream sandwich cookies.

Adapted from a recipe by Serious Eats. I like to add my favorite spices to this - cinnamon, nutmeg and cardamom. I also will often use 1 cup of whole wheat pastry flour and 1 cup all purpose flour. It adds a bit of fiber and I like the texture of the cookie with the pastry flour. 

Leave some room around each cookie as they do spread. This recipe makes two pans of cookies (12 on each pan) so I refrigerate the second pan while the first bakes. It helps ensure the second batch doesn't spread too much.

Quantity: about 24 cookies

Ingredients
  • ¾ cup plus 2 tablespoons unsalted butter, melted (7 ounces; 200 grams)
  • 1 1/2 cups packed dark brown sugar, divided (10.5 ounces; 300 grams)
  • 3/4 teaspoon salt (3g)
  • 1 large egg (50g)
  • 2 teaspoons vanilla extract (10ml)
  • 2 cups (10 ounces) all-purpose flour (285g) or 1 cup whole wheat pastry flour plus 1 cup all-purpose flour
  • 1 teaspoon baking powder (4g)
  • 1/2 teaspoon baking soda (2g)
  • 1 teaspoon cinnamon
  • 1 teaspoon nutmeg
  • ¾ teaspoon ground cardamom
 Instructions
  1. Preheat oven to 350°F. Line two baking sheets with parchment paper or silpats.
  2. Mix butter, brown sugar, and salt in a large bowl.
  3. Add in egg and vanilla and stir.
  4. Add to the bowl, flour, baking powder, baking soda, cinnamon, nutmeg, and cardamom and gently mix until combined.
  5. Pour 1 cup raw or turbinado sugar into a separate bowl.
  6. Scoop dough using a 1 inch cookie scoop, or about the size of a walnut sized and gently roll in sugar. 
  7. Place on cookie sheet and press down slightly to ½ inch thickness. Place 12 on each pan.
  8. Bake about 10 minutes - until golden edges appear and the tops have puffed and crinkled a bit.
  9. Let cookies cool on pans for 5 minutes, then transfer to wire rack to cool completely.

Monday, September 21, 2015

Harry Potter Birthday Party: The Great Hall and Honeydukes #4


So much candy!
This week I'm sharing the 4th post in my Harry Potter Birthday Party series. Today we're focusing on the Great Hall and Honeydukes - both of which were in our dining room!

If you missed the other posts, check them out:


The Great Hall

Not true to the movie but more inspired by it, we used beautiful gold tablecloths, silver and gold paper plates as well as cheap plastic goblets. I found the goblets at the local Dollarama and the cloth and plates on sale at an art store.

The glow sticks looked waaaaay better in person! The kids loved them...and they lasted for over 10 hours!
I wanted to make the candles hang from the ceiling but I didn't have a tonne of time. Instead, I bought glow sticks and hooks to hang them from the ceiling. I also hung tulle to make it more magical. I have to say the glow stick were the amazing. They looked great during the party even though it was daylight. That night my daughter had three of her best friends sleep over for a Harry Potter movie marathon, and the glow sticks were even more AWESOME.


The Great Feast

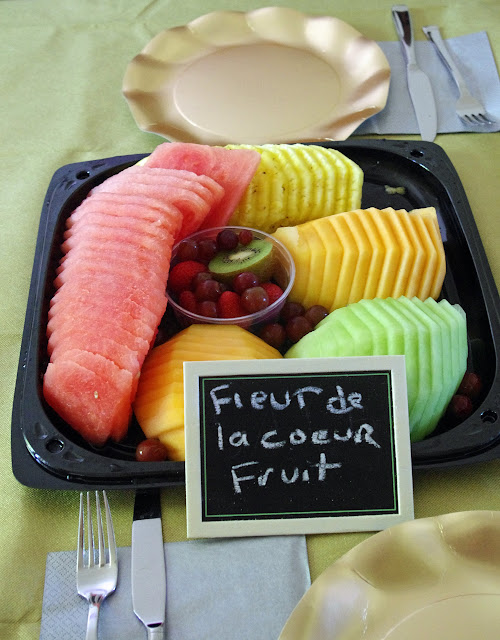
The food itself wasn't really food from the books or movies. We had grilled chicken wings, pizza pops, veggies and fruit. We did, however, give them Harry Potterish names like wicked wings, pizza pasties, fleur de la coeur fruit and herbology bites (veggies).

We served 'pumpkin juice' which was really orange-mango juice!

Gold disposable table cloth, gold and silver plates & napkins and plastic goblets completed the Great Hall Feast.


The kids devoured these wings!


Honeydukes

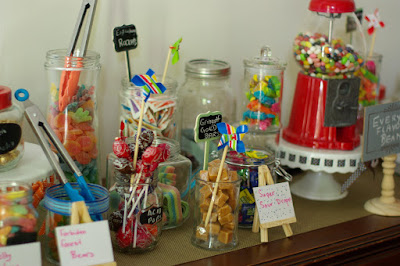
Our dining room side buffet became Honeydukes!

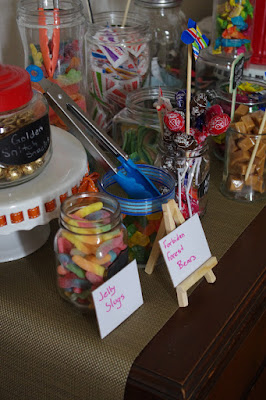
We picked up some Martha Stewart chalk board signs and easels to write out the candy names.
These containers had chalk board sticker already attached and ready to go.


We also bought cheap tongs so the kids could get their candy without sticking their hands in the jars!


For the candy shop, I bought a bunch of cute and cheap glass containers from the dollar store and lots of candy from them too. The candy went into the containers. From Michaels and Dollarama, I bought funky labels (on sale) and we gave the candy HP names including:

  • acid pops (lollipops)
  • gringott gold bars (caramels)
  • exploding rockets
  • laughing taffy
  • love potion necklaces
  • life preservers
  • every flavour beans
  • golden snitch snacks
  • chocolate frogs
  • jelly slugs
  • forbidden forest bears

Chocolate Frogs


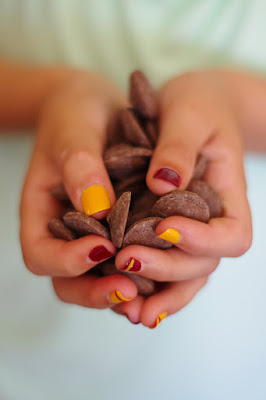
We made our own chocolate frogs. They are simple to make if you have the frog mold. I ordered one (two would have been better as it would have allowed me to make more at once) from amazon.com. The molds make quite a big frog! I melted about 2/3 of a bag of melting candy from Wilton and filled each cavity half full. I then sprinkled rice cereal in the middle and topped it off with more chocolate. I then threw them in the fridge for about 30 minutes to set. I started the process over again until I had about 24 frogs.

I also printed out Honeydukes labels and placed them on some resealable bags so the kids could 'shop' at the store and take their favourites home as part of their loot bag.

Do you love my daughter's Gryffindor coloured nails?!

They look better than this - bad lighting! Lumos!

Loot Bags


What else was in the loot bags? Glad you asked! I found the cutest owl pens at a local art store and Harry Potter magnets at our local toy shop. These with the candy bag went into our loot bags. The bags were simply brown paper bags with a customized thank you sticker attached. Adorable, don't you think?


Thanks for reading! Our next and last Harry Potter birthday party post will be all about the cake!


Thursday, September 10, 2015

Back to School Lunchs and Snacks Ideas

I've been thinking about lunch and snacks for the kids now that school is back in session. I'm sharing a few of my thoughts  below.
  • There are some incredibly talented parents out there that can create amazing bento box lunches. I'm not one of them - no time, no talent. I want healthy, easy to prepare food that my kids will actually EAT - not just a bite. I want it gone. Let me tell you, it doesn't happen often. Having said that, I do find that my kids often like little bits and bites of things for lunch - a few veggies sticks, a few crackers, a couple pieces of meat and a piece of fruit often sees great results. But of course, they go through phases - sandwiches and only sandwiches, absolutely no sandwiches, only hot dishes, o ly cold dishes...blah blah blah. If they make it themselves, they can go for it. If I make it..well, sometimes they get what they want and sometimes they don't.
  • Don't forget that left overs are some of your best friends! Any casserole can make a hot lunch the next day. BBQ chicken (or most other meats) can be transformed into a pasta salad, sandwich or fried rice for a relatively easy next day lunch.
  • Kids usually eat fast...they want to get out and play. Keep it simple, easy to eat. Most importantly give them things they will actually eat - who loves finding a lunch full of uneaten food??? If they are coming home with 1/2 of it eaten - give them less for a week and see if they are satisfied.
  • Try to have things they can choose from - feeling they have control over what goes in their lunch box may decrease the amount of uneaten food that comes back home.
  • This will also free up a bit of time for you in the morning - and who doesn't need a couple of extra minutes! Of course this depends on the age of your children and their level of maturity.


  • I'm always on the look out for new products the kids might enjoy. Over the summer, I was fortunate enough to be sent Litehouse's new Opadipity dips to try. They come in sweet and savory flavours including creamy ranch, cucumber dill, spinach parmesan, creamy cheesecake, strawberry delight and vanilla almond. We love them - they are also gluten free and have no preservatives! 
  • If you're kids like to dip fruits and veggies, I recommend giving them a try. I portion the dips out into small containers so the kids can pick their favorite dip, precut veggies/fruit or breadsticks for a school snack or lunch.


I'm always looking for new lunch and snack ideas, here are a few of mine:


  • Peanut free ideas - look here.
  • no nut granola
  • hard boiled eggs
  • homemade muffins
  • cereal and yogurt (separate containers)
  • Fruit - our favorites
    • canteloupe
    • apples
    • apple sauce
    • grapes (cut if required)
    • strawberries
  • Veggies - our favorites
    • carrots
    • celery
    • fennel
    • peppers
    • broccoli
    • cauliflower
  • chicken
  • tuna
  • salmon
  • hardboiled eggs
  • rice
  • seaweed
  • leftovers including cold pizza and pasta
  • pita
  • bagels
  • breadsticks
  • cheesesticks
  • pre portioned dips
  • granola bars
  • wagon wheels
  • fish crackers
  • homemade rice krispies


Wednesday, July 29, 2015

Harry Potter Kids Party: Invitations (#1)

Harry Potter Party for Kids

www.withinthekitchen.blogspot.com

I love planning my birthday kids parties. The decorations, games, cake, food, and loot bags all get detailed attention. See our son's Plants vs Zombies party as one example and our daughter's Hawaiian party as another example of fun times! This year my daughter is turning 11 and she is also a huge Harry Potter fan. As any Harry Potter fan knows, Harry was 11 when he received his acceptance letter to Hogwarts School of Witchcraft and Wizardry. She was desperately hoping for the same! All I could do was give her a HP birthday party and hope that would be enough!


I fully admit I go overboard with planning my kids parties. Take my advice and plan exactly what you will need...that way you won't end up with enough candy to open a real Honeydukes or wonder what you're gonna do with thirteen 'quidditch' brooms lol. Now, I'm not saying everything I do for the party was totally authentic by any means but everything was in the spirit of Harry Potter.


When planning a Harry Potter party my advice is to use what's already out there! Lots of people have had great parties and are willing to share what worked and what didn't. You can easily find Harry Potter inspired invitations, decorations, food and other ideas on the Internet.

Over my next few posts, I'll take you through some of the things we did including:


We'll start at the beginning with our invites.


Invitations


www.withinthekitchen.blogspot.com

There are many great invites made by other party planners out there. I borrowed ideas, words and ideas from a few and came up with ours. I printed them on blank cards from Michael's that came with envelopes.

Here's the invite wording:

Dear Miss (name here),

We are pleased to inform you that you have been invited to attend the Hogwarts School of Witchcraft and Wizardry, where we will be having a special birthday celebration for (birthday name here).

Term begins (insert time). Please make your way to (address here) in a Muggle mode of transportation and in Muggle attire to avoid suspicion. You will find your ticket attached. Please present it at time of boarding. 


We await your owl post response by no later than (insert date)

If you have trouble acquiring an owl, you may respond by Muggle phone or email.

Sincerely,

Minerva McGonagall, Deputy Headmistress

P.S. Term will end at approximately (insert time here).


You can find Minerva's signature here.  

www.withinthekitchen.blogspot.com

Inserted into each envelope was a ticket for the Hogwarts Express. You can find them here.

Originally, we were going to deliver them attached to owl balloons but we ran out of time. Instead we placed a puffy owl sticker on each one.

The kids loved the invitations and most even remembered to bring their tickets!

Monday, April 27, 2015

Wheetabix #mybixmix


As a Mom of two kids aged 9 &10, I try to make sure they eat well. This is especially true at breakfast. I think a great tasting and nutritious breakfast sets them up and fills them up for all of the activities throughout their day including their ability to focus at school.

My kids are old enough to make their own breakfast, so I try to make sure there are lots of healthy options for them. Our kitchen is usually stocked with items such as:

  • lots of cut/washed fruit - berries, pineapple, melons are favorites
  • milk
  • whole grain breads
  • yogourt
  • cereals - whole grain
  • homemade muffins filled with fibre, fruit etc
So it seemed like a no brainer when Wheetabix asked me to join them in their #mybixmix challenge. They wanted to see how Canadians could mix up their meals with Wheetabix and how it affected our energy and hunger pangs as the day went on. 

The kids loved the challenge! We ate Wheetabix like crackers with peanut butter, crumbled over yogurt, with milk (warm and cold), and even in smoothies! The kids liked it best when then they crumbled it over their yogurt and berries - they love they extra crunch it provided.


We also found that it kept us feeling satiated for most of the morning.

So next time you're in the cereal aisle pick a box of Wheetabix up and mix your bix! Check out your social media foods for #mybixmix for other awesome ideas!

Please note: I was compensated for this post but opinions are my own!

Wednesday, June 19, 2013

Fruit and yogurt muesli parfaits

My kids love breakfast! Their go to requests are cereal and yogurt for my son and yogurt and fruit for my daughter. When I combined both in a 'fancy' wine glass they thought I had created 'the best thing ever'. Lol. Yes, they are easy to impress! Now they both want parfaits or 'parfets' as my daughter calls them every morning! The best thing about it is when I use muesli (my son is loving Dorset Cereals 'super cranberry, cherry, and almond' muesli right now), I can make them the night before and leave them in the fridge for them to grab when they wake up (and possibly grab a few more minutes of sleep for me)!

How to make them is pretty obvious, just layer your favorite yogurt, muesli or granola, and fruit in a bowl or fancy glass. I recommend eating granola parfaits right away or the granola will get soggy. Go the muesli route is you want to make them the night before. Also, you can use frozen fruit if you make them ahead of time so they can thaw a bit before eating.

If you REALLY need a recipe...

Makes 2.

Ingredients

2 cups yogourt
2/3 cup muesli or granola
1 cup fruit

Instructions

Place 1/3 c yogurt on bottom of glass/bowl, sprinkle 1/3 cup muesli/granola over yogurt, spread 1/3 cup yogurt over muesli/granola, place 1/4 cup of fruit on top, layer another 1/3 c of yogurt, add 1/4 cup fruit.

Repeat in second glass/bowl.


Sunday, December 11, 2011

Reindeer Cake Pops


Ingredients
1 9-inch round or square cake, I used chocolate
3/4 c icing, I used store bought vanilla
24, 6-inch lollipop sticks
1 package chocolate melting candy
30 or more pretzels, I used chocolate covered ones
red smarties
edible ink pen
small candies for eyes
patience
Styrofoam to stick pops into so they stand up


I'd be totally lying if I said these were easy! They are not. The crumbling of the cake and forming the little balls of cake mush is easy and the melting of the candy coating isn't too hard either. Coating the deer heads takes a little finesse and a few practice runs. BUT those damn antlers put me on Santa's naughty list for sure -thanks to the expletives that came out of my mouth while trying to find a way to easily attach them to the heads!! Hopefully, Santa will forgive me!


(The Christmas tree cake pops that I made last year were waaaaay easier to make so I recommend that recipe if you are nervous or a cake pop virgin.)
 
These are adapted from Bakerella's beautiful reindeer cake pops.
 
What to do
 
1. Crumble cake by hand into a sand like consistency (if you have a few hard end pieces that don't want to crumble, eat them - or use a food processor).
 
2. For me the key to cake pops is adding the right amount of icing - too much and you end up with a sickly, sweet ball of mush. But add the right amount and they will be loved by kids and adults! I start with 1/2 cup of icing and mix it in with a silicone spatula. Often I will end up adding another 1/4 cup of icing so that the mixture is just "wet" enough to just stick together when formed into a ball.
 
3. Using a 1 inch cookie scooper, I form the cake mixture into 20-24 balls (I also use kitchen latex gloves so it isn't so messy) and place them on a cookie sheet.
 
4. Refrigerate the balls for at least 20 minutes but preferably an hour so that they harden up a bit.
 
5. Melt candy coating according to directions. (gotta be honest and say that I melt them over very low direct heat.)
 
6. Add 2 tbsp of vegtable shortening - this will thin the candy coating a little. If it is still too thick add a bit more shortening.

7. Get your lollipop sticks out. Take one stick and dip one end in the candy coating (1cm or 1/2 inch) and then poke it into the cake ball. Push it in so it is at least 3/4 of the way into the ball. Place back on cookie sheet. Repeat with the remaining balls.

8. Place all of the balls back in fridge for 15 minutes.

9. Get a piece of styrofoam ready.

10.Remove from fridge and, one-at-a-time, dip the cake pops into the candy coating. Make sure the whole ball is covered. Gently tap off any extra coating.

11. Place the coated cake pop into the styrofoam so it stands up and can dry. Repeat with all of the remaining balls.

12. The candy should dry rather quickly or you can place them back in the fridge until you are ready to finish them.

13. Here is where you will learn from my frustration. To affix the antlers, cut pretzels in half (or not - I did both ways - half and full). Now, using some melted candy coating, place some of it on a spoon or in a little bowl. You want it to start to firm up a little - this way it will dry rather quickly and you won't be stuck holding the antlers on those cute little heads for an eternity while it dries. I tried sticking the antlers through the chocolate with limited success - sometimes the pressure cracks the coating. So, once the coating starts to firm up, dip the end of an antler into the coating and using it as "glue" stick it to the cake ball head.

14. For the eyes, I used some small white round sprinkles I had on hand. To add the pupil I used a black colored edible ink pen.

15. The nose is a red smartie. Both are added using a little bit of candy coating glue, just like the antlers.


Wednesday, October 27, 2010

Alien Donuts - A Daring Baker Challenge!


The October 2010 Daring Bakers challenge was hosted by Lori of Butter Me Up. Lori chose to challenge DBers to make doughnuts. She used several sources for her recipes including Alton Brown, Nancy Silverton, Kate Neumann and Epicurious.


Well, ok, the "alien" wasn't part of the challenge but it is almost Halloween so they seemed fitting! Aren't they cute?!? My 4 and 6 yr olds loved helping dip the donuts (or doughnuts, as we write in Canada).


Sadly, I had some rather aggrevating camera problems during this challenge so I don't have any pics of the actual making of the dough process :( Also, if you don't have time to make the actual donuts at home, you could always buy some at Timmy's or Dunkin' and decorate yourself to save some time and effort.


The icing is good 'ol Betty Crocker Vanilla that I coloured with some food colouring gels. Then I microwaved the icing until it was quite thin and melted (maybe 15-20 seconds per cup of icing). Acting quickly, I dipped the donuts and donut holes and then placed them on a cooling rack on a pan. To help them set I then put them in the freezer for 20 minutes. Once set, I carefully placed the holes on top of the donuts and decorated with licorice and m&m's.


The whole process made for quite an afternoon! Messy and fun!


Here is Alton Brown's recipe for yeast donuts in case you decide to try these for yourself!
Yeast Doughnuts
 
Equipment required
  • A Dutch oven or very deep skillet
  • Deep fry thermometer, candy thermometer or any thermometer that will withstand and measure temperatures of up to 380 degrees
  • Metal slotted spoon, metal slotted spatula or tongs
  • Cookie sheets or a wire rack lined with paper towels to allow doughnuts to drain
  • Electric hand mixer or stand mixer, or a bowl and a spoon if you are able to utilize a lot of elbow grease
  • Doughnut or biscuit cutters or you can use a glass and a piping tip for the center


Preparation time


Hands on prep time - 25 minutes
Rising time - 1.5 hours total
Cooking time - 12 minutes


Yield: 20 to 25 doughnuts & 20 to 25 doughnut holes, depending on size


Ingredients
  • Milk 1.5 cup / 360 ml
  • Vegetable Shortening 1/3 cup / 80 ml / 70 gm / 2.5 oz (can substitute butter, margarine or lard)
  • Active Dry Yeast 4.5 teaspoon (2 pkgs.) / 22.5 ml / 14 gm / ½ oz
  • Warm Water 1/3 cup / 80 ml (95°F to 105°F / 35°C to 41°C)
  • Eggs, Large, beaten 2
  • White Granulated Sugar ¼ cup / 60 ml / 55 gm / 2 oz
  • Table Salt 1.5 teaspoon / 7.5 ml / 9 gm / 1/3 oz
  • Nutmeg, grated 1 tsp. / 5 ml / 6 gm / ¼ oz
  • All Purpose Flour 4 2/3 cup / 1,120 ml / 650 gm / 23 oz + extra for dusting surface


Canola Oil DEPENDS on size of vessel you are frying in – you want THREE (3) inches of oil (can substitute any flavorless oil used for frying)


What to do:
  1. Place the milk in a medium saucepan and heat over medium heat just until warm enough to melt the shortening. (Make sure the shortening is melted so that it incorporates well into the batter.)
  2. Place the shortening in a bowl and pour warmed milk over. Set aside.
  3. In a small bowl, sprinkle the yeast over the warm water and let dissolve for 5 minutes. It should get foamy. After 5 minutes, pour the yeast mixture into the large bowl of a stand mixer and add the milk and shortening mixture, first making sure the milk and shortening mixture has cooled to lukewarm.
  4. Add the eggs, sugar, salt, nutmeg, and half of the flour. Using the paddle attachment of your mixer (if you have one), combine the ingredients on low speed until flour is incorporated and then turn the speed up to medium and beat until well combined.
  5. Add the remaining flour, combining on low speed at first, and then increase the speed to medium and beat well.
  6. Change to the dough hook attachment of the mixer and beat on medium speed until the dough pulls away from the bowl and becomes smooth, approximately 3 to 4 minutes (for me this only took about two minutes). If you do not have a dough hook/stand mixer – knead until the dough is smooth and not sticky.
  7. Transfer to a well-oiled bowl, cover, and let rise for 1 hour or until doubled in size.
  8. On a well-floured surface, roll out dough to 3/8-inch (9 mm)thick. (Make sure the surface really is well-floured otherwise your doughnuts will stick to the counter).
  9. Cut out dough using a 2 1/2-inch (65 mm) doughnut cutter or pastry ring or drinking glass and using a 7/8-inch (22 mm) ring for the center whole. Set on floured baking sheet, cover lightly with a tea towel, and let rise for 30 minutes.
  10. Preheat the oil in a deep fryer or Dutch oven to 365 °F/185°C.
  11. Gently place the doughnuts into the oil, 3 to 4 at a time. Cook for 1 minute per side or until golden brown (doughnuts only took about 30 seconds on each side at this temperature).
  12. Transfer to a cooling rack placed in baking pan.
  13. Decorate as you wish once cooled.
  14. Enjoy!

Monday, May 3, 2010

Candy Coated Chocolate Strawberries


Local strawberry season doesn't start till June but I couldn't wait another month when I came across some beautiful organic strawberries at the market last week. After enjoying their pure unadulterated goodness right out of the carton (well, after washing them), I thought I would jazz up the rest with chocolate! And to please the kids we added some sprinkles and sugar...so cute and delcious!


Ingredients:
1 cup milk chocolate chips
12 strawberries
1/3 cup each of various sprinkles and/or sanding sugar
12 lollipop sticks (optional)

Melt the milk chocolate chips in a bowl set over a small pot of simmering water or melt in microwave (full power 30 seconds, stir, reheat for 10 second intervals and stir again if needed) .

Poke a strawberry with a fork or lollpop stick and dip it into the melted chocolate.

Immediately roll in your favorite sprinkles or sanding sugar. Lay on a baking sheet covered in waxed paper or a silpat to set or if on sticks place in mug or glass (strawberry up!) until set.
 
So simple, so delicious. Enjoy!

Tuesday, April 20, 2010

Pucker-up Lemon Loaf


This is adapted from my Mom's amazing lemon loaf recipe. The sanding sugar (sugar with large granules) produces a great crisp-like topping that adds a great crunch to this beautifully moist loaf. It also keeps it crunch after the lemon glaze is added.

Ingredients
1.5 cups flour
1/2 cup butter, softened
2 eggs, at room temperature
2 tbsp cream cheese, softened
1/2 cup brown sugar
1/2 cup granulated sugar
2 tsp baking powder
1 tsp salt
1/2 cup buttermilk
1 tsp lemon rind

Glaze
Juice of 1 -2 large lemons
1/3 cup sugar

Optional
Sanding sugar

Method
Preheat oven to 350 degrees. Grease 9 x 5 loaf pan.

1. In large mixing bowl, cream butter and sugars until fluffy about 3 minutes.
2. Beat in cream cheese for another minute.
3. Beat in eggs one at a time.
4. Add vanilla and rind.
5. In another bowl sift or whisk flour, baking powder and salt.
6. Alternating with buttermilk, mix in dry ingredients in three additions (start with milk).
7. Pour batter into greased 9 x 5 loaf pan.
8. Bake for 60-70 minutes.
9. Cool for 10 minutes. Poke loaf all over with tooth pick or skewer.
10. Mix lemon juice and sugar until sugar is mostly dissolved. Pour evenly over loaf.
11. Wait another 10 minutes so juices can soak into loaf. Remove loaf from pan and cool completely.

Enjoy!

Note:
Do not over beat dry ingredients into wet. Mix until just incorporated to avoid a "tough" loaf.

Monday, April 12, 2010

Easy Beef & Pork Meatloaf


In North America, meat loaf is often considered a comfort food- something that takes adults back to our childhoods and something most kids will eat without a fuss.

My own children will experience meatloaf for the first time tomorrow! I made it tonight because my husband has been craving it. My recipe went by memory from the dish my Mom made me as kid. It turned out wonderfully! It filled the apartment with a great aroma - onions, garlic, cumin wafted through each room...mmm. I had a little taste of it and it is delcious! I hope the kids like it tomorrow! And my husband is looking forward to it for lunch - although he hasn't decided if he wants it in the form of a sandwich or simply as is.

Ingredients
1 lb extra lean ground beef
1/2 lb lean ground pork
2 shallots, finely chopped
1/2 cup corn niblets
1/2 panko bread crumbs
1/4 cup ketchup
1/4 BBQ sauce - something smoky
1 egg, slightly beaten
2 tsp Old Bay seasoning or other seasoned salt
1 tsp cumin
1/2 tsp thyme
2 tsp smoked paprika
1 tsp onion powder
1/2 tsp pepper
4 cloves garlic, chopped

Method
Preheat oven to 375 degrees.
Put everything in large bowl. With gloved (to keep your hands semi clean) hands, mix everything together with hands. Mix really well. Place in 9 x 5 loaf pan. Make sure there is at least an inch from top of meat to top of pan as the fat produced could easily splatter - be very careful!. If desired, place another squirt of ketchup or BBQ on top of loaf. Bake for 1 hour and 15 minutes or longer - until meat thermometer registers 170 degrees. Let sit 15 minutes before serving. Enjoy!

Thursday, April 8, 2010

Fruity Sauteed Chicken

From whistler and chicken 2


3-year old:"Mom, I don't like this. What is it?"
Mom: "Chicken. You love chicken"
3-year old: "Then this isn't chicken, Mom."

Hmmm, hard to argue with logic like that. What my 3-year old doesn't like is any hard outer pieces on chicken - like BBQ charbroiled bits or pan fried hard outer parts. Normally, I just try to cut the outer part or cook it with skin on and then take it off when cooked. Tonight, I threw caution to the wind and tried something new. 

We went to Whistler for the Easter weekend and by the time we arrived back home there was a lot of fruit on the counter that needed to be used quickly or thrown away due to over ripeness. I suppose I could have made fruit salad but taking the easy route has never been my style!

Instead, I decided on a simple chicken dish that the kids would eat without worry of "hard bits". I diced up two apples, 1 pear and a handful of grapes. I threw these in a pan with six boneless skinless chicken thighs and a 1/2 cup of OJ .Voila 20 minutes later dinner was complete. I added some steamed rice and cauliflower and called it a meal.

The kids thought it was funny to have fruit on their chicken but then dug right in!

Quick, easy and kid approved!

Ingredients
2 apples, diced
1 pear, diced
handful of seedless grapes, quartered
1/2 cup orange juice
6 boneless, skinless chicken thighs
salt
pepper


Method
1. Season chicken with salt and pepper.
2. If desired, lightly oil non-stick pan.
3. Over medium high heat brown chicken on both sides.
4. Add juice and fruit to pan.
5. Reduced heat to medium, cover and cook for approximately 15 minutes.
6. Remove cover and cook another 5 minutes to thicken sauce and cook chicken through. (make sure there is no pink and internal chicken thigh temperature is 170 degrees)

Serve with rice and favorite veggies.
Enjoy!