Showing posts with label beef. Show all posts

Monday, July 11, 2016

Beef Chili Cobbler


Beef Chili Cobbler

This dish is a huge hit in my house. The chili is delicious and, of course, can be tweaked to whatever you like - more spices, different spices, heck even taco seasoning tastes great in it. The biscuits are from Greg Henry's 'Savory Pies' which I reviewed here. You can substitute a different cheese if you like. As you can see, this is quite a versatile dish. 

You can make this dish ahead of time (in the morning or a day ahead). Make the chili, cool and refrigerate (I usually place it in another dish). Make the biscuit dough and refrigerate. I warm the chili first in the pan and continue as directed. 

Special Equipment: 12-inch cast iron pan

Ingredients


Chili
2 lbs ground beef
1 tsp salt
1 tsp ground pepper
1 medium onion, diced
1 poblano pepper, diced
1/2 jalapeno, diced
6 white mushrooms, diced
6 garlic cloves, crushed
2 tsp ground cumin
1/2 tsp chili powder
1 tsp smoked paprika
1 red pepper
1 14 oz can black beans, drained
2 cups beef broth
1 1/2 cups tomato sauce


Cobbler
1-1/4 cups flour
1/2 cup corn meal
1/2 tsp salt
1 tsp baking powder
1 tsp baking soda
1 cup grated parmesan
6 tablespoons cold butter, cut into on inch pieces
1-1/4 cups 2% milk

Instructions

Preheat oven to 375 degrees F.

Chili

  1. In the 12-inch cast iron pan, sautee ground beef with salt and pepper over medium-high heat to brown meat. This will take 7-10 minutes.
  2. Add onions, poblano, jalapeno, pepper, mushrooms, cumin, chili powder, paprika, and garlic. Sautee for about 5 minutes.
  3. Add beans, beef broth and tomato sauce.
  4. Simmer for 15 minutes.


Cobbler
  1. Add flour cornmeal, salt, and baking powder to the bowl of a food processor. Pulse 10 times to combine.
  2. Add butter, a piece at a time, and pulse until mixture has a sandy appearance.
  3. Add parmesan and pulse another few times to combine.
  4. Add milk and combine on medium-low speed until  coarse dough forms.


Putting it together
  1. Drop batter by the tablespoon or from an 2 inch ice cream scoop onto the chili (about 14 drops).
  2. Place the pan on a baking sheet to catch any overflow and insert into the oven for approximately 25 minutes (mixture is bubbly and cobbler is golden brown).

Wednesday, February 24, 2016

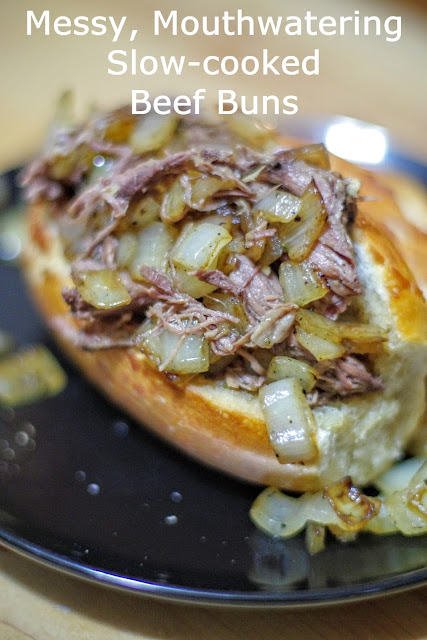
Messy, Mouthwatering Drippy Beef Buns

withinthekitchen.blogspot.com

This messy, drippy beefy sandwich is great on any rainy, cold day...or any other day for that matter.

We've had lots of beef dips before but never with peperoncini peppers until today - you can thank Ree Drummond for that! If anyone in your house doesn't like the peppers (they are quite mild) they are easy to pull out.

Based on a recipe from Pioneer Woman.

Ingredients


2 tbsp butter
2 tbsp vegetable oil
3 lb blade pot roast
1 tsp salt
1 tsp ground pepper
2 cups beef stock
1-1/2 cups water
1 tbsp ground rosemary
2 cloves of garlic, thinly sliced or crushed
1 375 ml jar of pickled peperoncini peppers (12 ounces)
dash of Worcestershire sauce (optional)
2 drops liquid smoke (optional)

2 medium onions, diced
1 tbsp butter
1/2 tsp salt

8 crusty buns

Instructions

  1. Preheat oven to 300 degrees F or 150 degrees C.
  2. Season the roast by sprinkling salt and pepper evenly over it.
  3. Add the butter and oil, over high heat, to a medium sized dutch oven or oven proof pot.
  4. When the pot is very hot (almost smoking), seer the beef on all sides. You want a beautifully brown, caramelized colour on all sides.
  5. Once seared, remove beef from pot and remove left over oil/butter. You don't have to clean the pot, just get rid of the extra fat.
  6. Add back the beef, beef broth, water, rosemary and garlic.
  7. Remove the stems, if desired, from the peppers (I usually just pull them off) and add them and all the juice from the bottle into the pot.
  8. If desired, add a dash of Worcestershire sauce and liquid smoke.
  9. Bring to a simmer over medium high heat.
  10. Turn off heat, cover and place in the oven for 3-1/2 to 4 hours. To test: The beef should easily pull apart with a fork when done.
  11. You can remove the beef to another bowl to pull apart or shred the beef (if your roast was held together by string - remove it!) with two forks or just keep it in the cooking liquid.
  12. Heat saute pan over medium heat and add butter.
  13. Add onions and salt.
  14. Saute until golden brown, approximately 10 minutes.
  15. Slice buns (you may want to take out some of the bread so you have room for more meat!) and pile with meat and onions. Add some extra beef cooking liquid to make a moist, drippy, beautiful mess of a sandwich!

If you want to make this the day ahead of time, complete step #10. Take out the peppers, cool and refrigerate overnight (beef and peppers separately). The next day, use a spoon to remove the layer of fat that congeals on top and discard it. Add the peppers back into the pan and reheat on stove top over medium heat. Go to step #11.

You can also toast your buns before loading them with meat - this is a good tip if your buns are really soft.

Enjoy!

Fresh rosemary.
Ground rosemary.
Spicy but not super hot.
Mouthwatering, right?
Practically falls apart.


Monday, December 15, 2014

Drunken Beef and Potato Stew

www.withinthekitchen.blogspot.com

Vancouver rarely gets really cold. Usually our winters are mild and rainy with a few periods of snow thrown in over the season. This year, however, has been colder than usual...and I'm not complaining because it has also been sunnier than usual...I'll take sunny & cold over mild  & rainy anytime!

And let's face it, cold weather is perfect for cooking up soups and stews. Stew is exactly where my mind went to when I was trying to decide on a recipe to create for The Little Potato Company. Have you heard of them? If not, you've probably seen them...they're in lots of grocery stores across Canada...even Costco. They produce over a dozen potato products and take their work very seriously to give their customers the perfect little potato. I also love that they give back to the community by donating over 25,000 pounds of potatoes to food banks every year!
www.withinthekitchen.blogspot.com
Here, I used their Blushing Belle potatoes. According to The Little Potato Company, they were "...originally bred in Germany by one of the oldest breeding companies in Europe, Blushing Belle is extremely versatile, and adapts well to a variety of cooking methods. Named after its blushing red skin and buttery yellow flesh, Blushing Belle delivers a soft, light texture with mild, delicate flavour. Excellent roasted or mashed."

Image from The Little Potato Company


I used them in this recipe because they hold up well under long heat. In other words, they won't turn to mush before they make it to your plate. I also added big pieces of carrot and celery and lots of garlic! Oh and did I mention the wine? Yup, a whole bottle of dry red wine goes into this stew!

www.withinthekitchen.blogspot.com


Ingredients

2 tbsp vegetable oil
2 lbs beef stew meat
3 c dry red wine (1 bottle)
3 cups beef stock
1/3 c flour
1.5 lbs baby red potatoes
1 medium white onion, chopped
1 large leek, chopped
2 large shallots, chopped
4 large carrots, peeled and chopped into large chunks
4 stalks celery, chopped
6 gloves garlic, peeled and chopped
2 inch piece of ginger, grated
1/2 c tomato paste
1 tsp salt
1/2 tsp ground pepper
1 tsp smoked paprika
1/2 tsp cayenne
1/2 tsp cumin
2 tsp Worcestershire sauce
2 tbsp cornstarch
2 tbsp water


Directions

  1. Preheat oven to 300 degrees.
  2. On medium high heat, add vegetable oil to large sautee pan.
  3. Brown beef by placing pieces of beef in large dutch oven or other bakable pot - don't crowd the meat! Work in batches if necessary.
  4. Turn beef until all sides are browned.
  5. Remove beef from pan and place in large mixing bowl.
  6. If needed, add another tablespoon of oil to pot and add onions, leeks and shallots. Cook for 5 minutes. Stir often so they don't burn.
  7. Add garlic to onions and cook for 1 minute.
  8. Remove and place onions/garlic mixture into beef bowl.
  9. Add tomato paste to pot and cook for 3 minutes, stirring constantly. This will deepen the flavour of the tomato paste.
  10. Add 1 cup of wine to pan and mix with paste. Stir and get all the bits stuck on the bottom of the pan off of the pan.
  11. Bring to simmer.
  12. Add the beef and onions back into the pan.
  13. In a small bowl stir flour salt, pepper, cayenne, paprika, and cumin.
  14. Sprinkle flour mixture over the beef and combine.
  15. Add Worcestershire sauce, ginger, 2 cups wine, and stock to the pot.
  16. Bring the pot to a simmer.
  17. Add carrots, potatoes, and celery.
  18. Cover and place pot in oven.
  19. Cook for 3 hours, until beef is incredibly tender.
  20. Remove from oven.
  21. If it is not thick enough, mix cornstarch with cold water in a small dish until cornstarch is dissolved.
  22. Add to stew and stir in.
  23. Place back in oven for another 15 minutes.
  24. Remove from oven.
  25. Serve.
Note: As with most beef stews, this dish tastes even better the next day!

Saturday, October 18, 2014

Smoky Three Bean Beef Chili

withinthekitchen.blogspot.com

Fall is here. This weekend we're in Whistler, BC. My favorite seasons to visit Whistler are summer and fall. Obviously, I'm not a skiier - I took a few snow boarding lessons but they weren't money well spent! I'll stick to running. Anyways, Whistler in fall is beautiful - a full palate of colours are awaiting outside my door. Walking through and around the village is always time well spent.

withinthekitchen.blogspot.com
Whistler, BC. Snow will be here soon.
With fall comes cooler temperatures and cravings of warmer comfort foods. Chili, like this three bean beef chili, is perfect for cool days, and even cooler evenings. Add some warm, fresh bread and you've got a perfect meal to enjoy the colors of fall as the sun sets over the mountain.

Ingredients

1.5 lb ground beef
1 can (15.5 oz) black beans, drained and rinsed
1 can (15.5 oz) kidney beans, drained and rinsed
1 can (15.5 oz) white cannelloni beans, drained and rinsed
2 tbsp tomato paste
1 large onion
6-8 cloves garlic, crushed
1 tbsp liquid smoke
1 tbsp chipotle powder
2 tsp smoked paprika
1 tbsp ground cumin
1 28 oz can tomato sauce
2 cups tomato puree or beef broth
2 cups shredded cheese to garnish
green onions to garnish

Instructions

  1. Over medium high heat, brown beef in large, heavy bottom pot.
  2. Remove beef to a bowl and leave fat in pan. Add onions.
  3. Saute for 3 minutes.
  4. Add garlic and saute another minute.
  5. Add tomato paste and stir for 2 minutes.
  6. Add beef and stir. 
  7. Add sauce and puree or stock.
  8. Add all beans.
  9. Add chipotle, cumin, liquid smoke, paprika.
  10. Stir and simmer for at 1 hour over medium low heat.
  11. Serve with cheese, and green onions if desired.

Sunday, October 5, 2014

IFBC 2014 - Fun Facts!


International Food Blogger Conference 2014 Seattle

Seattle - the land of coffee, great restaurants, Pike Place Market and the International Food Blogger Conference. I spent the weekend soaking up all IFBC2014 had to offer.

What exactly did they offer you ask? Well, let me tell you:
·        A chance to meet other fabulous food bloggers,
·        Exposure to new products and companies
·        Attend educational, informative and often once in lifetime sessions with renowned authors, CEOs, photographers, writers, chefs and industry experts
·        Delicious food
·        Exploration of a vibrant, friendly city
·        Swag – and lots of it.

Today, I’m going to share a few things I learned from my favorite sessions. And trust me it’s just a few tidbits from three of many sessions – I have a notebook full of scribbles from each one!

Photography with Todd Coleman

Todd is Creative Director of Tasting Table. He offered great photography tips that I am hoping to incorporate into my photography.  A few of his tips include:


  • Color trumps all – don’t be afraid to go bold with colors
  • Think beyond the table top – food can go anywhere
  • You don’t need super expensive equipment to take great photos – a speed light and some foil for reflecting is often all the tools you need
  • Uneven surfaces make photos interesting
  • Pushed perspective – get in close to your subject. A wide angle lens moved in close can make interesting photos
  • Line things up like soldiers – symmetry is pleasing to the eye –so the next time you are photographing cookies, or shrimp line ‘em up!
  • Make friends with shadows because they can make photos interesting! Find the light within shadows so everything is in balance.

  • “Do something unexpected.” – Todd Coleman

    Cooking demo with Theirry Rautureau aka The Chef in the Hat

    I hadn’t heard of Chef Theirry before IFBC but this Frenchman in Seattle has a long history in the Emerald city. I hear he is much like Chef Vij in Vancouver in that he loves to mingle with his restaurant guests and will even sit down for a story or two.

    At his IFBC cooking demonstration he showed us a simple tomato soup that could be served warm or cold. As he cooked he shared some great tidbits and his endearing humour. Here are a few of the things I took away with me:
    • If you have olive oil but don’t use it all the time, you should refrigerate it so it doesn’t go rancid.
    • You can pickle almost anything! He suggested pickling celery sticks! Just remember the magic ratio 3:2:1.  3 parts vinegar; 2 parts water; 1 part sugar – bring the mixture to a boil and then cool it. Once cooled, poor it over celery sticks, radishes, beets, and almost any root veggies is up for grabs! You can also add a cinnamon stick or other spice if you like. Chef Theirry said you can even pickle apples and rhubarb!
    • To dress a salad with your favorite dressing pour it on the sides of a high bowl and THEN add your lettuce and toppings. Gently mix your greens. Your dressing will be evenly dressed!

    Know your Beef, Know your Butchery: Cut Education Session

    I think I learned the most at this fact filled sessions put on by Beef Checkoff. Here are just a few tidbits.


  • There are three grades of beef in the US: Prime, Choice, Select
  • Marbling  is intramuscular fat i.e. fat within the muscle tissue.  It is also called “taste fat”.
  • Prime cuts have the most “taste fat”
  • Marbling is very important because it affects:

    • Tenderness
    • Juiciness
    • Taste/flavor
    • Marbling also acts as a bit of insurance when it comes to overcooking! If it has a high marbling percentage it will still taste great even if you over cook it a bit


  • Why are beef prices rising in the US?

    • smallest herd since the 1950s because of drought
    • things are starting to rebound but takes time
    • Want to save money? Go for less tender cuts like chuck, brisket, loin. These cuts are close to the animals limbs which means they are subject to lots of motion and thus less connective tissue. This makes them less tender. But that doesn't mean they can’t make great meals! You just have to know how to coax out their best flavour and taste. So when you cook these cuts think braising, long and slow cooking, adding moisture.
    • All beef starts on grass but are finished for their last 100-200 days on either grass or grain (which also includes some grass)
    •  Only 2-3% of the US herd is bred for sale as prime beef.


    My next post IFBC2014 will be about my favorite session: The Sur la Table/Kitchen Aid excursion  and my favorite food finds from the conference!

    Note: In order to receive the discounted active blogger rate at IFBC2014, all participating bloggers were required to write three posts about their experience at the conference. This is post #2.

    Sunday, January 29, 2012

    Super Foods - Hemp Hearts - Miso Meatballs with Hemp Hearts


    Have you given up on your New Year’s resolution to lose weight, or eat healthier foods? Sadly, the stats say that most of us have. If you haven’t: CONGRATULATIONS! KEEP GOING! If you have jump back on what ever wagon you fell off of and begin again!


    To help, over the coming weeks I am going to share some new and healthy (or fairly healthy) recipes. In January, I read an article in the Vancouver Sun about 2012’s “super foods”. While I think there are many good and healthy foods, I don’t really believe any one of them can leap a building in a single bound. That said, trying new foods is one way to stay motivated in our quest for better health.

    In my personal quest for healthier eating I have decided to try most of the foods on the list and share my recipes with you. (It also gives me ammo when I ask my kids to try new foods - lead by example!) Here is the list:

    1. Pomegranate
    2. Quinoa
    3. Chia
    4. Kale
    5. Farro
    6. Kangaroo
    7. Hemp hearts
    8. Spirulina
    9. Black garlic
    10. Avocado
    11. Chick peas
    12. Dates and Figs

    I won’t be trying spirulina since I can only find it in powdered form and honestly it just doesn’t sound appealing.

    I have already tried pomegranate, quinoa, avocado, chick peas, and dates and figs but I will offer facts and recipes for each. That leaves: chia, kale, faro, kangaroo, hemp hearts, and black garlic as foods that have never crossed my lips.

    Shelled Hemp Seeds aka Hemp Hearts
    Shelled Hemp Seeds

    This week I tried hemp hearts. Hemps hearts are shelled hemp seeds. Whether you inhaled or not during high school or university, you do not need to worry about getting a buzz from these seeds - there is no active "buzz" generating ingredients! In fact, according to nutritionist Leslie Beck, Canada legalized industrial hemp farming back in the late 1990s. Canadian law ensures that no more than 0.3 % THC is present in harvested hemp products (sorry, not sure about the U.S.) This low level of the active "buzz" generating ingredient means it's pretty much impossible to "get high" off hemp.

    According to Wikipedia, hempseed is usually very safe for those unable to tolerate nuts, gluten, lactose, and sugar. Hempseeds are a great way to get an ideal ratio of Omega-6 to Omega-3‘s.

    Nutritional Info from Manitoba Harvest

    Ok, so you know they are healthy and good for you. But how do they taste? I think they taste like soft sunflower seeds. They have an almost creamy consistency which varies depending on the brand. So far I have tasted Mum's and Bob's Red Mill (sorry Manitoba Harvest - I haven't tried yours yet!). Both are very good. Mum's have an organic and non-organic version as well as a "regular" variety and one that is slow roasted and Bob's is non-organic. I prefer Bob's because of the creamier taste but Mum's have been on sale lately and price often will win out.

    I have been putting a couple of tablespoons of hemp hearts in my morning yogourt. They really do keep me from feeling hungry longer than say cereal, oatmeal or toast. I'd say I go about 5 hours before I need a snack.

    As for other ideas, I think you could:
    • use as a coating for fish
    • add to hummus recipe
    • throw in muffins, cakes, cookies
    • meatballs
    In fact, I made these meatballs for dinner recently. They are fantastic! Full of flavour and the hemp hearts add a definite nutrition boost! When you first mix the ingredients, you might think it looks a bit wet. Don't worry the hemp hearts will suck up the excess moisture.

    If you have any other ideas for recipes let me know!

    Miso Meatballs with Hemp Hearts Recipe
    Ingredients


    3/4 lb lean ground beef
    2 tbsp honey garlic sauce
    1 tsp ground pepper
    1 tsp soy sauce
    1 tbsp grated ginger
    3 cloves garlic, chopped
    2 tbsp chives, finely chopped
    1 tbsp red miso
    3 tbsp hemp hearts
    1 egg, slightly beaten


    vegetable oil for sauteeing.


    What to do
    • Mix all ingredients together.
    • Cover and refrigerate for 2 hours or more.
    • Preheat oven to 300 degrees F.
    • Add 1 - 2 tbsp oil and heat saute pan over medium heat.
    • Working in batches, make and brown 1-1/2 inch meatballs.
    • Saute for about 15 minutes (internal temperature of 160 degrees F must be reached to avoid food bourne illnesses!!)
    • Place batches in oven to keep warm.
    • If desired, thread on small skewers with pineapple and green onions.


    Friday, August 19, 2011

    The Stoked Smoked Burger


    This recipe is based on one I found in Gourmet Grilling. The mayo is fantastic and makes enough that you should have leftovers for sandwiches or fries! The burger is nicely spiced but not too hot. The avocado MAKES this burger - warm avocado adds such a nice and creamy texture and flavour that you will never go back to ordinary avocados on your burgers!

    Ingredients
    • 1 cup mayonnaise or Miracle Whip Dressing
    • 2 tablespoons Dijon mustard
    • 3 tablespoons minced chipotle in adobo, including some sauce, divided
    • 1/4 cup real bacon bits
    • 2 pounds ground beef - not extra lean - fat adds flavour to burgers!
    • 1 tbsp + 2 tsp sweet smoked paprika
    • 2-3 cloves of garlic, finely chopped
    • 1 firm-ripe avocado, quartered lengthwise, peeled, and cut lengthwise into 1/3-inch thick slices
    • 6-8 slices applewood smoked cheddar (or other fave cheese)
    • Olive oil for brushing on avocado
    • 1 tsp salt
    • 6-8 hamburger buns, grilled

    What to do:

    • In a food processor or blender, purée mayonnaise, mustard, and 2 tablespoons chipotle, 2 tsp smoked paprika; transfer to a bowl and refrigerate.
    • Mix beef (using gloved hands always works best for me) with 1 tablespoon chipotle, 1 tbsp paprika, garlic, bacon bits and 1 teaspoon salt until combined. Form into 6 - 8 patties. Make a small indentation in the center of the burger with your thumb.  This will keep them round and help to prevent them from puffing up while cooking. Most importantly, it prevents uneven cooking. Refrigerate if not cooking right away.
    • Prepare a medium hot gas BBQ.
    • Meanwhile, brush both sides of avocado slices with olive oil.
    • Grill patties until they reach 160°F on an instant-read thermometer, approximately 6 to 8 minutes on each side. Add cheese and melt.
    • Grill avocado slices, turning once, until grill marks appear, about 60 seconds on each side.
    • Slather sauce on buns and stack burgers with avocado and any other of your favorite condiments. 
    • Enjoy!

    Wednesday, November 17, 2010

    Prime Rib Hash


    Prime Rib or Standing Rib Roast was on sale last week at my local grocery store. To be honest, I find Prime Rib too fatty for my taste but I thought it might be good in hash. I was right! This is an easy and delicious recipe for left over prime rib!


    Ingredients
    3 cups cooked and cubed prime rib
    3 cups cubed baked or boiled potatoes (preferably ones baked with the roast!)
    1 large onion, diced
    1 red pepper, diced
    1 small turnip, diced and steamed or boiled
    4 cloves garlic, minced
    1 inch piece of ginger, minced
    1 sweet potato, cooked and diced
    1 tbsp butter
    salt
    pepper
    smoked paprika
    1 tbsp savory, chopped

    What to do

    In large nonstick skillet, melt 1 tbsp of the butter over medium heat; cook onion and pepper until softened, about 3 minutes. Add potatoes, beef, garlic, ginger, turnip, smoked paprika, salt and pepper; heat, stirring, until heated through, about 5-7 minutes. Remove from heat; mix in savory. Enjoy!
     
    Makes 4-6 servings.


    Monday, April 12, 2010

    Easy Beef & Pork Meatloaf


    In North America, meat loaf is often considered a comfort food- something that takes adults back to our childhoods and something most kids will eat without a fuss.

    My own children will experience meatloaf for the first time tomorrow! I made it tonight because my husband has been craving it. My recipe went by memory from the dish my Mom made me as kid. It turned out wonderfully! It filled the apartment with a great aroma - onions, garlic, cumin wafted through each room...mmm. I had a little taste of it and it is delcious! I hope the kids like it tomorrow! And my husband is looking forward to it for lunch - although he hasn't decided if he wants it in the form of a sandwich or simply as is.

    Ingredients
    1 lb extra lean ground beef
    1/2 lb lean ground pork
    2 shallots, finely chopped
    1/2 cup corn niblets
    1/2 panko bread crumbs
    1/4 cup ketchup
    1/4 BBQ sauce - something smoky
    1 egg, slightly beaten
    2 tsp Old Bay seasoning or other seasoned salt
    1 tsp cumin
    1/2 tsp thyme
    2 tsp smoked paprika
    1 tsp onion powder
    1/2 tsp pepper
    4 cloves garlic, chopped

    Method
    Preheat oven to 375 degrees.
    Put everything in large bowl. With gloved (to keep your hands semi clean) hands, mix everything together with hands. Mix really well. Place in 9 x 5 loaf pan. Make sure there is at least an inch from top of meat to top of pan as the fat produced could easily splatter - be very careful!. If desired, place another squirt of ketchup or BBQ on top of loaf. Bake for 1 hour and 15 minutes or longer - until meat thermometer registers 170 degrees. Let sit 15 minutes before serving. Enjoy!