Sunday, January 10, 2016

Grandma's Easy Date Squares Recipe


www.withinthekitchen.blogspot.com


Date squares? Have you ever had one? Is it a dessert you associate with your great aunt Agnes? Date squares seem to have become something of an "old-fashioned" dessert. Date squares or matrimonial squares (some say because they were made with so many "dates". Get it? You gotta go on a lotta dates to get married???) as they are known in some parts of Western Canada have been around since at least the 1930s.

www.withinthekitchen.blogspot.com
They are made from a layer of sweet, gooey dates that is sandwiched between two layers of buttery golden oats.

www.withinthekitchen.blogspot.com
My mom used to make them when I was a kid but I hadn't thought much about them since then. That is, until my 9 year old son saw a bag of dates at the grocery store. He wanted to try them. They were on sale so I bought two bags since my brain flickered with the idea of date squares. Turns out my son didn't like dates straight out of the bag (no surprise). That left me with two bags of dates and the brain flicker turned into a brighter light (luckily I didn't have the urge to walk into it).

I knew the kids would love the oat mixture - it's pretty much a crumble topping but I wasn't sure about the dates in the middle. Would the texture be appealing? In a word. YES. Yes, it would . Granted the dates are mixed with enough sugar to make them sweet and delicious and taste bud friendly to almost anyone.

I think date squares deserve a new minute in the sun, another 15 seconds of fame and it starts right here. Try this recipe. Let me know what you think of them. I know you'll love them (so will your great aunt Agnes so be sure to share)!


Ingredients

2 cups dates
3/4 cup water
1/4 cup orange juice
1/2 tsp baking soda
1/4 cup brown sugar (can reduce or increase this amount to suit tastes)

1-1/2 cups large flake oats
1-1/4 cup flour
1 cup brown sugar
3/4 cup unsalted butter, softened
1/2 tsp baking powder
1/2 tsp salt
1 tbsp cinnamon

Instructions


Fruit Mixture:

  1. Place dates, water, juice, baking soda and sugar in sauce pan.
  2. Bring to a boil.
  3. Reduce heat and simmer for approximately 10 minutes.
  4. Remove from heat.
  5. Using a fork or potato masher, squish the date mixture a bit to form a coarse paste.
  6. Cool.

Oat Mixture:

  1. In large mixing bowl, add flour, sugar, oats, salt, baking powder and cinnamon.
  2. Mix with hands,
  3. Cut butter into 1 inch pieces and add to bowl.
  4. Using your hands, rub and mix butter and other ingredients together until you have a  crumbly mixture that will hold together if squeezed.

Making the squares:

  1. Preheat oven to 350 degrees F.
  2. Spray an 8x8 baking dish with non stick spray.
  3. If desired, line with parchment or nonstick foil, letting it hang over edges for easier removal later. 
  4. Place half of oat mixture in bottom of dish and use your hands to firmly press mixture evenly over bottom.
  5. Add all of the cooled date mixture on top of crumble and spread evenly (I use an offset spatula).
  6. Add rest of oat mixture over dates.
  7. Gently press down to cover fruit.
  8. Bake for approximately 30-35 minutes, until top is golden brown.
  9. Remove from oven and cool completely.
  10. Either cut in pan or remove by pulling overhanging foil.
  11. Cut into desired number of squares.

Sunday, December 6, 2015

Double Chocolate Candy Cane Bark

Need an easy, delicious sweet treat for dessert or a hostess gift? Try this! Any bag of chocolate chips will do and in any flavour. A few crushed candy canes and maybe a few extra sprinkles and you're done!

Ingredients
  • 3 bags of milk chocolate chips
  • 3 bags of white chocolate chips
  • 1 bag skor bits
  • 5 candy canes, crushed
  • various sprinkles or other candies (smarties) or crushed cookies


What to do
  1. Melt chips in separate bowls or sauce pans (careful not to burn them).
  2. Spread melted white chocolate on a cookie sheet that has been lined with a silpat.
  3. Sprinkle 1/2 of skor bits over white choclate.
  4. Spread melted milk chocolate over white and spread with a light hand.
  5. Sprinkle with more skor bits, candy sprinkles and crushed candy canes.
  6. Place in fridge until set.
  7. Break or cut into pieces.
  8. Enjoy!

Saturday, November 14, 2015

Bacon Wrapped Turducken for Sunday Football

www.withinthekitchen.blogspot.com
There are days for salad with no dressing and a squeeze of lemon. Sunday football and  especially Grey Cup on Sunday November 29th, isn't one of those days! Football calls for a little bit of decadence and a whole lot of easy. Easy dishes, that is. Because who wants to send the day in the kitchen when you could be watching the game? GO EDMONTON!

A perfect fit with game day feasting is a turducken! Specifically, a bacon wrapped turducken. That's right, a duck wrapped in chicken wrapped in turkey, wrapped in bacon I'll give you a minute to think about that........drooling yet? How about a layer of stuffing and another inside layer of bacon??!!!! Sorry vegetarians, this is not your kind of meal. Carnivores, jump for joy!

www.withinthekitchen.blogspot.com

Echelon Foods has added just such a turducken to it's line of deliciousness. I've been a big fan of their turduckens for awhile now and have served them at previous Thanksgiving dinners- both the roast and the whole beast.  Our guests are always impressed!

www.withnthekitchen.blogspot.com

But it's for more than the holidays. In fact, it's perfect for any game day and is sure to make a huge impression on your guests - a definite touchdown. It's easy to make - just defrost and throw it into your oven for four hours. And since you are putting such a show stopper on the table, you can add other premade or easy to make side dishes to round out the feast.

www.withinthekitchen.blogspot.com

For our buffet, I made a quick batch of orange infused cranberry sauce, simple cheesy potato skins, raw veggies, chips, salsa, guacamole (store bought), date squares that I had made earlier in the week, all of our left over Halloween candy, and a few other dishes. Trust me when I say, the bacon wrapped turducken was the MVP of the game! The outer layer of bacon comes out crispy and the birds on the inside are quite moist.

www.witinthekitchen.blogspot.com

I loved that with a little pre-planning I could watch the game with guests and not get stuck in the kitchen.

www.withinthekitchen.blogspot.com
I highly recommend any of Echelon's turduckens but the bacon wrapped turducken roast will definitely score a touch down at your next football (or hockey or baseball or basketball or whatever sport you're into) feast. Echelon will deliver your bacon wrapped turducken frozen solid to your door (the dry ice is an added bonus!). You can start defrosting right away (it will take 2-3 days to thaw so factor that in  to your timing) or put it in your freezer until you need it.

Our roast easily fed 12 people and none went away hungry!

www.withinthekitchen.blogspot.com


www.withinthekitchen.blogspot.com

Note: I received a bacon wrapped turducken for review but opinions, as always, are my own.


Saturday, October 24, 2015

Harry Potter Birthday Party Part 5: The Cake

www.withinthekitchen.blogspot.com


If you missed our other Harry Potter Birthday Party post, check them out:


Such a simple cake but the kids loved it!

It's a simple five layered chocolate and vanilla cake with vanilla frosting.

It's covered with marshmallow fondant. Let me be clear, I dislike regular fondant and try to avoid it like the plague! It tastes awful. When I use it, I make figurines (e.g. on our Plants vs Zombie cake) but would never cover a cake in it. But I had heard rumours that marshmallow fondant is not only easy to work with but also tastes waaaay better. So what the heck, I thought, let's try it.

It doesn't taste like marshmallows but it is sweet and pleasant tasting. More importantly all the kids (and my husband) ate it and liked it - not one peeled it off the cake! That says something!

It was easy to work with. Even though I rolled it a bit too thin, it still adhered to the cake well and it was easy to smooth out.  The ribbons on the bottom of the cake hid a bit of messiness around the edges of the cake!

After it was covered, I added a bit of color gels to pieces of extra fondant. After rolling them out and cutting them into shapes (you can use whatever cookie cutters you have on hand or even cut them free style with a knife), I wrote on them with edible ink. The kids gave me their favorite spells and quotes from the Harry Potter books and movies and I just copied them onto individual fondant pieces. If you rub a tiny bit of water on the cake or the back of the fondant piece it will be easy to adhere it to the cake!

Note: Make sure you make the fondant a day or so in advance - it makes it much easier to work with.

Here are the sites I referred to when making our marshmallow fondant:
Great Video by My Cupcake Addiction: https://www.youtube.com/watch?v=GaKqSND8sPc


www.withinthekitchen.blogspot.com


www.withinthekitchen.blogspot.com

www.withinthekitchen.blogspot.com


www.withinthekitchen.blogspot.com


www.withinthekitchen.blogspot.com

www.withnthekitchen.blogspot.com

www.withinthekitchen.blogspot.com


Sunday, October 4, 2015

Grammie's Ginger Snaps


Only nine ingredients and a little bit of time stands between you and these spicy, sweet ginger snaps. These are so easy to pull together. My kids love rolling them in the sugar and placing them on the baking sheet. I prefer to use raw sugar to roll the cookies in - it's crunchier than regular granulated so it adds a great texture element.

The video below was made by my 11 year old - I think she did a great job - don't you?


Ingredients

3/4 cup butter
1 cup white sugar
1 egg
1/2 cup molasses
2.5 cups flour
2 tsp baking soda
2 tsp ginger
1 tsp cinnamon
3/4 tsp salt

1 cup extra granulated sugar or raw sugar in bowl for dipping cookies

Instructions

  1. Cream butter and 1 cup sugar well.
  2. Beat in egg.
  3. Mix in molasses.
  4. In another bowl, stir together flour, baking soda, ginger, cinnamon, and salt.
  5. Add to the creamed mixture and mix well.
  6. Shape into 1 inch balls.
  7. Roll in sugar and on baking sheet.
  8. Bake at 350 degrees for 10 minutes.
  9. Cool on pan for 5 minutes and then transer to wire racks to cool completely.

Makes about 4 dozen cookies.

Monday, September 21, 2015

Harry Potter Birthday Party: The Great Hall and Honeydukes #4


So much candy!
This week I'm sharing the 4th post in my Harry Potter Birthday Party series. Today we're focusing on the Great Hall and Honeydukes - both of which were in our dining room!

If you missed the other posts, check them out:


The Great Hall

Not true to the movie but more inspired by it, we used beautiful gold tablecloths, silver and gold paper plates as well as cheap plastic goblets. I found the goblets at the local Dollarama and the cloth and plates on sale at an art store.

The glow sticks looked waaaaay better in person! The kids loved them...and they lasted for over 10 hours!
I wanted to make the candles hang from the ceiling but I didn't have a tonne of time. Instead, I bought glow sticks and hooks to hang them from the ceiling. I also hung tulle to make it more magical. I have to say the glow stick were the amazing. They looked great during the party even though it was daylight. That night my daughter had three of her best friends sleep over for a Harry Potter movie marathon, and the glow sticks were even more AWESOME.


The Great Feast

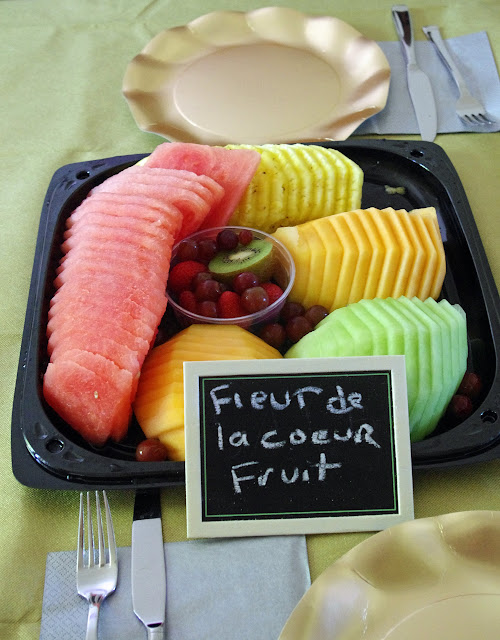
The food itself wasn't really food from the books or movies. We had grilled chicken wings, pizza pops, veggies and fruit. We did, however, give them Harry Potterish names like wicked wings, pizza pasties, fleur de la coeur fruit and herbology bites (veggies).

We served 'pumpkin juice' which was really orange-mango juice!

Gold disposable table cloth, gold and silver plates & napkins and plastic goblets completed the Great Hall Feast.


The kids devoured these wings!


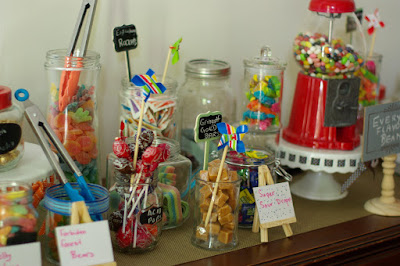
Honeydukes

Our dining room side buffet became Honeydukes!

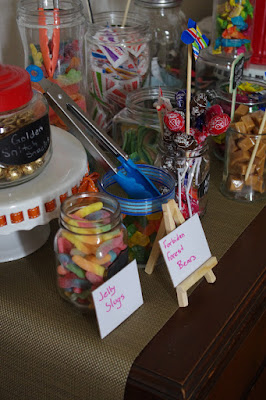
We picked up some Martha Stewart chalk board signs and easels to write out the candy names.
These containers had chalk board sticker already attached and ready to go.


We also bought cheap tongs so the kids could get their candy without sticking their hands in the jars!


For the candy shop, I bought a bunch of cute and cheap glass containers from the dollar store and lots of candy from them too. The candy went into the containers. From Michaels and Dollarama, I bought funky labels (on sale) and we gave the candy HP names including:

  • acid pops (lollipops)
  • gringott gold bars (caramels)
  • exploding rockets
  • laughing taffy
  • love potion necklaces
  • life preservers
  • every flavour beans
  • golden snitch snacks
  • chocolate frogs
  • jelly slugs
  • forbidden forest bears

Chocolate Frogs


We made our own chocolate frogs. They are simple to make if you have the frog mold. I ordered one (two would have been better as it would have allowed me to make more at once) from amazon.com. The molds make quite a big frog! I melted about 2/3 of a bag of melting candy from Wilton and filled each cavity half full. I then sprinkled rice cereal in the middle and topped it off with more chocolate. I then threw them in the fridge for about 30 minutes to set. I started the process over again until I had about 24 frogs.

I also printed out Honeydukes labels and placed them on some resealable bags so the kids could 'shop' at the store and take their favourites home as part of their loot bag.

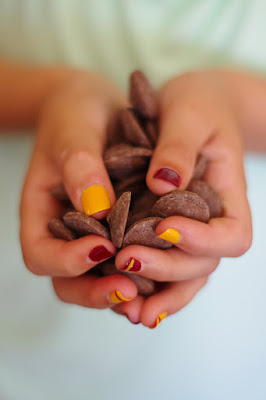
Do you love my daughter's Gryffindor coloured nails?!

They look better than this - bad lighting! Lumos!

Loot Bags


What else was in the loot bags? Glad you asked! I found the cutest owl pens at a local art store and Harry Potter magnets at our local toy shop. These with the candy bag went into our loot bags. The bags were simply brown paper bags with a customized thank you sticker attached. Adorable, don't you think?


Thanks for reading! Our next and last Harry Potter birthday party post will be all about the cake!


Monday, September 14, 2015

REESE Peanut Butter Chocolate Eclairs


www.withinthekitchen.blogspot.com


Chocolate and peanut butter - is there anything better? This combo makes my mouth water just thinking about it. And Reese does it perfectly. Whether it's their famous peanut butter cup or their candies, I can't say no when they're offered up (or when I pass them in the grocery store).


www.withinthekitchen.blogspot.com
I picked up my first jar REESE peanut butter and chocolate spread while I was down in Washington State last year - as soon as I tasted it (yes, on a spoon...don't judge), I wish I had bought a few more jars. It quickly disappeared and I tried to forget about it until my next US trip.

Well, now I'm happy to say that you can buy this delectable thick, creamy spread, which is full of finely crushed pieces of peanuts to give it the texture of the famous REESE peanut butter cup, in your local Canadian grocery store!
www.withinthekitchen.blogspot.com

And when asked by Hershey to create a recipe featuring this spread, of course, I said yes!

After much thought and input from the family and a few test recipes, we all decided this REESE peanut butter chocolate eclair was the unequivocal winner. The kids have already asked that it be part of  our Thanksgiving and Christmas dinner menus!
www.withinthekitchen.blogspot.com
Eclair pastry sometimes intimidates people - don't let it! It really isn't that difficult. Make sure you use a strong spoon when you are stirring the dough - one wooden spoon was harmed in the making of this dessert! The handle broke - make sure yours is sturdy!


Pastry Dough

Ingredients

1 cup milk
1/8 tsp salt
1 tsp sugar
1 cup flour
4 large eggs + 1 egg


Directions

  1. Place milk, salt and sugar in a sauce pan over medium high heat.
  2. Bring to a boil and immediately remove from heat.
  3. Quickly add flour in one dump and stir until dough is formed. It should be glossy and come together in a ball that comes away from the sides of the pan easily.
  4. Place back on medium heat and stir continuously until a milky white film forms on the bottom of the pan.
  5. Remove from heat and let sit for 5 minutes (you don't want to cook the eggs).
  6. Break 4 eggs into liquid measuring cup.
  7. Pour one egg at a time into dough and stir until incorporated.
  8. Repeat with each egg, one at a time.
  9. The dough will look like a thick and shiny paste. If it is too dry, beat the remaining egg and add half of it. Set aside the other half.
  10. If you have one, place a half inch decorating tip inside a pastry bag and then add the dough. If you don't have one, simply place the dough into plastic resealable bag and cut half an inch off one of the bottom tips of the bag.
  11. Place a silicone mat on baking sheet (you may need two sheets).
  12. Starting about half inch above the baking sheet, pipe a 3-4 inch strip of pastry. Leave 2-1/2 inches between pipings.
  13. Depending on size, 12-16 eclair should be piped.
  14. If you haven't already, beat one egg. Brush each eclair lightly with egg. With the brush, gently push any dough tips back into the dough.
  15. Bake for 30-35 minutes, switch pans half way through baking if using two pans. You want the pastry to be completely dry or it will collapse. (you can take one out and open it to check if dry).
  16. Once golden brown, turn off oven but DO NOT remove pastry. Open oven door two inches and let the pastry sit for 30 minutes. This will help dry the pastry out so it's not soggy in the middle later.
  17. Remove from oven and cool completely.


Filling

Ingredients

2/3 cup Reese  peanut butter spread
1/4 c heavy or whipping cream
2 tbsp unsalted butter


Directions

  1. Mix all ingredients at medium-high speed for one  minute until incorporated and slightly lighter in color.
Putting filling in eclairs

  1. Cut each eclair length wise put do not cut through (like a hot dog bun).
  2. Place filling in a pastry bag or strong resealable plastic bag with the end snipped off.
  3. Pipe the filling into sliced pastries. 

Topping

Ingredients

1 cup Reese peanut butter chips
1 cup salted, roasted peanuts, chopped


Directions

  1. I find it easiest to melt the chips in 1/4 cup batches in the microwave (about 45 second should do it).
  2. Place each batch in a pastry bag with a very small 1/4 inch opening and drizzle on top of the eclairs.
  3. Top each eclair with a sprinkle of crushed peanuts.
  4. Let set until the melted chips have set again (about 15 minutes).


Note:
The pastries are best on the same day they are made but will last a few days in an airtight container.


www.withinthekitchen.blogspot.com


Want more amazing recipes using Hershey's Reese peanut butter chocolate spread? Of course you do! Find them by following the #doyouspoon hashtag on Facebook, Twitter and Instagram! 


Disclosure: I received free product samples and was compensated for this post by Hershey's Canada. The opinions expressed are, as always, my own.