Showing posts with label dessert bars. Show all posts

Sunday, January 10, 2016

Grandma's Easy Date Squares Recipe


www.withinthekitchen.blogspot.com


Date squares? Have you ever had one? Is it a dessert you associate with your great aunt Agnes? Date squares seem to have become something of an "old-fashioned" dessert. Date squares or matrimonial squares (some say because they were made with so many "dates". Get it? You gotta go on a lotta dates to get married???) as they are known in some parts of Western Canada have been around since at least the 1930s.

www.withinthekitchen.blogspot.com
They are made from a layer of sweet, gooey dates that is sandwiched between two layers of buttery golden oats.

www.withinthekitchen.blogspot.com
My mom used to make them when I was a kid but I hadn't thought much about them since then. That is, until my 9 year old son saw a bag of dates at the grocery store. He wanted to try them. They were on sale so I bought two bags since my brain flickered with the idea of date squares. Turns out my son didn't like dates straight out of the bag (no surprise). That left me with two bags of dates and the brain flicker turned into a brighter light (luckily I didn't have the urge to walk into it).

I knew the kids would love the oat mixture - it's pretty much a crumble topping but I wasn't sure about the dates in the middle. Would the texture be appealing? In a word. YES. Yes, it would . Granted the dates are mixed with enough sugar to make them sweet and delicious and taste bud friendly to almost anyone.

I think date squares deserve a new minute in the sun, another 15 seconds of fame and it starts right here. Try this recipe. Let me know what you think of them. I know you'll love them (so will your great aunt Agnes so be sure to share)!


Ingredients

2 cups dates
3/4 cup water
1/4 cup orange juice
1/2 tsp baking soda
1/4 cup brown sugar (can reduce or increase this amount to suit tastes)

1-1/2 cups large flake oats
1-1/4 cup flour
1 cup brown sugar
3/4 cup unsalted butter, softened
1/2 tsp baking powder
1/2 tsp salt
1 tbsp cinnamon

Instructions


Fruit Mixture:

  1. Place dates, water, juice, baking soda and sugar in sauce pan.
  2. Bring to a boil.
  3. Reduce heat and simmer for approximately 10 minutes.
  4. Remove from heat.
  5. Using a fork or potato masher, squish the date mixture a bit to form a coarse paste.
  6. Cool.

Oat Mixture:

  1. In large mixing bowl, add flour, sugar, oats, salt, baking powder and cinnamon.
  2. Mix with hands,
  3. Cut butter into 1 inch pieces and add to bowl.
  4. Using your hands, rub and mix butter and other ingredients together until you have a  crumbly mixture that will hold together if squeezed.

Making the squares:

  1. Preheat oven to 350 degrees F.
  2. Spray an 8x8 baking dish with non stick spray.
  3. If desired, line with parchment or nonstick foil, letting it hang over edges for easier removal later. 
  4. Place half of oat mixture in bottom of dish and use your hands to firmly press mixture evenly over bottom.
  5. Add all of the cooled date mixture on top of crumble and spread evenly (I use an offset spatula).
  6. Add rest of oat mixture over dates.
  7. Gently press down to cover fruit.
  8. Bake for approximately 30-35 minutes, until top is golden brown.
  9. Remove from oven and cool completely.
  10. Either cut in pan or remove by pulling overhanging foil.
  11. Cut into desired number of squares.

Saturday, April 30, 2011

Oat Bars

 
Posted by Picasa

 
I love oats. I love coconut. I love butter. I love this recipe. It is adapted from a Best of Bridge recipe. This recipe results in a very buttery oat flavour with a subtle coconut flavour. Melted chocolate or bit of softened store bought icing can be drizzled over them for some added flare.

The oat bars around the edges are crispy but the ones cut from the middle are relatively soft. Also, when you spread the mixture onto your cookie sheet it will only take up half of the pan. While it bakes it will spread to fill the rest of it. I also think you could add a bit of cinnamon for added flavour too.

Ingredients
  • 1 cup of unsalted butter
  • 3-1/2 cups oats
  • 2/3 cup unsweetened shredded coconut
  • 1/4 tsp salt
  • 1 cup brown sugar
  • 2 tbsp corn syrup
  • 2 tsp vanilla
  • 1/2 tsp baking powder
  • 1/2 tsp salt

What to do
  • Preheat oven to 325 degrees F.
  • In large pot, melt butter and corn syrup.
  • Add brown sugar and stir.
  • Stir in oats, baking powder, salt, vanilla, and coconut until well combined.
  • Place on large cookie sheet and flatten until mixture is about 1cm thick.
  • Bake for 15-20 minutes.
  • Cool 10 minutes and cut into squares or rectangles.
  • If desired, drizzle with melted chocolate.

Sunday, March 27, 2011

Yeasted Meringue Coffee Cake - March 2011 Daring Baker’s Challenge


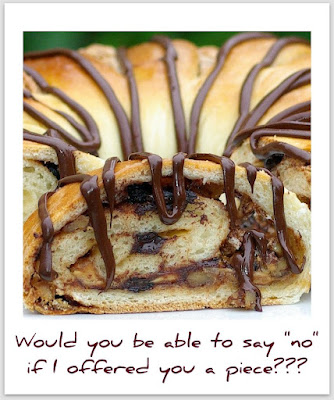
The March 2011 Daring Baker’s Challenge was hosted by Ria of Ria’s Collection and Jamie of Life’s a Feast. Ria and Jamie challenged The Daring Bakers to bake a yeasted Meringue Coffee Cake. 

This is was a great Daring Baker's Challenge. I usually leave bread making to my bread machine so it was definitely a new experience for me to make a yeast bread from scratch.

Although the recipe looks tough, it is really straight forward and not all that difficult. Feel free to change up the filling - flavours, spices, fruit etc. Lots of Daring Bakers did a more savoury take on this recipe too ...think pizza flavours etc. Go wild!

My coffee cake was sweet and the bread itself is very moist thanks to the meringue. It got rave reviews from the office and kids. Enjoy.


The recipe below is from James and Ria.


FILLED MERINGUE COFFEE CAKE


Makes 2 round coffee cakes, each approximately 10 inches in diameter. The recipe can easily be halved to make one round coffee cake.


Ingredients


For the yeast coffee cake dough:
  • 4 cups (600 g / 1.5 lbs.) flour
  • ¼ cup (55 g / 2 oz.) sugar
  • ¾ teaspoon (5 g / ¼ oz.) salt
  • 1 package (2 ¼ teaspoons / 7 g / less than an ounce) active dried yeast
  • ¾ cup (180 ml / 6 fl. oz.) whole milk
  • ¼ cup (60 ml / 2 fl. oz. water (doesn’t matter what temperature)
  • ½ cup (135 g / 4.75 oz.) unsalted butter at room temperature
  • 2 large eggs at room temperature
For the meringue:
  • 3 large egg whites at room temperature
  • ¼ teaspoon salt
  • ½ teaspoon vanilla
  • ½ cup (110 g / 4 oz.) sugar
For the filling:


1 cup (110 g / 4 oz.) chopped walnuts
1/3 cup Tablespoons (30 g / 1 oz.) brown sugar
1 teaspoon ground cinnamon
1 cup (170 g / 6 oz.) semisweet chocolate chips or coarsely chopped chocolate
1/2 cup butterscotch chips
1/2 cup toffee bits


Prepare the dough:

In a large mixing bowl, combine 1 ½ cups (230 g) of the flour, the sugar, salt and yeast.


In a saucepan, combine the milk, water and butter and heat over medium heat until warm and the butter is just melted.

With an electric mixer on low speed, gradually add the warm liquid to the flour/yeast mixture, beating until well blended. Increase mixer speed to medium and beat 2 minutes. Add the eggs and 1 cup (150 g) flour and beat for 2 more minutes.


Using a wooden spoon, stir in enough of the remaining flour to make a dough that holds together. Turn out onto a floured surface (use any of the 1 ½ cups of flour remaining) and knead the dough for 8 to 10 minutes until the dough is soft, smooth, sexy and elastic, keeping the work surface floured and adding extra flour as needed.


Place the dough in a lightly greased (I used vegetable oil) bowl, turning to coat all sides. Cover the bowl with plastic wrap and a kitchen towel and let rise until double in bulk, 45 – 60 minutes. The rising time will depend on the type of yeast you use.


Prepare your filling. In a small bowl, combine the cinnamon and sugar for the filling if using. You can add the chopped nuts to this if you like, but I find it easier to sprinkle on both the nuts and the chocolate, chips and toffee bits separately.

Once the dough has doubled, make the meringue: In a clean mixing bowl – ideally a plastic or metal bowl so the egg whites adhere to the side (they slip on glass) and you don’t end up with liquid remaining in the bottom – beat the egg whites with the salt, first on low speed for 30 seconds, then increase to high and continue beating until foamy and opaque. Add the vanilla then start adding the ½ cup sugar, a tablespoon at a time as you beat, until very stiff, glossy peaks form.


Assemble the Coffee Cakes:


Line 2 baking/cookie sheets with parchment paper.


Punch down the dough and divide in half. On a lightly floured surface, working one piece of the dough at a time (keep the other half of the dough wrapped in plastic), roll out the dough into a 20 x 10-inch (about 51 x 25 ½ cm) rectangle. Spread half of the meringue evenly over the rectangle up to about 1/2-inch (3/4 cm) from the edges. Sprinkle half of your filling evenly over the meringue (ex: half of the cinnamon-sugar followed by half the chopped nuts and half of the chocolate chips/chopped chocolate).


Now, roll up the dough jellyroll style, from the long side. Pinch the seam closed to seal. Very carefully transfer the filled log to one of the lined cookie sheets, seam side down. Bring the ends of the log around and seal the ends together, forming a ring, tucking one end into the other and pinching to seal.


Using kitchen scissors or a sharp knife (although scissors are easier), make cuts along the outside edge at 1-inch (2 ½ cm) intervals. Make them as shallow or as deep as desired but don’t be afraid to cut deep into the ring.


Repeat with the remaining dough, meringue and fillings. Cover the 2 coffee cakes with plastic wrap and allow them to rise again for 45 to 60 minutes.


Preheat the oven to 350°F (180°C). Brush the tops of the coffee cakes with the egg wash. Bake in the preheated oven for 25 to 30 minutes until risen and golden brown. The dough should sound hollow when tapped.

Wednesday, March 23, 2011

Mango-Berry Crisp


My kids LOVE LOVE LOVE this dessert - "delicious", "the best ever", "mmmm" were all used in describing it and they each ate two servings. My  4 year old son plans on having it for breakfast :) Note: They did have it for breakfast (with yogourt) and begged me to make another.
Some tips: I prefer to use a shallow longer dish rather than a deep casserole dish that way you get to enjoy more crispy topping per serving!
  • Also, any fruit pretty much works and the quantities are just guide lines. Just don't over pack the dish or you may experience juice overflow and make a mess of your oven!
  • I coated the blueberries in flour so they wouldn't become too juicy.
  • Coarse sugar sprinkled on top before baking adds a great touch to this dish!

Ingredients
  • 2 mangos
  • 2 apples
  • 1-1/2 cups strawberries, chopped
  • 1 cup blueberries
  • 3/4 cup flour
  • 1/2 cup oats
  • 1 cup brown sugar
  • 1/2 cup butter, melted
  • 2 tsp cinnamon
  • 1/2 teaspoon nutmeg
  • 1/2 teaspoon ginger


What to do
  • Preheat oven to 350 degrees.
  • Chop up mango, apples, and strawberries.
  • Place chopped fruit in medium baking dish.
  • Place blue berries in bowl and throw in a table spoon of flour. Coat berries.
  • Place berries with other fruit.
  • In another bowl, whisk flour, spices, and sugar.
  • Add oats.
  • Pour butter over flour mixture and stir until combined.
  • Drop in small amounts over fruit base until fruit is well covered.
  • If you have any course sugar, sprinkle over topping along with an extra shake of cinnamon.
  • Place in oven and bake for 1 hour or until golden brown.

Monday, March 14, 2011

Oatmeal Fudge Bars


This recipe makes enough to feed a large crowd! They are delicious but not too sweet. They are also known as Mrs. Larson Bars and very similar to the oat fudge bars found at Starbucks.

Side Story:
My 4 year-old son loves to help out in the kitchen. As soon as he hears me rummaging through my pans he is running into the kitchen and grabbing our little step ladder so he has a good view of whatever recipe is about to come to life.

Most weekends we bake something up - cookies, bars, muffins etc and he loves stirring, beating, picking flavours, measuring ingredients ...pretty much everything except cleaning up :)

Anyways, last week his preschool teacher told my husband that when my son was asked what his Mom did...he replied "she's a chef!" And while I really work in the non-profit sector, in his eyes I'm a chef...and, according to him, a pretty good one at that. And isn't it great that not only am I chef, I happily share my "office" with him where we bake up special treats and create memories that will hopefully last forever.

Ingredients
Base:
1 cup unsalted butter
2 cups brown sugar
2 eggs
3 cups oats
2 teaspoons vanilla
2 1/2 cups flour
1 teaspoon baking soda
1 teaspoon salt
  • Cream together sugar and butter until light and fluffy.
  • Add eggs and vanilla and mix until well combined.
  • In a medium-sized bowl, whisk together the flour, baking soda and salt.
  • Combine the butter mixture and the dry ingredients.
  • Mix in oats.
Topping:

12 ounces chocolate chips (this is 1 pack plus about 3 oz).
1 14-ounce can of sweetened condensed milk (I use Eagle Brand)
2 tablespoons butter
1/2 teaspoon vanilla
1/2 teaspoon salt
1/4 cup peanut butter (optional)

  • Melt butter in large sauce pan over low heat.
  • Add rest of ingredients.
  • Stir constantly until melted.
Putting it all together:
  • Preheat oven to 350 degrees.
  • Spread and press 3/4 of oat mixture into a jelly roll pan (or two 9 x 13 pans)
  • Spread chocolate mixture on top and spread until even.
  • Sprinkle remaining oat mixture on top of chocolate.
  • Bake for approximately 22 minutes until oats are golden brown.
Enjoy!

Thursday, March 10, 2011

Chocolate Blast Mint Brownies


Brownies have been around since the late 1800s although the exact moment of creation of these chocolatey treats is surrounded in a bit of mystery (read this for more info on its history).

Although there are cakey brownie recipes and fudgey brownie recipes, I prefer the dense, chewy, fudgey type. This recipe is adapted from Michael Smith recipe. I've added more chocolate and added mint chips for some fun.

Ingredients:
  • 350 grams of good quality dark chocolate
  • 1 cup butter
  • 1 cup flour
  • 2/3 cup cocoa
  • 1 tsp baking powder
  • 1/4 tsp salt
  • 4 eggs
  • 2 cups brown sugar
  • 1 tbsp vanilla extract (preferably pure)
  • 1/2 cup chocolate chips (semi-sweet, dark, milk, or white)
  • 1/2 cup mint flavoured chocolate chips

What to do:
  • Preheat oven to 350 degrees.
  • Grease and flour a 9 x 13 inch pan. Note: I use extra cocoa instead of flour so there is no white flour color on the brownies when baked.
  • Melt butter and chocolate over low heat. Stir until smooth and remove from heat to cool.
  • Sift flour, cocoa, baking powder, and salt together in a large bowl.
  • Once melted chocolate mixture has a cooled a bit, add sugar, eggs and vanilla. Stir well.
  • Add the chocolate mixture to the flour bowl and mix until incorporated.
  • Add both types of chocolate chips.
  • Spread batter into the pan.
  • Bake for 25 minutes.
  • Enjoy!

Thursday, January 27, 2011

Daring Baker Challenge - Biscuit Joconde Imprime

The January 2011 Daring Bakers’ challenge was hosted by Astheroshe of the blog accro. She chose to challenge everyone to make a Biscuit Joconde Imprime to wrap around an Entremets dessert.

The Daring Baker's Challenge was fantastic! I had never attempted to create a Biscuit Joconde Imprime before so it was truly a challenge and also lots of fun.

The kids chose the colours of the circles and the type of filling. Butterscotch pudding with whipped cream folded in was the choice and it worked perfectly. We kept it in the freezer and it was delicious each time we pulled it out for a taste.

I'll definitely be making this again and already have a few designs in mind.

Below you'll find the recipe we were given just in case you'd like to give it a try!


Joconde Sponge


YIELD: Two ½ size sheet pans or a 13” x 18” (33 x 46 cm) jelly roll pan

Ingredients:

¾ cup/ 180 ml/ 3oz/ 85g almond flour/meal - *You can also use hazelnut flour, just omit the butter
½ cup plus 2 tablespoons/ 150 ml/ 2⅔ oz/ 75g confectioners' (icing) sugar
¼ cup/ 60 ml/ 1 oz/ 25g cake flour *See note below
3 large eggs - about 5⅓ oz/ 150g
3 large egg whites - about 3 oz/ 90g
2½ teaspoons/ 12½ ml/ ⅓ oz/ 10g white granulated sugar or superfine (caster) sugar
2 tablespoons/ 30 ml/ 1oz / 30g unsalted butter, melted


Directions:

1. In a clean mixing bowl whip the egg whites and white granulated sugar to firm, glossy peeks. Reserve in a separate clean bowl to use later.

2. Sift almond flour, confectioner’s sugar, cake flour. (This can be done into your dirty egg white bowl)

3. On medium speed, add the eggs a little at a time. Mix well after each addition. Mix until smooth and light. (If using a stand mixer use blade attachment. If hand held a whisk attachment is fine, or by hand. )

4. Fold in one third reserved whipped egg whites to almond mixture to lighten the batter. Fold in remaining whipped egg whites. Do not over mix.

5. Fold in melted butter.

6. Reserve batter to be used later.

Patterned Joconde-Décor Paste

YIELD: Two ½ size sheet pans or a 13” x 18” (33 x 46 cm) jelly roll pan

Ingredients

14 tablespoons/ 210ml/ 7oz/ 200g unsalted butter, softened
1½ cups plus1½ tablespoons/ 385ml/ 7oz/ 200g Confectioners' (icing) sugar
7 large egg whites - about 7 oz / 200g
1¾ cup/ 420ml/ 7¾ oz/ 220g cake flour
Food coloring gel, paste or liquid

Directions:

1. Cream butter and sugar until light and fluffy (use stand mixer with blade, hand held mixer, or by hand)
2. Gradually add egg whites. Beat continuously.
3. Fold in sifted flour.
4. Tint batter with coloring to desired color, if not making cocoa variation.

Preparing the Joconde- How to make the pattern:

1. Spread a thin even layer of décor paste approximately 1/4 inch (5 millimeter) thick onto silicone baking mat with a spatula, or flat knife. Place mat on an upside down baking sheet. The upside down sheet makes spreading easier with no lip from the pan.

2. Pattern the décor paste – Here is where you can be creative. Make horizontal /vertical lines (you can use a knife, spatula, cake/pastry comb). Squiggles with your fingers, zig zags, wood grains. Be creative whatever you have at home to make a design can be used. OR use a piping bag. Pipe letters, or polka dots, or a piped design. If you do not have a piping bag. Fill a ziplock bag and snip off corner for a homemade version of one.

3. Slide the baking sheet with paste into the freezer. Freeze hard. Approx 15 minutes.

4. Remove from freezer. Quickly pour the Joconde batter over the design. Spread evenly to completely cover the pattern of the Décor paste.

5. Bake at 475ºF /250ºC until the joconde bounces back when slightly pressed, approx. 15 minutes. You can bake it as is on the upside down pan. Yes, it is a very quick bake, so watch carefully.

6. Cool. Do not leave too long, or you will have difficulty removing it from mat.

7. Flip cooled cake on to a powdered sugared parchment paper. Remove silpat. Cake should be right side up, and pattern showing! (The powdered sugar helps the cake from sticking when cutting.)

Preparing the MOLD for entremets

You can use any type of mold. I would suggest:

1. Start with a large piece of parchment paper laid on a very flat baking sheet. Then a large piece of cling wrap over the parchment paper. Place a spring form pan ring, with the base removed, over the cling wrap and pull the cling wrap tightly up on the outside of the mold. Line the inside of the ring with a curled piece of parchment paper overlapping top edge by ½ inch. CUT the parchment paper to the TOP OF THE MOLD. It will be easier to smooth the top of the cake.

Preparing the Jaconde for Molding:

1. Trim the cake of any dark crispy edges. You should have a nice rectangle shape.

2. Decide how thick you want your “Joconde wrapper”. Traditionally, it is ½ the height of your mold. This is done so more layers of the plated dessert can be shown. However, you can make it the full height.

3. Once your height is measured, then you can cut the cake into equal strips, of height and length. (Use a very sharp paring knife and ruler.)

4. Make sure your strips are cut cleanly and ends are cut perfectly straight. Press the cake strips inside of the mold, decorative side facing out. Once wrapped inside the mold, overlap your ends slightly. You want your Joconde to fit very tightly pressed up to the sides of the mold. Then gently push and press the ends to meet together to make a seamless cake. The cake is very flexible so you can push it into place. You can use more than one piece to “wrap “your mold, if one cut piece is not long enough.

5. The mold is done, and ready to fill.

*Note: If not ready to use. Lay cake kept whole or already cut into strips, on a flat surface, wrap in parchment and several layers of cling wrap and freeze.

Entremet- Filling Options:

 
It is nice to have a completed dessert so you can unmold and see the Joconde working. Fill with anything you desire. Layers of different flavors and textures! However, it needs to be something cold that will not fall apart when unmolded.

Suggestions:

Mousses, pastry creams, Bavarian creams, cheesecakes, puddings, curds, jams, cookie bases, more cake (bake off the remaining sponge and cut to layer inside), nuts, Dacquoise, fresh fruit, chocolates, gelee.

Tuesday, January 11, 2011

Oatmeal Kiss Cookies


About 10 years ago, I found the best oatmeal cookie recipe ever! They were soft and chewy and a little bit spicy. The first, and only, time I made them were as treats for a weekend boat trip to Nanaimo where we were watching the sinking of H.M.C.S. Saskatchewan - Nanaimo's first artificial reef. The weekend and the cookies were fantastic! But I lost the recipe. Like many underwater treasures, it has remained lost ever since.

Being the optimist that I am, I continue to create original and test others oatmeal cookie recipes in the hopes of finding something as good as those lost cookies. This recipe isn't as spicy as the elusive one but it is still delicious! For me, chocolate and oats are one of those perfect flavour combinations and the addition of cinnamon makes it even better. I used "mini-kisses" by Chipits. They are 1/3 the size of original chocolate "kisses" and perfect for these small cookies. 

Ingredients
  • 1-1/4 cups flour
  • 1/2 tsp salt
  • 1/2 tsp baking soda
  • 1 tsp cinnamon
  • 1-1/4 large flake rolled oats
  • 1/2 cup butter, unsalted
  • 1/2 cup lightly packed brown sugar
  • 1/4 cup water
  • 1 package baking "kisses" or large chocolate chips

What to do
  1. Preheat oven to 375 degrees.
  2. Whisk together flour, salt, baking soda, and cinnamon in large bowl.
  3. Stir in oats.
  4. In another mixing bowl, cream butter and sugar.
  5. Blend in water.
  6. Stir dry ingredients into butter mixture.
  7. Shape into small balls and place a "kiss" or chip in the centre.
  8. Bake for 8 to 10 minutes.
  9. Enjoy!

Tuesday, January 4, 2011

Buttery Cinnamon Buns


Cinnamon buns - what's not to love? Ooey, gooey goodness of cinnamon and butter all wrapped up in a warm, soft sweet bread roll. And when you are lucky enough to wake up to their aroma slowly making its way from the kitchen to your bedroom...well, you are lucky indeed.

These ones are especially delicious and believe it or not, you don't need cream cheese icing. I know, I know some of you have already flipped to another blog at that comment! But really, the butter that is placed in the bottom of the pan before baking give these little "sin"amon buns a buttery, caramel flavour that needs to be enjoyed on its own. If you don't believe me ask my family who managed to devour a pan of these in less than 24 hours!


Bun Ingredients


1 cup milk
3 tbsp water, room temperature
1 large egg
2 tbsp butter, room temperature
3/4 tsp salt
2 tbsp sugar
3-1/4 cups flour
2 tsp bread machine yeast


Filling
1/3 cup granulated sugar
1/3 cup brown sugar
2 tbsp cinnamon (note: I love cinnamon - if you don't reduce the amount)
1/3 cup melted butter, divided


What to do:


1. In order of what is recommended by your bread machine maker, add milk. water, egg, salt, sugar, flour and yeast into bread maker.
2. Select dough cycle.
3. When finished, remove dough and put on lightly foured surface.
4. It is a soft dough but if necessary knead in enough flour to make it easy to handle.
5. Cover and let rest for 10 minutes.
6. Combine cinnamon and sugars in bowl.
7. Roll dough into 12 x 9 rectangle.
8. Generously brush with 1/2 of the  melted butter.
9. Sprinkle with cinnamon sugar mixture.
10. Roll dough tightly like a jelly roll starting on the long side.
11. Pinch the seam tight.
12. Shape back into 12 inch roll, if needed.
13.With a sharp knife cut into 1-inch slices.
14. Pour rest of melted butter in a 9 x 13 inch pan.
15. Arrange cut slices in pan in butter.
16. Cover loosely with waxed paper or kitchen towel and let rest for 20 - 30 minutes until doubled in size (resting place should be warm and free of drafts).
17. Bake at 350 degrees for 25 to 30 minutes.
18. Enjoy!


Friday, October 22, 2010

Apple Crumble with Berries


If you are ever in Vancouver, British Columbia during UBC Apple Fest you MUST go! This year visitors could buy more than 60 varieties of apples and learn about another 140 types! They expected to sell almost 30,000 lbs over two days to approximately 14,000 visitors.


My kids loved the Johnny Apple Seed Kids Area where they had their faces painted, made apple blossom rings our of tissue paper and learned more about apples than I thought possible.


We bought 2 types of apples that we had never tried before. The first was a bag of Winter Banana apples. Winter Banana apples are an heirloom variety. Winter Banana Apples are pale yellow with faint pink blush. The flavor is a nice combination of sweet and mild, with a definite banana aroma and a crisp texture.


The second was a bag of Topaz apples. The Topaz is a sharper-tasting apple and is medium-large in size. The skin colour is yellow, almost completely overlaid with red and crimson flush. The flesh is crisp. I preferred the Topaz to the Winter Banana but both taste wonderful.


Although both varieties were great straight out of the bag, I also used them in this apple crumble. This is a quick dessert using apples, frozen berries, and instant oatmeal (I ran out of my usual long cooking oats). Quick. Simple. Delicious.


Ingredients
4-5 large apples, peeled and sliced  (1/4 inch)
1 cup mixed berries - frozen or fresh
juice of one lemon
2 tbsp rum
1 tbsp flour
1/4 - 1/3 cup brown sugar (depending on how tart apples and berries are)
1 tsp cinnamon
pinch of nutmeg


Topping
3 packs instant brown sugar oatmeal
1 tsp cinnamon
1/3 cup cold butter cut into small pieces


What to do
1. Preheat oven to 350 degrees.
2. Mix the first 8 ingredients in a 1.5 quart baking.
3. In another small bowl place topping ingredients together. With hands, quickly rub butter into oatmeal and cinnamon until crumbly.
4. Sprinkle over top of apple mixture.
5. Bake at 350 degrees for 30-40 minutes until juices bubbles and top browns.
6. Enjoy!

Thursday, July 8, 2010

Blueberry Cream Cheese Bars


I have been making these bars for quite a few years now. I think the original recipes came from Martha Stewart or maybe Gourmet but over the years I have made my own changes and additions. I often add pine nuts to the short bread crust and almond extract to the cream cheese filling. If you add pine nuts use up to 1/3 cup in the base. And don't feel bound to the blueberries - pretty much any jam or preserves you have will work in this decadent dessert bar.


Ingredients - Base
1 1/2 sticks (3/4 cup) unsalted butter
2 cups all-purpose flour
1/2 cup packed light brown sugar
1/2 teaspoon salt
1/3 cup toasted pine nuts (optional)


What to Do:
Preheat oven to 350°F.

1. Cut butter into smaller pieces.
2. In a food processor, pulse all ingredients until mixture begins to form small clumps.
3. Sprinkle mixture into a 13 x 9 x 2-inch baking pan and with a metal spatula or a flat bottom cup press evenly to flatten.
4. Bake shortbread in middle of oven until golden, about 20 minutes.

Note: While shortbread is baking, prepare topping.

Ingredients - Topping
16 oz (2 packs) cream cheese
3/4 cup berry sugar (or regular granulated)
2 eggs, large
1 tsp almond extract (can substitute vanilla, if desired)
1 cup blueberry jam


What to Do:
Preheat oven to 350°F.

1. In a bowl whisk cream cheese until smooth.
2. Whisk in eggs, sugar, and almond extract into the cream cheese.
3. Evenly spread jam over hot shortbread base and pour cream cheese mixture over it.
4. Bake until slightly puffy, about 30 minutes.
5. Cool completely in pan and cut into 24 bars.


Bar cookies keep, covered and chilled, 3 days.


Monday, April 26, 2010

Triple Threat Bars

Oooohs, aaaahs and mmmmmmms will be all that you hear from your friends and families when they bite into these oh-so-delicious layered bars.


I have been making these for years and the recipe is adapted from a recipe I found on a condensed milk can (Eagle Brand , I think). I call them "triple threats" because of the chocolate, peanut butter and caramel oozing from every bite of these decadent treats. They are not for anyone watching their waist line (well, unless you are watching it expand!) - butter, condensed milk, chocolate, caramel, peanut butter ... my mouth is watering ... definitely makes for a bit of a calorie nightmare but we all need a treat once in awhile! A small square or two is worth an extra workout this week. Don't you agree?


Triple Threat Bars


Ingredients
1/2 cup butter
1.5 cups graham cracker crumbs
2 cups coconut
1 can condensed milk (not evaporated milk)
3/4 cup peanut butter
1.5 cup milk chocolate chips
1 cup mini peanut butter cups
1 cup soft caramels (maybe 20 prepackaged caramels such as Kraft)

Method:
Preheat oven to 350 degrees.

1. Place butter in 9 x 13 pan and melt in oven.
2. Remove pan from oven.
3. Sprinkle graham wafer crumbs evenly in pan.
4. Sprinkle coconut evenly in pan.
5. Pour condensed milk evenly over coconut.
6. Place back in oven for 20-25 minutes until golden brown.
7. About 5 minutes before taking out pan, melt peanut butter and chocolate chips in small sauce pan over low heat. Stir constantly to prevent burning.
8. Pour peanut butter and chocolate mixture over hot base.
9.Cool 10 minutes and then sprinkle mini peanut butter cups and cut up caramels evenly over bars. If desired run a knife through caramels once they have had a few minutes to melt to spread out a bit.

Note:
I had made a batch of pistachio caramels that turned out too hard so I melted them down with a bit of cream and used them in this recipe. I'm sure premade soft caramels would work too - I would just cut them in half and sprinkle on top while still warm so they will melt. Dollups of ice cream sundae butterscotch would work if you are serving them on a plate as a dessert but the sauce would be a bit too messy if you were to serve them as a cookie bar meant to be picked up with your hands.


Enjoy!

Wednesday, January 27, 2010

Homemade Graham Crackers!

Have you ever thought about making graham crackers from scratch? Me neither, I assumed they grew in a box. With this recipe you will get amazing tasting graham crackers as long as you make them thin, if you make them thicker they are more like graham cookies - which is also a good thing (they are softer and great in milk!) This recipe is the base for the nanaimo recipe found here.


From graham crackers nanaimo bars
I recommend trying this treat - it's fun to say you've made graham crackers from scratch because I can guarantee not many others have!

Ingredients:
2 1/2 cups plus 2 tablespoons all-purpose flour
1 cup brown sugar, lightly packed
1 teaspoon baking soda
3/4 teaspoon salt
7 tablespoons frozen unsalted butter, cut into 1-inch cubes
1/3 cup mild-flavored honey
5 tablespoons milk
2 tablespoons pure vanilla extract

For the topping:

3 tablespoons sugar
1 teaspoon cinnamon

What to do:
Adjust the oven rack to the upper and lower positions and preheat the oven to 350 degrees.

Combine the flour, brown sugar, baking soda, and salt in a food processor with steel blade . Pulse or mix on low to mix. Add the butter and pulse on and off until the butter mixture is the consistency of a coarse meal.
In a small bowl, whisk together the honey, milk, and vanilla extract. Add to the flour mixture in the processor and pulse until the dough barely comes together into a sticky ball. It will be very soft and sticky.

Take half of dough and turn the dough out onto a plastic wrap. Gently fold over wrap and shape into rectangle. Repeat with other half of dough. Chill until firm, about 2 hours or overnight.
To prepare the topping: In a small bowl, combine the sugar and cinnamon, and set aside.

Take one wrapped portion of dough. Sift an even layer of flour onto the work surface and roll the dough into a long rectangle about 1/8 inch thick (approx 16 inches long). Trim the edges of the rectangle to 4 inches wide. Working with the shorter side of the rectangle parallel to the work surface, cut the strip every 4 inches to make 4 crackers.

Mark a vertical line down the middle of each cracker, being careful not to cut through the dough. Using a fork, prick the dough to form two dotted rows on each side of the dividing line. Place the crackers on parchment-lined baking sheets and sprinkle with the topping.

From graham crackers nanaimo bars


From graham crackers nanaimo bars

Chill until firm, about 30 to 45 minutes. Repeat with the second batch of dough.

Within the kitchen BIG Tip: This is much easier if you use a silpat. You can flour and roll the dough on the silpat. Carefully divide the dough into squares as described – be careful with knife – do not cut through the silpat! Using silpat method you can then just move entire silpat onto baking sheet and move to fridge.

From graham crackers nanaimo bars

Bake for 25 minutes, until browned and slightly firm to the tough, rotating the sheets halfway through to ensure even baking.

Yield: 8 large crackers (original recipe says 10 – I didn’t bother keeping scraps as dough is not easy to work with).

From graham crackers nanaimo bars

From graham crackers nanaimo bars

Based on http://www.101cookbooks.com/archives/000126.html and Nancy Silverton's Pastries from the La Brea Bakery (Villard, 2000)

Nanaimo Bars - A Canadian Tradition


From graham crackers nanaimo bars
The January 2010 Daring Bakers’ challenge was hosted by Lauren of Celiac Teen. Lauren chose Gluten-Free Graham Wafers and Nanaimo Bars as the challenge for the month. The sources she based her recipe on are 101 Cookbooks and http://www.nanaimo.ca/.

From graham crackers nanaimo bars


This challenge is a great way to celebrate Canada and the upcoming Vancouver Olympics! And being a West Coast Canadian I had to take up this challenge (I chose to make regular flour crackers).

Nanaimo Bars are a part of Canadiana - every child knows what it is and most have had the sweet three layer bar many times. Chocolate, coconut, nuts, butter cream and chocolate have caused sugar highs in many Canadian kids and adults alike. I don't remember eating my first nanaimo bar but they were always on the table at any special occasion. I've never made nanaimo bars from scratch (including making my own graham crackers) so this was a baking first in my tiny kitchen.

From graham crackers nanaimo bars


The results were fantastic and soooo much better than store bought which are often too sweet. This recipe produces a nutty and chocolatey base, with a not-too-sweet filling and a dark chocolate finish. I made them yesterday and there is one left....as soon as I finish typing there will be none :)

They are named after the City of Nanaimo located on Vancouver Island. In 1986, Nanaimo Mayor Graeme Roberts, in conjunction with Harbour Park Mall, initiated a contest to find the ultimate Nanaimo Bar Recipe. During the four-week long contest, almost 100 different variations of the famous confection were submitted. The winner: Joyce Hardcastle. This is the recipe:
Nanaimo Bar Recipe

Bottom Layer

½ cup unsalted butter (European style cultured)
¼ cup sugar
5 tbsp. cocoa
1 egg beaten
1 ¼ cups graham wafer crumbs (see here for homemade recipe crackers!)
½ c. finely chopped almonds (I used raw skin on almonds)
1 cup coconut (I used unsweetened desiccated coconut)

What to do:
Melt first 3 ingredients in top of double boiler. Add egg and whisk to cook and thicken.You know it is done when it resembles pudding. Remove from heat. Stir in crumbs, coconut, and nuts. Press firmly into an ungreased 8" x 8" pan. Refrigerate for 15 minutes or more minutes.

Second Layer

½ cup unsalted butter
2 Tbsp. and 2 Tsp. cream (I used whipping cream but I have recipes that call for milk)
2 Tbsp. vanilla custard powder (if you live in Canada or have access to it, you must use Bird's brand for authentic taste!)
2 cups icing sugar
Cream butter, cream, custard powder, and icing sugar together well. Beat until light. Spread over bottom layer.

Note: See the little offset spatula in the picture??  I got tonnes of grief from hubby about buying yet another kitchen utensil... "when will you ever use that thing??" The answer: Yesterday! My other spatulas were too big for the pan. Love it when I am right!

From graham crackers nanaimo bars


From graham crackers nanaimo bars

Third Layer

4 squares semi-sweet chocolate (1 oz. each) - I used dark Nestle chocolate - great when you don't want something too sweet but you want deep chocolate flavour!
2 Tbsp. unsalted butter

Note: If you want a slightly thicker layer 2 more ounces of chocolate can be added along with 1 additional tbsp of butter.

Melt chocolate and butter overlow heat. Cool. Once cool (luke warm is ok - especially if you refrigerate the other two layers first) , but still liquid, pour over second layer and chill in refrigerator.

From graham crackers nanaimo bars


From graham crackers nanaimo bars

From graham crackers nanaimo bars

From graham crackers nanaimo bars

From graham crackers nanaimo bars

Within the Kitchen Tip:
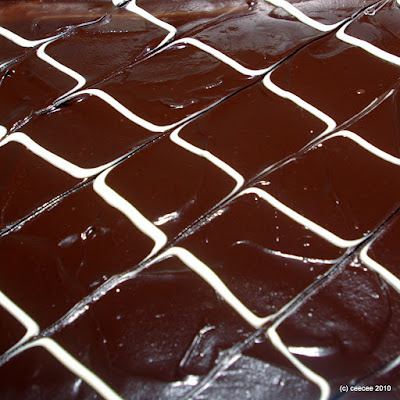
To make the white chocolate design melt 2 ounces of white chocolate. Place in ziploc bag and cut off small part of bottom tip of bag. Make diagonal lines across pan as shown. Using a toothpick drag one end of it through chocolate and then alternate direction and pull through again, wiping the toothpick in between each.

Extra info:
Information on Vancouver 2010 click here.
This video of Vancouver is amazing and a taste of what you will experience is you are coming for the Olympics!