Showing posts with label snacks. Show all posts

Saturday, January 16, 2016

Mango Blueberry No Nut Granola Recipe

www.withinthekitchen.blogspot.com


Every few months I make a batch of granola. The kids eat it with yogurt or milk. They also love taking it to school as a snack at recess. For this reason, I make it nut free.

This time I used coconut oil. At room temperature, it is solid but as soon as it hits 76 degrees it will begin to liquefy. By heating the oils and the spices, the spices bloom and their flavors and aromas are released. Your kitchen will smell great!
www.withinthekitchen.blogspot.com

This makes a big batch of granola so I usually distribute half of it into small snack bags so they are ready for lunch boxes or snacking at anytime. The other half of the batch goes into a big container that we keep on the counter for easy kid-access!

Note about coconuts from this Health Canada site: A coconut is a seed of a fruit and nutmeg is obtained from the seeds of a tropical tree. Coconut and nutmeg are not considered tree nuts for the purposed of food allergen labeling in Canada and are not usually restricted from the diet of someone allergic to tree nuts. However, some people have reacted to coconut and nutmeg. If you are worried, consult your allergist before trying coconut or nutmeg products. 

I also make sure anyone who eats it knows there is coconut oil in it.


Ingredients

1/4 cup canola oil
3/4 cup coconut oil
1 c maple syrup
2 tsp vanilla
1 tbsp cinnamon
1 tsp ground nutmeg
1 tsp cardamon
1 tsp salt
8 cups rolled oats
1 cup wheat germ
1 cup wheat bran
1 cup milled flax
3/4 cup dried blueberries
1 cup dried mango, chopped

Optional
1/2 tsp fleur de sel

Instructions

  1. Preheat oven to 325 degrees F.
  2. In medium sized pot combine oils, maple syrup,vanilla, cinnamon, nutmeg, and cardamom.
  3. Stir over medium-low heat until just simmering and remove from heat. Watch carefully and be careful not to burn yourself.
  4. Combine oats, wheat germ, bran and flax with salt.
  5. Pour oil mixture over oats and stir until well combined.
  6. Spread granola on two large cookie sheets.
  7. Bake for 30-40 minutes until golden. While baking, stir granola every ten minutes to ensure even baking.
  8. Remove from oven.
  9. If desired, add sprinkle of 1/2 tsp fleur de sel. 
  10. Cool completely.
  11. Place in large bowl.
  12. Add dried fruits and combine.
  13. Store in air tight containers.
www.withinthekitchen.blogspot.com

www.withinthekitchen.blogspot.com
Enjoy!

Thursday, September 10, 2015

Back to School Lunchs and Snacks Ideas

I've been thinking about lunch and snacks for the kids now that school is back in session. I'm sharing a few of my thoughts  below.
  • There are some incredibly talented parents out there that can create amazing bento box lunches. I'm not one of them - no time, no talent. I want healthy, easy to prepare food that my kids will actually EAT - not just a bite. I want it gone. Let me tell you, it doesn't happen often. Having said that, I do find that my kids often like little bits and bites of things for lunch - a few veggies sticks, a few crackers, a couple pieces of meat and a piece of fruit often sees great results. But of course, they go through phases - sandwiches and only sandwiches, absolutely no sandwiches, only hot dishes, o ly cold dishes...blah blah blah. If they make it themselves, they can go for it. If I make it..well, sometimes they get what they want and sometimes they don't.
  • Don't forget that left overs are some of your best friends! Any casserole can make a hot lunch the next day. BBQ chicken (or most other meats) can be transformed into a pasta salad, sandwich or fried rice for a relatively easy next day lunch.
  • Kids usually eat fast...they want to get out and play. Keep it simple, easy to eat. Most importantly give them things they will actually eat - who loves finding a lunch full of uneaten food??? If they are coming home with 1/2 of it eaten - give them less for a week and see if they are satisfied.
  • Try to have things they can choose from - feeling they have control over what goes in their lunch box may decrease the amount of uneaten food that comes back home.
  • This will also free up a bit of time for you in the morning - and who doesn't need a couple of extra minutes! Of course this depends on the age of your children and their level of maturity.


  • I'm always on the look out for new products the kids might enjoy. Over the summer, I was fortunate enough to be sent Litehouse's new Opadipity dips to try. They come in sweet and savory flavours including creamy ranch, cucumber dill, spinach parmesan, creamy cheesecake, strawberry delight and vanilla almond. We love them - they are also gluten free and have no preservatives! 
  • If you're kids like to dip fruits and veggies, I recommend giving them a try. I portion the dips out into small containers so the kids can pick their favorite dip, precut veggies/fruit or breadsticks for a school snack or lunch.


I'm always looking for new lunch and snack ideas, here are a few of mine:


  • Peanut free ideas - look here.
  • no nut granola
  • hard boiled eggs
  • homemade muffins
  • cereal and yogurt (separate containers)
  • Fruit - our favorites
    • canteloupe
    • apples
    • apple sauce
    • grapes (cut if required)
    • strawberries
  • Veggies - our favorites
    • carrots
    • celery
    • fennel
    • peppers
    • broccoli
    • cauliflower
  • chicken
  • tuna
  • salmon
  • hardboiled eggs
  • rice
  • seaweed
  • leftovers including cold pizza and pasta
  • pita
  • bagels
  • breadsticks
  • cheesesticks
  • pre portioned dips
  • granola bars
  • wagon wheels
  • fish crackers
  • homemade rice krispies


Monday, September 29, 2014

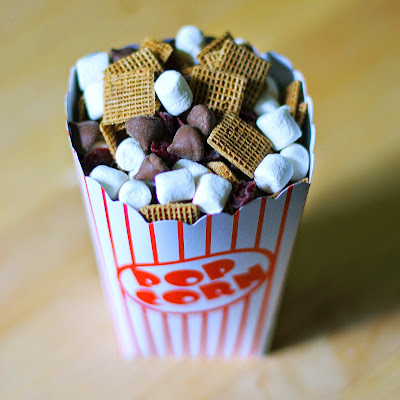
S'more Snacks Recipe

www.withinthekitchen.blogspot.com
My son's snack mix was such a hit in our house my 10 yr old daughter decided to get in on the act too. Her's is more of a treat than a healthy snack but the cereal is low in sugar, fat and salt so that makes me feel a little better about it!
www.withinthekitchen.blogspot.com
She chose a classic s'more mix - chocolate, mini marshmallows and Shreddie(tm) cereal. She threw in some sweetened dried cranberries too.
www.withinthekitchen.blogspot.com

Ingredients

6 cups cereal - we used Shreddies
2 cups (1 bag) mini Hershey Kisses
2 cups mini marshmallows
1 cup sweetened dried cranberries

Instructions

Mix everything in a large bowl.
Divide into snack bags - 1/2 c of mix in each bag.
Servings: about 12.

Saturday, August 30, 2014

School Snack Mix

www.withinthekitchen.blogspot.com


My kids are old enough to make most of their own lunches. They can reheat leftovers for their Thermos and usually make their own sandwiches. For snacks, we keep a big bowl of treats that they can choose to go along with whatever fruit or veggies they pack. The bowl has a mix of prepackaged treats like granola bars and krispie treats but we also have homemade goodies too. These homemade treats might be healthy muffins, nut-free granola or my son's homemade cereal mix. The one I'm sharing today has pumpkin seeds, cereal, dehydrated raspberries, dried cranberries and mini Hersey kisses. My 8-year old loves putting everything into a big mixing bowl, swirling it around and placing scoops of the mix into snack size bags.

www.withinthekitchen.blogspot.com

Anything could go into your version of the mix. Other ideas my kids have come up with include:
  • flax
  • chia
  • hemp seeds
  • bran buds
  • raisins
  • sunflower seeds
  • nuts (unless you have a nut free school)
  • dried apricots
  • oats
  • granola
  • your favorite cereal
This really doesn't need a recipe but here are the proportions we used for our School Snack Mix.

Ingredients

4 cups cereal (we used Chex)
1/2 cup roasted pumpkin seeds
1/2 mini Hershey Kisses (or other chip)
1/2 cup dried cranberries
1 cup dehydrated raspberries (ours are from Trader Joe's)

Instructions

Place everything in a big bowl and gently mix.
Scoop into reusable containers or resealable snack bags.

How many portions you get will depend on size of scoops. Ours made 8 snack sized bags.

www.withinthekitchen.blogspot.com

Wednesday, July 9, 2014

Refrigerator Raisin Bran Muffins


Versions of this recipe have been around for decades. The great thing about it is you can keep the batter in your fridge and bake up a fresh batch in the mornings for breakfast or after school for snacks. I've read you can keep it for up to 6 weeks! 

While I haven't tested that, I doubt they'd last that long just because they are sooo delicious and moist! To be honest, I usually bake up the whole batch and throw them in the freezer so we can grab these muffins anytime we're running out the door. They don't take long to thaw and are much healthier than a store bought muffin or processed snack.

This recipe is also pretty forgiving in terms of ingredients...if you don't have bran flakes, use bran buds or fibre cereal. If you don't have whole wheat pastry flour you can substitute all purpose (though you'll lose some fibre content). The batter will also thicken as it stands so if you do keep it in the fridge expect it to go from almost liquid to very thick. Finally, sometimes I make these in mini muffin tins - they take about 12-15 minutes to bake. 

This recipe will make about 4 dozen muffins! If you use dark colored muffin tins you might want to reduce your oven temperature to 350 degrees or watch carefully as they may brown a bit faster than a normal tin.

Ingredients

2 c boiling water
2 c wheat bran
2 c raisins
3 c whole wheat pastry flour
1 tbsp cinnamon
3 tbsp baking soda
1 tsp salt
1-1/2 c all purpose flour
1/2 c wheat germ
4 eggs
1-1/2 c brown sugar
1 c vegetable oil
1/4 c molasses
4 c buttermilk
4 c bran flakes

Instructions


  1. Preheat oven to 375 degrees F. Spray muffins tins with baking spray.
  2. In medium bowl, add bran and raisins. Carefully add boiling water over them.
  3. In a very big bowl whisk the eggs.
  4. Whisk in the brown sugar.
  5. Add the oil, molasses, and buttermilk. Whisk until well combined.
  6. In another large bowl, whisk flours, wheat germ, baking soda, cinnamon and salt.
  7. Add the flour mixture to the buttermilk bowl. Gently whisk together. It will look lumpy but will come together. It will be very liquidy!
  8. Stir in the bran mixture.
  9. Add the bran flakes and combine. It will look very wet.
  10. Fill muffins tins 2/3 full.
  11. Bake for 20-25 minutes.


Monday, April 21, 2014

Cherry Surprise Honey Muffins


My son requested these muffins - I think he's a little bit sick of my chocolate avocado muffins that I've been making for weeks! I forgot how good these cherry surprise honey muffins are...so moist and the honey really adds a wonderful touch of flavor to these treats.

Makes 12 muffins.

Ingredients

3/4 cup rolled oats
1/2 cup honey
1/4 cup brown sugar 
2 eggs
1/3 cup vegetable oil
1 tsp vanilla
1-1/4 cups whole wheat pastry flour (all purpose can be substituted)
1 tsp baking powder
1/2 tsp baking soda
1/2 tsp salt
1/2 cup plain yogourt
1 tsp cinnamon
1/2 c cherry jam

Instructions


  1. Preheat oven to 350 degrees F.
  2. On medium low heat combine honey, oats, cinnamon, and vanilla. Heat until honey is warm. Remove from heat.
  3. In large mixing bowl beat together sugar, eggs and oil on medium high speed until well combined.
  4. In small bowl whisk together flour, baking soda, baking powder and salt.
  5. Add half the flour mixture to the egg bowl and stir on low speed until just combined. 
  6. Add the yogurt and mix again. 
  7. Add the oat mixture and stir. 
  8. Add the last of the flour. Stir just until combined.
  9. Fill muffin tin about 1/2 way with batter.
  10. Add a tsp or so of cherry jam in the middle of each tin.
  11. Cover with a bit more batter.
  12. Bake for 15-17 minutes until golden and tooth pick test comes out clean.
  13. Cool for ten minutes in tins and then remove muffins from tins and cool completely on wire rack.