Showing posts with label how to. Show all posts

Tuesday, December 31, 2013

How to get pomegranate seeds out without turning red!


withinthekitchen.blogspot.com

Aren't pomegranates beautiful? The pretty red skin holds hundreds of little ruby red jewels of juicy goodness that are perfect for salads, yogourt add-ins and smoothies. They also hold lots of vitamins C, K and B5 as well as iron and fibre. The problem with this delicious fruit is, of course, releasing the seeds without turning your kitchen and your clothes red!

Although there are a few ways to get the seeds out, the one I use involves a bowl, some water, and a little elbow grease.

First, I fill a large bowl with water and place it in the bottom of the sink. Then I place a few paper towels on a cutting board. I cut off the pomegranate in half. The paper towels will soak up any drops of juice that may escape. Note: Some people just take off an inch or so of the bottom of the fruit and then score it and proceed. This will produce even less of a mess but I am not that patient!

Then place the pomegranate in the bowl of water and gently break apart the fruit.

The seeds will sink to the bottom while the white membranes float to the top. Most importantly, your hands will not turn red! Scoop out the membranes and outer skin. Gently run your fingers through the seeds and remove any membrane pieces that are still attached to the seeds. Drain the water, place the seeds in a container and refrigerate until needed.


Pomegranate season in North America ends in January so get them while you can!


Wednesday, December 11, 2013

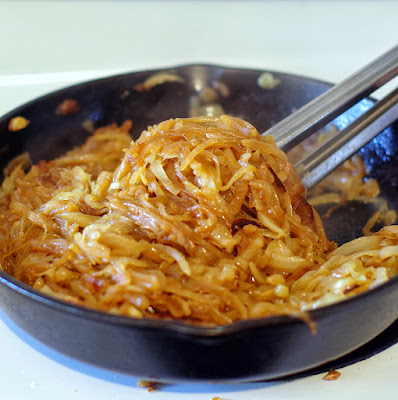
How to caramelize onions


http://withinthekitchen.blogspot.ca/2013/12/how-to-carmelize-onions.html
Caramelized onions


Caramelized onions are one of my favorite condiments/side dishes! They go with almost everything - pulled pork, baked beans, grilled cheese, chilli, and are amazing by themselves or on a piece of toast. I LOVE them.

But let's face it - they are a lot of work. Cutting those tear inducing veggies into thins slices is no easy task. And as they caramelize those suckers shrink so you need many onions! A few weeks ago I bought a hand-held mandoline and I have to say it makes slicing much easier (just try not to cut off a finger). Whenever I make these morsels of delightfulness I make a BIG batch and freeze them in smaller portions. I know some people think the flavour and texture of the onions is negatively effected by freezing but either they have waaay better taste buds than I do or they are full of poppycock.

Just remember to have patience. I don't add balsamic vinegar or sugar to these beauties - I just go slow and let nature take its course. I do use a cast iron pan most of the time because it produces a better colour and seems to take a little less time. Finally, I prefer using yellow onions not walla walla or sweet onions - I think the yellow variety ends up with the best flavour.
Mandoline makes slicing easier and less teary!

Mmmm


So good!

Ingredients

8-10 medium yellow onions
2 tbsp unsalted butter
1 tbsp olive oil
sprinkle or two of salt

Instructions

Makes about 3 cups.
  1. Over medium heat melt butter and oil. 
  2. As soon as it starts to sizzle, add the onions. 
  3. Stir frequently.Once the onions begin to brown turn heat to low. Stir frequently. 
  4. Onions will slowly caramelize over the next 30-45 minutes. It takes time but it is worth it.


Tuesday, March 13, 2012

How to make pickled onions


I first tasted pickled onions when they were offered as a condiment at my favorite taco place. They were divine and I set out to make my own. As it turns out, it is super simple to whip a batch. I use balsalmic vinegars but red wine vinegar will also work. And if you don't have chili sauce don't worry about it -the addition of the sauce just add a bit of kick to it. 
Cut onions as thinly as possible.
These will be fine in your fridge for a couple of weeks but I doubt they will last that long!

So many uses:
  • tacos
  • sandwiches
  • salads
  • out of the container
  • as a condiment with meat

Ingredients
2 medium to large red onions
1 cup white sugar
3/4 cup white basalmic vinegar
1/4 cup red basalmic vinegar
1 tsp sriracha sauce or other hot sauce
1/4 tsp salt
1/2 fresh ground pepper

What to do
  • Cut onions in half and slice as thinly as possible.
  • Over medium heat, stir vinegars, sugar, hot sauce, salt, and pepper until sugar is dissolved.
  • Bring to a simmer and add onions.
  • Bring back to simmer and immediately remove from heat.
  • Cool.
  • Place in container and refrigerate overnight.


Sunday, January 16, 2011

How to Make Ricotta Cheese


I love ricotta cheese - on bread, mixed with chocolate, sprinkled with herbs, in lasagna, in a lemon tart...ricotta is so versatile and delicious. But for most of us ricotta comes from a tub that we buy in our local grocery store. Some of us are lucky enough to buy fresh ricotta from specialty stores. But have you ever thought to make your own fresh ricotta at home? Why not? It's easy, fast and your taste buds will thank you.

You will need cheesecloth and colander.

Ingredients
4 cups 1% milk (or 2% or whole)
2 cups whipping or heavy cream
1/2 tsp salt
3 tbsp white wine vinegar

What to do
  1. Dampen cheesecloth and line a colander with it.
  2. Place colander over a large bowl.
  3. In a large sauce pan, bring the milk, cream and salt to a boil over medium heat. Stirring often to prevent burning.
  4. Take off heat and add vinegar.
  5. Let rest 2 minutes while mixture separates.
  6. Pour mixture into colander.
  7. Wait 30 minutes while liquid drains into bowl. You may want to run a spoon through it a couple of times to let the liquid escape.
  8. Use immediately or place in air tight container and refrigerate for up to 3 days.