Wednesday, May 12, 2021

Simple Caramel Corn

www.withinthekitchen.blogspot.com

www.withinthekitchen.blogspot.com

www.withinthekitchen.blogspot.com
We made this for Superbowl 49! Go Seattle Seahawks!

www.withinthekitchen.blogspot.com
Watch the temperature!

www.withinthekitchen.blogspot.com
Mix it well.

www.withinthekitchen.blogspot.com
Add chocolate!


Ingredients

12-14 cups popcorn (popped)

1/2 c + 2 tbsp unsalted butter
1/3 cup corn syrup
1-1/4 cup golden brown sugar
1/2 tsp kosher salt
1/4 tsp baking soda
1 tsp vanilla

1 tsp kosher or maldon flake salt

1 cup chocolate or candy coating

Instructions

  • Put your popped popcorn in a very large bowl.
  • Preheated oven to 250 degrees F.
  • In a medium sauce pan, melt butter on low heat.
  • Add salt, sugar and syrup. Stir well until sugar melts into mixture.
  • Attach candy thermometer to the side of the pan.
  • Turn heat to medium high and bring to boil. DO NOT STIR.
  • Carefully, watch the thermometer. as soon as it reaches 248 degrees remove pot from heat.
  • Quickly stir in baking soda and vanilla. Stir well. The caramel will lighten in color a smidge.
  • Immediately, pour caramel on top of popcorn. Stir so popcorn is well coated. Be careful! It's hot and can burn!
  • Transfer popcorn onto large cookie sheet (2 if needed).
  • Place in oven for 45 minutes. Stir a couple of times.
  • Take out of oven and immediately sprinkle 1 tsp of salt.
  • Place on cooling rack and cool completely.
  • If desired melt candy according to directions and drizzle over cooled caramel corn.
  • If using dark chocolate, melt in double broiler and drizzle.

Caramel corn should last a week, if stored in an airtight container. Trust me - it won't last that long!

Saturday, July 23, 2016

Easy Blueberry Freezer Jam

withinthekitchen.blogspot.com

Anyone with a free 20 minutes can make freezer jam. What's so great about freezer jam?
- quick
- easy
- tastes fresher and fruity than regular jam
- freezes well
- makes great gifts
- less sugar than traditional jam
- great activity for kids

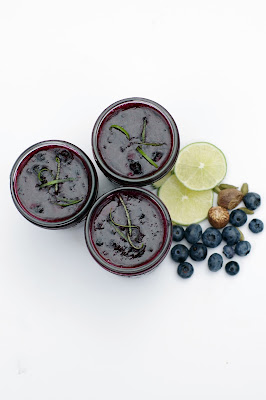
Right now is blueberry season in Vancouver - I picked up 20lbs (that's right 20lbs!) of these plump and delicious berries last week. We froze a few pounds for winter smoothies and then went into cook/bake mode - sweet fruity, and buttery aromas were filling our kitchen thanks to hours of making  jams, crumbles, pies and cakes.

Today, I'm sharing the freezer jam the kids and I mixed up. Normally, I don't cook the fruit I use in freezer jam but in the case of blueberries a little bit of cooking softens the berry skins and brightens the flavour of the blueberries. Luckily, it only adds a few minutes to the process. 

If you don't like the spices I used or even the lime, just leave them out and you'll have pure, unadulterated blueberry flavour. The jams will last in the fridge for 3 or 4 weeks or place them in the freezer for up to a year.

To crush the berries, I pulse them a few times in my food processor - you want them chunky but broken down a bit.

Special equipment: 4 - 1 cup glass or plastic jars.

Ingredients

4 cups crushed blueberries (about 4-1/2 cups before crushing)
1 package freezer pectin (I use Bernadin pectin)
1-1/2 cup granulated sugar
zest of half a lime
juice of half a lime
1/2 teaspoon cardamom
1/2 teaspoon nutmeg

Instructions

  1. Place berries in pan over medium heat.
  2. Bring to a boil and remove from heat.
  3. In a large bowl, mix together pectin, sugar and spices.
  4. Add berries and lime juice and zest and stir for 3 minutes.
  5. Divide among containers and let sit for 30 minutes to thicken.
  6. Cover and refrigerate or freeze.

withinthekitchen.blogspot.com

withinthekitchen.blogspot.com

Monday, July 11, 2016

Beef Chili Cobbler


Beef Chili Cobbler

This dish is a huge hit in my house. The chili is delicious and, of course, can be tweaked to whatever you like - more spices, different spices, heck even taco seasoning tastes great in it. The biscuits are from Greg Henry's 'Savory Pies' which I reviewed here. You can substitute a different cheese if you like. As you can see, this is quite a versatile dish. 

You can make this dish ahead of time (in the morning or a day ahead). Make the chili, cool and refrigerate (I usually place it in another dish). Make the biscuit dough and refrigerate. I warm the chili first in the pan and continue as directed. 

Special Equipment: 12-inch cast iron pan

Ingredients


Chili
2 lbs ground beef
1 tsp salt
1 tsp ground pepper
1 medium onion, diced
1 poblano pepper, diced
1/2 jalapeno, diced
6 white mushrooms, diced
6 garlic cloves, crushed
2 tsp ground cumin
1/2 tsp chili powder
1 tsp smoked paprika
1 red pepper
1 14 oz can black beans, drained
2 cups beef broth
1 1/2 cups tomato sauce


Cobbler
1-1/4 cups flour
1/2 cup corn meal
1/2 tsp salt
1 tsp baking powder
1 tsp baking soda
1 cup grated parmesan
6 tablespoons cold butter, cut into on inch pieces
1-1/4 cups 2% milk

Instructions

Preheat oven to 375 degrees F.

Chili

  1. In the 12-inch cast iron pan, sautee ground beef with salt and pepper over medium-high heat to brown meat. This will take 7-10 minutes.
  2. Add onions, poblano, jalapeno, pepper, mushrooms, cumin, chili powder, paprika, and garlic. Sautee for about 5 minutes.
  3. Add beans, beef broth and tomato sauce.
  4. Simmer for 15 minutes.


Cobbler
  1. Add flour cornmeal, salt, and baking powder to the bowl of a food processor. Pulse 10 times to combine.
  2. Add butter, a piece at a time, and pulse until mixture has a sandy appearance.
  3. Add parmesan and pulse another few times to combine.
  4. Add milk and combine on medium-low speed until  coarse dough forms.


Putting it together
  1. Drop batter by the tablespoon or from an 2 inch ice cream scoop onto the chili (about 14 drops).
  2. Place the pan on a baking sheet to catch any overflow and insert into the oven for approximately 25 minutes (mixture is bubbly and cobbler is golden brown).


Wednesday, April 20, 2016

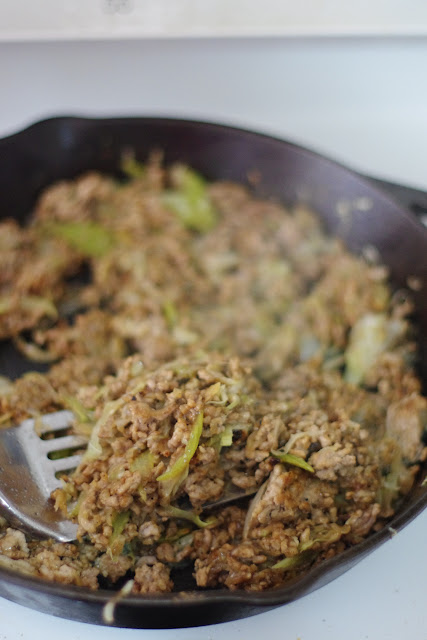
Baked Halifax Meat Egg Rolls

www.withinthekitchen.blogspot.com
Growing up in Halifax, Nova Scotia I was lucky enough to experience many amazing gastronomical creations that were not available elsewhere. My three top food items were:

  • Moon Mist Ice Cream - a combination of grape, banana and bubblegum flavours - the day I recently found out that Save-on-Foods carries it way out here in Vancouver was a very happy day indeed!!!!
  • Donairs - Halifax has the BEST donairs in the world. I miss them. I read that King of Donairs is expanding west. I hold out hope that some day they will open a shop out here on the west coast. 
  • Meat Egg rolls - Here is something that I have never found outside of Halifax - egg rolls made from a meat paste. No visible veggies, just meat. They are more flat than round and they are soooo good. Below is a recipe that is as close as I can come up with (based on a compilation of other recipes) to the memories of my childhood. Any other Haligonians out there missing their childhood egg rolls?


Makes 10 egg rolls.
Time: 40 minutes (20 prep; 20 bake)

Ingredients

1 lb ground pork
1 medium onion, diced
2 stalks celery, diced
1 cup shredded green cabbage
1 tsp salt
1 tsp ground pepper
1 tsp sesame oil
1 tbsp vegetable oil
2 tsp Chinese five spice powder
2 tbsp cornstarch
1-1/2 tbsp reduced sodium soy sauce
2 tbsp warm water
1 tsp garlic, chopped
10 egg roll wrappers

extra oil for brushing

Instructions

  1. Preheat oven to 400 degrees F.
  2. Heat large pan over medium high heat and and oils.
  3. Add pork, salt, pepper, and onions. Brown pork until cooked through – about 10 minutes.
  4. Add celery, cabbage, and five spice powder and cook until vegetables are soft – about 5 minutes.
  5. In a small, bowl combine cornstarch, soy sauce and water.
  6. Add to pan along with garlic, cook for 2 minutes.
  7. Take off heat.
  8. Place pork mixture in food processor and pulse until a smooth paste is formed.
  9. Place 3-4 tbsp of meat mixture in the middle of an eggroll wrapper.
  10. Brush beaten egg along the outside of the wrapper (about an inch wide).
  11. Fold one end of the wrapper over the long side of the mixture and press down. Then fold the other long side over that (like an envelope fold). Don’t make them too tight – they might burst.
  12. Fold the ends over about half an inch – all seams should be on one side of the egg roll. If they don’t stick you can add a bit more egg wash to make ends stick.
  13. Brush oil over both sides of egg roll and place on baking pan, seam side down.
  14. Bake for twenty minutes, flipping at 10 minutes.
  15. Serve with plum sauce or for something different serve with mango chutney!
www.withinthekitchen.blogspot.com

Thursday, April 7, 2016

S'more Tarts - A Grown Up Treat

www.withinthekitchen.blogspot.com

I love s'mores! Who doesn't, right? But sadly, we don't have access to a roaring campfire all that often. These individual tarts are a great way to bring back the s'more feeling when you can't make it outside (and bonus you can avoid all the smoke and ash of a real camp out).

This sour cream ganache has a tart/sharp flavour to it and is very rich! I think you could serve two people with one individual tart, if desired.

Makes 4, four inch tarts.

Crust

1-1/4 c graham crackers
1/4 c coconut
1/2 c unsalted butter, melted

Instructions

  1. Combine all three ingredients in a mixing bowl. 
  2. Remove two tablespoons of crumb mixture and set aside.
  3. Press into 4 mini tart pans (10cm/4 inches each) - as compactly as possible.
  4. Refrigerate for at least 20 minutes.

Ganache


1 cup full fat sour cream at room temperature
210 grams dark chocolate, broken into small pieces

Instructions

  1. Melt chocolate in double broiler.
  2. Take off heat and stir in sour cream until smooth.

Instructions - final steps


  1. Spoon ganache into graham tarts and smooth.
  2. Place mini marshmallows over ganache to cover tarts.
  3. Set oven to broil with rack about 4 inches from burner.
  4. Place all tarts on a rimmed baking pan and place under broiler. 
  5. Carefully watch until marshmallows are golden brown. You may have to remove individual tarts if you find some browning faster than others.
  6. If desired, drizzle with melted chocolate and sprinkle with left over crumbs.
  7. Can be left covered at room temperature for up to 6 hours.

www.withinthekitchen.blogspot.com
Too many marshmallows? Never!
www.withinthekitchen.blogspot.com

www.withinthekitchen.blogspot.com
Decadence at its best!
www.withinthekitchen.blogspot.com

Thursday, March 31, 2016

Hummus and Kale Salad Recipe

www.withinthekitchen.blogspot.com

Remember when everyone was in love with kale?? Well, honestly I did not jump on the bandwagon because I just didn't like it even though I wanted too. But I didn't like it raw, I didn't like it steamed, or stir-fried or baked.
And then the love fest with kale seemed to die down a bit.

Jim Gaffigan and kale:


Of course, that's when I finally found a kale dish I like, no, love.

One afternoon while walking on Granville Street and spending too much money and time shopping, I realized I was hungry. Hungry to the point of not caring what I ate. I grabbed a salad at a specialty grocery store without really looking.....turned out it was a hummus and kale salad.

Obviously, I didn't expect to like it but thought it would take care of my hunger and then figured I'd grab a coffee to cover the kale aftertaste. Except, I liked the salad. Mind blown. Today, I made my own simple version - chopped kale mixed with my favorite commercially made hummus. It's great on its own or with grilled chicken thrown in. Simple. Delicious.

PS - bonus -  kale is such a sturdy green that this salad will last 2 days in the fridge before it wilts!

Serves four as a side dish.

Ingredients

1 bunch green kale, chopped small
1 cup hummus
1/2 red pepper, chopped
2 green onions, chopped

Instructions

In a large bowl, mix the kale and hummus together.
Add red pepper and onions. Mix.


www.withnthekitchen.blogspot.com