Pages

Tuesday, December 31, 2013

How to get pomegranate seeds out without turning red!


withinthekitchen.blogspot.com

Aren't pomegranates beautiful? The pretty red skin holds hundreds of little ruby red jewels of juicy goodness that are perfect for salads, yogourt add-ins and smoothies. They also hold lots of vitamins C, K and B5 as well as iron and fibre. The problem with this delicious fruit is, of course, releasing the seeds without turning your kitchen and your clothes red!

Although there are a few ways to get the seeds out, the one I use involves a bowl, some water, and a little elbow grease.

First, I fill a large bowl with water and place it in the bottom of the sink. Then I place a few paper towels on a cutting board. I cut off the pomegranate in half. The paper towels will soak up any drops of juice that may escape. Note: Some people just take off an inch or so of the bottom of the fruit and then score it and proceed. This will produce even less of a mess but I am not that patient!

Then place the pomegranate in the bowl of water and gently break apart the fruit.

The seeds will sink to the bottom while the white membranes float to the top. Most importantly, your hands will not turn red! Scoop out the membranes and outer skin. Gently run your fingers through the seeds and remove any membrane pieces that are still attached to the seeds. Drain the water, place the seeds in a container and refrigerate until needed.


Pomegranate season in North America ends in January so get them while you can!


Thursday, December 26, 2013

Pastry wrapped Brie stuffed with caramelized onions


www.withinthekitchen.blogspot.com

This appetizer gets me more compliments than anything I have ever made. EVER. It's that good. But more importantly, it's easy. Well, ok, caramelizing the onions taking a bit of time but it's not complicated. Check out how to caramelize onions here. The great thing about brie and puff pastry is that you can add pretty much anything and it will be delicious. Jams, sauces, nuts, fruit will all work. You can serve it with bread, like I did here, or use crackers - heck a spoon will work too! In the pictures I added more onions and I love baking it in a cast iron pan because I can serve it in the pan. Let the cheese sit once once you take it out of the oven so it gets ooey and gooey.

withinthekitchen.blogspot.com


Ingredients

1 egg
1 tbsp water 
All-purpose flour to cover work surface
1/2 of a 17.3-ounce package puff pastry, thawed 
1 cup carmelized onions
1 (13- to 16-ounce) Brie cheese round
1 crusty baguette
clove of garlic, peeled (optional)
olive oil spray (optional)

Instructions

  1. Defrost the puff pastry according to directions.
  2. Preheat the oven to 400°F.
  3. Beat the egg and water in a small bowl.
  4. Sprinkle the flour on the work surface. 
  5. Roll the pastry sheet into an approximately 14-inch square. 
  6. Gently take the brie and place in centre of pastry. Push gently and remove brie– you just want to see the indentation of the brie.
  7. Spread the onions on the pastry within the impression you just made. 
  8. Place brie on top of onions.
  9. Spread more onions on top.
  10. Fold the pastry up and over the cheese to cover. Trim the excess pastry and press to seal. 
  11. Brush the seam with some of the egg mixture.
  12. Place seam-side down onto a baking sheet.
  13. Brush all of pastry with the egg mixture.
  14. Bake for 20-25 minutes or until the pastry is golden brown. Let stand for 45 minutes (yes, 45 minutes).
  15. Serve with thinly cut bread. To take it up a notch, cut the bread into 1 cm slices, rub with a clove of garlic, spray with a bit of olive oil and grill on medium heat until slightly charred. 

withinthekitchen.blogspot.com

Monday, December 16, 2013

Christmas Cake Ideas

Hope everyone is having a great time preparing for Christmas! It's a lot of work isn't it??!!

My kids' school had their annual Christmas Craft and Bake Sale last week. The kids love it - each class make crafts to sell, families donate their gently used toys to resell, lots of sweet treats are made for the bake sale and there is an annual "cake walk". Families make a special cake and the kids do a kinda musical chairs thing to determine who wins a cake. This year I made 8 cake creations for the "walk". I thought I'd show some of them here just in case any of you are looking for ideas.
Two layer cake frosted with vanilla butter cream. After frosted we simply added a
gingerbread house we found at the dollar store and a few decorations from the local cake supply store. Super cute.


Same as above. A few different decorations.

Double layer cake that has been frosted. Ten (yes 10) kit kat bars surround the cake.
Threw a bunch of  Smarties on top with a Lindt Santa in the middle.

Same with a different toy on top!


This one is my fave even though the Santa needs work! lol. Frosted single layer cake with fondant for the blanket and figurines.


Wednesday, December 11, 2013

How to caramelize onions


http://withinthekitchen.blogspot.ca/2013/12/how-to-carmelize-onions.html
Caramelized onions


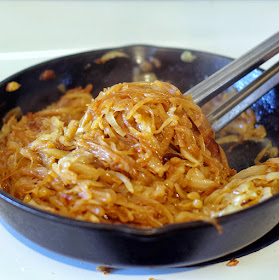
Caramelized onions are one of my favorite condiments/side dishes! They go with almost everything - pulled pork, baked beans, grilled cheese, chilli, and are amazing by themselves or on a piece of toast. I LOVE them.

But let's face it - they are a lot of work. Cutting those tear inducing veggies into thins slices is no easy task. And as they caramelize those suckers shrink so you need many onions! A few weeks ago I bought a hand-held mandoline and I have to say it makes slicing much easier (just try not to cut off a finger). Whenever I make these morsels of delightfulness I make a BIG batch and freeze them in smaller portions. I know some people think the flavour and texture of the onions is negatively effected by freezing but either they have waaay better taste buds than I do or they are full of poppycock.

Just remember to have patience. I don't add balsamic vinegar or sugar to these beauties - I just go slow and let nature take its course. I do use a cast iron pan most of the time because it produces a better colour and seems to take a little less time. Finally, I prefer using yellow onions not walla walla or sweet onions - I think the yellow variety ends up with the best flavour.
Mandoline makes slicing easier and less teary!

Mmmm


So good!

Ingredients

8-10 medium yellow onions
2 tbsp unsalted butter
1 tbsp olive oil
sprinkle or two of salt

Instructions

Makes about 3 cups.
  1. Over medium heat melt butter and oil. 
  2. As soon as it starts to sizzle, add the onions. 
  3. Stir frequently.Once the onions begin to brown turn heat to low. Stir frequently. 
  4. Onions will slowly caramelize over the next 30-45 minutes. It takes time but it is worth it.


Monday, December 2, 2013

Caramelized Apple Coffee Cake


When I think of apples Granny Smith, Pink Ladies, Golden Delicious and Macintosh come to mind. But there are also other wonderful apples that deserve our attention. Among these strong silent types is the Ambrosia apple. New in the world of apples, it started here in British Columbia and is now available around the world. It is a medium to large apple that is mostly red with ribbons of yellow throughout its skin. It is sweet and crunchy. It doesn't oxidize quickly which is a bonus if adding them to a fruit platter or fruit salad.
Batter, apples, almonds, repeat!

Is there anything better than caramel and apples? Only if you add almonds! To let the amazing flavours of those ingredients take top billing in this cake, I used our family's basic coffee cake recipe. It has a great texture to hold up to the apples and caramel sauce and isn't too sweet. I like this recipe the day it is made but if there is any left the next day the flavours meld together even more!

When I add the apples and caramel I set side most of the caramel sauce to add later once the cake is baked. There is also enough caramelized apples to have a bite or four before assembling it! Also, if you find your sauce is a bit too thick you can add up to another 1/4 cup of cream. It will thicken a bit as it rests.

See the layers of apples?!


Ingredients

Batter
1/4 cup unsalted butter, room temperature
3/4 cup granulated sugar
3/4 cup milk
1 egg slightly beaten
1 tsp vanilla
1.5 cups all purpose flour
2 tsp baking powder
1/2 tsp salt

Carmelized apples
4 ambrosia apples
1/2 c unsalted butter
1/4 c sugar
3 tbsp brown sugar
2/3 c whipping cream
1 c chopped roasted almond


Instructions

Carmelized Apples
  1. Over medium heat, melt unsalted butter in large sauté pan.
  2. Stir in sugars and continue to stir until combined with butter. 
  3. Add ambrosia apples. Sauté for about 10 minutes until apples start to turn golden brown and their juices start to release into the pan.  
  4. Add almonds and sauté for another 2 or 3 minutes. 
  5. Add whipping cream and simmer for 3 minutes until sauce thickens slightly. Remove from heat.


Cake:

  1. Cream butter and sugar for three minutes until light and fluffy.
  2. Mix in egg and vanilla until combined.
  3. In another bowl whisk together flour, baking powder and salt.
  4. Add sifted ingredients, alternately with milk (3 flour: 2 milk) into butter mixture and mix gently with each addition.
  5. Put 1/2 batter into greased tube pan.
  6. Layer half of apples and almonds reserving most of the sauce.
  7. Add rest of batter.
  8. Add rest of apples and almonds spreading evenly.
  9. Bake at 350 degrees for 30 minutes or until toothpick comes out clean.
  10. Cool cake 10 minutes, remove from pan and flip so topping side faces up.
  11. Spoon leftover caramel sauce over cake. 
  12. Cool completely.

Monday, November 18, 2013

Pumpkin Cranberry No-Bake Granola Bars


I was inspired by my friend Deborah over at Gourmetmom in making this dish. She sent me her fantastic seed cookies last month as part of the Foodie Pen Pals program we belong to and I wanted to create something just as healthy and delicious!

Prunes come together quickly in the food processor.
I made my own pumpkin butter, added prunes, flax, chia seeds etc. My 9 year old LOVES these bars - which means, of course, there is no way in H-E-double hockey sticks that I am going to tell her there are prunes or pumpkin seeds in them because she tells me she hates both!

They are packed with nutrition with a hint of sweetness and best of all no baking involved if you buy toasted pumpkin seeds!

Ingredients

2 cups pitted prunes
1/2 c pumpkin butter
1/4 cup honey
1/4 cup maple syrup
1/4 cup vegetable oil
3/4 cup pumpkin seeds
3/4 cup sweetened cranberries
3 cups oats
2 tbsp ground flax
1 tbsp chia seeds
2 tsp pumpkin spice

Instructions


  1. Spray a 9 x 11 pan with baking spray and cover the bottom and 2 sides with parchment. Spray parchment again. This will make it easier to remove the bars later.
  2. Place prunes in food processor and pulse until they are well chopped and starting to look well mashed.
  3. Heat honey, maple syrup, oil and pumpkin butter over medium low heat until it is well combined and just beginning to simmer.
  4. If desired toast oats in oven at 350 degrees F for 8 minutes.
  5. Place oats, prunes, spice, flax, chia, pumpkin seeds and cranberries in bowl and combine well.
  6. Add warmed honey mixture and stir until well combined being careful not to burn yourself.
  7. Place mixture in pan and gently spread until even and about 1 inch thick.
  8. If you don't have a 9 x 11 pan you can use a 9 x 13 and just make them thinner or don't spread all the way out. The mixture is stiff enough that you can easily shape it to the length you desire.
  9. Let sit until room temperature or place in fridge for a few hours before cutting into bars. I usually make 28 small bars.

These can also be frozen.

Monday, November 11, 2013

Panda Banana Cupcakes with Cream Cheese Icing


Isn't he cute!

My friend Anabel over at The Graceful Glutton and I may have an unhealthy obsession with pandas. Specifically the new born pandas at the Atlanta Zoo. We've been watching the panda cam since the day they were born.

So for Anabel's birthday it seemed a no brainer that these mini panda cupcakes were a perfect way to celebrate (never mind that she doesn't really like cake - I forgive her for that).

The idea for these are from Bakerella who makes the cutest creations ever.

For these panda cupcakes, I made a banana cupcake and cream cheese icing. Decorating the cupcakes is a snap. Don't skimp on the icing - a thicker blob of icing will make it easier to stick in the chocolate chips.


Cupcakes

Makes approx 18 mini cupcakes
Based on recipe by Rose Levy Beranbaum

Ingredients

2  large ripe bananas (1 cup)
1/2 cup sour cream
2 large eggs
1 tsp vanilla extract
1 teaspoons almond extract
2 cups sifted cake flour
¾ cup superfine sugar
1 tsp baking soda
¾ tsp baking powder
1/2 teaspoon salt

10  tablespoons unsalted butter 

Instructions

  1. Preheat oven to 350 degrees F.
  2. In a food processor, combine bananas and sour cream until smooth.
  3. Add eggs and vanilla. Mix just to blend.
  4. Combine the remaining dry ingredients in a stand mixer bowl and blend on lowest speed for 30 seconds to blend. Add the butter and half the banana mixture. Mix on low speed until the dry ingredients are moistened. Increase to medium speed and beat until well combined – about 2 minutes. Scrape down the sides. Gradually add the remaining banana and mix lightly – don’t over beat.
  5. Fill 18 mini cupcake tins about 3/4 full.
  6. Bake approximately 12-15 minutes until a toothpick comes out clean when inserted into the middle of a cupcake.
  7. Let the cupcakes cool in the pan on a rack for 10 minutes before removing from tins. Let cool.

Cream cheese Icing

Ingredients

8 ounces cream cheese, room temperature
1/4 cup butter, room temperature
2 cups icing sugar, sifted
1 tsp vanilla

Instructions

In large bowl, beat cream cheese until smooth.
Add butter and beat until smooth. 
Mix in vanilla. 
Add icing sugar and mix at low speed until combined. Increase speed and beat until well combined.

To decorate you will need:

White/clear sanding sugar.
Chocolate jimmies.
Chocolate chips
Candy eyes

Bringing it all together:

Gently spread icing on a cupcake.
Place sugar in a bowl and dip iced cupcake to cover icing.
Gently stick in chocolate chips for ears, eyes and nose.
Using icing for glue, add candy eyes on top of chocolate eyes.
Gently add jimmies for mouth.
Revel in cuteness.
Repeat with other cupcakes.


Monday, November 4, 2013

Easy Caramel Pumpkin Pie

Easy Caramel Pumpkin Pie - withinthekitchen.blogspot.com

This dessert is as easy as pie! No, seriously, this pie is simple so even novice bakers will produce a delicious dessert. The addition of dulche de leche evaporated milk gives the pie a sweet side but also a bit of a flavour twist that my husband loved more than a traditional pumpkin pie. The kids loved it too so leftovers didn't last long!

PS - I call it caramel pumpkin pie cause dulche de leche is just too long!
Easy Caramel Pumpkin Pie - withinthekitchen.blogspot.com


Serving: Serves 6-8
Ingredients
1 can (14oz/398 mL) or 1.5 cups pure pumpkin purée (not pie filling)
1 can (300 mL)  dulce de leche flavoured sweetened condensed milk (I use Eagle Brand®)
2 eggs
2 tsp ground cinnamon
½ tsp ginger
½  tsp nutmeg
Pinch of salt
whipped cream (optional)
9-inch (23 cm) unbaked pie shell (if you want to make your own try the pie crust recipe here.)

Instructions
  1. Preheat oven to 425 ºF (220 ºC)
  2. In large bowl, whisk together pumpkin, sweetened condensed milk, eggs, and spices.
  3. Pour into unbaked pastry shell.
  4. Bake in preheated oven for 15 minutes.
  5. Reduce oven temperature to 350 ºF (180 ºC) and bake an additional 35 to 40 minutes or until knife inserted two inches from edge comes out clean. If edges start to burn too early cover crust edges with foil.
  6. Cool.
  7. Store in refrigerator.
  8. If desired add whipped cream before serving.
Easy Caramel Pumpkin Pie - withinthekitchen.blogspot.com

Thursday, October 31, 2013

Foodie Pen Pals - October - Cooking with Jax


Another great month with Foodie Pen Pals!

This month I was lucky enough to be paired with Jax from Cooking with Jax! Check out her site for great recipes.

I have a confession to make - for the first time ever I forgot to take pictures of everything before we ate them!!! This shows just how good of a package it was. So, in addition to what was left when I finally remembered to pull out my camera there was also Thai curry paste, a fruit bar, maple flavoured coffee, and mandarin flavoured juice!

My favorite item was the bag of coconut chips! I must find more of them - I think they will be perfect on top of cupcakes (although they were also fabulous right out of the bag).

Jax, thanks so much for all the thought that went into this great pen pal box and sorry I forgot to take a pic of the whole package!


The Lean Green Bean

And now it’s time for some details about Foodie Pen pals.  In case you’re a new reader, here’s a reminder of what the program is all about:

-On the 5th of every month, you will receive your pen pal pairing via email. It will be your responsibility to contact your pen pal and get their mailing address and any other information you might need like allergies or dietary restrictions.

-You will have until the 15th of the month to put your box of goodies in the mail. On the last day of the month, you will post about the goodies you received from your pen pal!

-The boxes are to be filled with fun foodie things, local food items or even homemade treats! The spending limit is $15. The box must also include something written. This can be anything from a note explaining what’s in the box, to a fun recipe…use your imagination!

-You are responsible for figuring out the best way to ship your items depending on their size and how fragile they are. (Don’t forget about flat rate boxes!)

-Foodie Pen pals is open to blog readers as well as bloggers. If you’re a reader and you get paired with a blogger, you are to write a short guest post for your pen pal to post on their blog about what you received. If two readers are paired together, neither needs to worry about writing a post for that month.

-Foodie Pen pals is open to US, Canadian and European residents.  Please note, Canadian Residents will be paired with other Canadians only. Same with Europeans. We've determined things might get too slow and backed up if we’re trying to send foods through customs across the border from US to Canada and vice versa. 

If you’re from the US or Canada and are in participating for September, please CLICK HERE to fill out the participation form and read the terms and conditions. 

You must submit your information by Nov 4th as pairings will be emailed on Oct 5th!


Wednesday, October 30, 2013

Halloween Monster Marshmallow Pops


Ok, I did these the day before Halloween last year and didn't have time to post pre-Halloween. I thought I'd post them early this year for readers to see but of course I forgot! Yikes, I must be getting old! Anyways I'm posting them today instead of waiting another year.

They are easy to make. Melt green candy melts, stick lollipop stick in marshmallow, dip in melted candy, dip top marshmallow in colored sanding sugar and add two candy eyes. Once dry draw on a mouth and scars with an edible ink marker. Easy Peasy.

Ingredients

24 Marshmallows
2 cups green candy melts
edible food pen - black
sanding sugar or other candy decorations for hair
24 lollipop sticks
48 candy eyes

Instructions

  1. Melt green candy melts according to directions (2 cups should easily do 24 marshmallows)
  2. Stick lollipop stick in marshmallow,
  3. Dip marshmallow in melted candy - if needed gently tap to remove excess melted candy.
  4. While still wet, dip top of marshmallow in colored sanding sugar
  5. Add two candy eyes - if the candy is already dry add a little dap of candy to the back of the eyes and stick to marshmallow.
  6. Once dry draw on a mouth and scars with an edible ink marker.
  7. (I stick finished ones in styrofoam to dry but you could also just place them hair side down carefully on a baking sheet with parchment or a silpat to dry.)

Monday, October 21, 2013

Homemade Almond Butter

Easy almond butter - one ingredient! withinthekitchen.blogspot.com
Easy almond butter - one ingredient!


Who knew it was so easy to make almond butter? Not me, that's who!

We had a bag of almonds that tasted a bit stale to me so I was going to through them out...but it was a whole pound of nuts. Since I didn't want to waste them I decided to use them in my first attempt at making almond butter - if I totally screwed it up then no biggie since I was going to throw them out anyways.

I basically roasted them for twelve minutes in the oven. This actually made them taste much better!

I then threw them in my Nutribullet. If you don't have one a food processor will do the job - it just might take a bit longer or be a bit grainier than my results.

I didn't add anything else - no salt, no sugar, no nothing.

My husband says this almond butter is better than any type we have bought before! It's also creamier and doesn't seem to go as clumpy once in the fridge. It's delicious on apples, bread, yogourt, smoothies, oatmeal...well pretty much anything!

Ingredients


1 lb almonds (raw or roasted, skin on)

Instructions


  1. If using raw almonds, toast them in a 350 degree oven for 10 to 12 minutes.
  2. Cool.
  3. Throw into food processor or Nutribullet.
  4. Turn it on. It will quickly look like sand and you may think this is not gonna work. It will.
  5. If you have to, stop it and stir or shake it. Turn on again. Repeat as needed.
  6. Eventually (5-10 minutes) you will see it start to look more like almond butter. Keep going so it become really smooth. (another 3-5 minutes)
  7. I was multitasking the day I made this so I turned off the Nutribullet for 10 minutes while I did other things and then put it on again to ensure it was as smooth as possible.

Makes about a cup of almond butter.
Yum!


Monday, October 14, 2013

Turducken Roast Review


Happy Thanksgiving! We had 10 family members over for Canadian Thanksgiving dinner this year. Last year we roasted a turducken and we liked it so much we were thrilled when we were asked to try Echelon's new premium turducken roast with Italian sausage stuffing. De-boned duck and chicken breasts are layered with italian sausage stuffing into a whole turkey. It is formed into a large sized roast as the wings and legs are removed. It is wrapped in a twine net to ensure it stays together.


This year, we decided to smoke the turducken. We've smoked a traditional turkey before and loved the smoky flavour it imparts so I was hoping smoking the turducken would add an extra level of flavour.

Our turducken roast was so simple to prepare. We just had to defrost it. Our roast was about six pounds in weight so we had to let it defrost in the fridge for three days. Thanksgiving morning my husband  got the smoker ready and then all I did was open the package and slipped the turducken onto a roasting rack and placed it in the smoker. Five hours later we took it out and let it sit for 45 minutes. No basting required. Easy Peasy. The smoker imparts an amazing colour to the turducken skin.

Right out of the package!

Into the smoker it goes!
The best part of smoking the turducken is that it frees up my oven for other dishes! I was able to bake fresh buns, bake a spaghetti squash dish, and bake up an amazing puff pastry brie appetizer. It also makes those last few minutes of getting every on table much easier. The benefit of the roast version of turducken is the ease of slicing it. There are no bones, no legs, no wings, and it's already filled with stuffing. A sharp knife and a fork is all you need. The turducken slices definitely must be cut thicker than regular turkey slices or it doesn't stay together. And since it looks so great to have a slice that includes turkey, duck, chicken and stuffing you want it to stay together. It easily fed 6 adults and 4 kids. There was even a few slices left over for lunch!


Yup, overcooked but look at the beautiful colour of that skin!!
Getting back to the smoker, we all agreed that the smoking added lots of flavour to the skin and a little to the turkey layer but it didn't seem to penetrate further than that. Given the thickness and solid nature of the turducken this really isn't too surprising. Also, we learned that the turducken is pretty forgiving in terms of dryness. We overcooked the turducken - we should have taken it out when it 165 degrees F. By the time we finished our wine and remembered to check on the bird(s) the internal temperature had reached 200 degrees F!! Yikes! I was worried everything was as dry as the dessert. Thankfully, our turducken was  quite moist. There was a couple bites of my turkey layer that were on the dry side but every other layer was perfectly moist! Let's face it over cooking it wasn't the turducken's fault, it was ours. The turducken layers though kept it from drying everything out! Yeah turducken!

Three birds and stuffing all in one slice!
I wholeheartedly recommend a turducken from Echelon Foods! Guests love being able to boast about eating a turducken, it is flavourful and soooo easy to prepare either in the oven or in a smoker. If you haven't tried one yet go for it! You'll love it.
Happy Thanksgiving!
A turducken was provided to me for review but opinions, as always, are my own.