Pages

Thursday, January 31, 2013

Foodie PenPals - January


Foodie PenPals. Have you heard of it? It's a great program run by Lindsay over at the Lean Green Bean. She started it in September 2011 with 30 participants and it has grown to over 1300! Now that's success! In a nutshell each participant receives a foodie pen pal to send a little foodie related package that shouldn't cost more than $15 (not including shipping). It can be home made goods, local  food items, or other foodie related treats. Then each person sending a package also receives a similar package (though not from the person they sent one too). Organizing it must take a lot of dedication and effort and Lindsay does a great job of pulling everything together!

My third month of Foodie pen pals and I still love it :) this month my pen pal is Candice from Ontario. 

Candice sent a great package filled with amazing treats! White tea - which was perfect because I was fighting a cold the day it arrived! Also, a great stash of chocolate, apple cider mix and granola bars! All were perfect for a busy Mom on the run! Thanks Candice!

And now it's time for some details about Foodie Penpals.  In case you’re a new reader, here’s a reminder of what the program is all about:


-On the 5th of every month, you will receive your penpal pairing via email. It will be your responsibility to contact your penpal and get their mailing address and any other information you might need like allergies or dietary restrictions.

-You will have until the 15th of the month to put your box of goodies in the mail. On the last day of the month, you will post about the goodies you received from your penpal! 

-The boxes are to be filled with fun foodie things, local food items or even homemade treats! The spending limit is $15. The box must also include something written. This can be anything from a note explaining what’s in the box, to a fun recipe…use your imagination!

-You are responsible for figuring out the best way to ship your items depending on their size and how fragile they are. (Don’t forget about flat rate boxes!)

-Foodie Penpals is open to blog readers as well as bloggers. If you’re a reader and you get paired with a blogger, you are to write a short guest post for your penpal to post on their blog about what you received. If two readers are paired together, neither needs to worry about writing a post for that month. 

-Foodie Penplas is open to US, Canadian & European residents.  Please note, Canadian Residents will be paired with other Canadians only. Same with Europeans. We've determined things might get too slow and backed up if we're trying to send foods through customs across the border from US to Canada and vice versa. 

If you’re from the US or Canada and are in participating for November, please CLICK HERE (www.theleangreenbean.com/foodie-penpals/) to fill out the participation form and read the terms and conditions. 
You must submit your information by February 4th as pairings will be emailed on February 5th!

*If you're from Europe, please CLICK HERE (www.thisisrocksalt.com/foodie-penpals/) to signup. 

Sunday, January 27, 2013

Daring Bakers! Gevulde Speculaas


Francijn of Koken in de Brouwerij was our January 2013 Daring Bakers’ Hostess and she challenged us to make the traditional Dutch pastry, Gevulde Speculaas from scratch! That includes making our own spice mix, almond paste and dough! Delicious!

According to Francijn, gevulde speculaas (stuffed speculaas) is a traditional Dutch pastry. Despite all the steps, it is not hard to make, it doesn't take a lot of time, but it is delicious, beautiful and very traditional. The spices are amazing and reminds me of gingerbread spices. I loved the ease of making my own almond paste from scratch. To make rolling the dough easier, I divided it into medium sized ziploc bags. I also used a slightly smaller pan than suggested - 8 x 6 - which was about the size of the bags so placing the dough into the pan was easier.

The recipe got rave reviews from my family and co-workers! I highly recommend trying it!

You can download the recipe here.

The dough is easier to handle if you place it in a medium sized Ziploc bag.


Home-made almond paste goes in the middle.


Another layer of dough.
The finished cake will fill your home with the most amazing aroma thanks to the spice mix.


Thursday, January 24, 2013

Cookbook review - Savory Pies by Greg Henry and Sausage and Red Pepper Polenta Recipe


I love reviewing cookbooks - it gives me a chance to cook and experience recipes that I would not otherwise find. Such is the case with Savory Pies by Greg Henry. It is a gem of a book. No sweet pies will be found in this book though. All of the beautifully presented recipes are filled with vegetables, meats, poultry, seafood recipes that have some sort of crust. Traditional crusts, of course, are included but you'll also cobblers, filo pastry crusts, tarts, flat breads, and even hand pies.The book is divided into useful sections including crusts, appies, main course - meat and seafood, main course - vegetarian, and hand pies. The pictures will make you hungry! The instructions are clear and a nice bonus are the 'wine pairing' side bars that are included with many recipes. 

The recipes will appeal to family nights (chicken pot pie and mac-n-cheese pie with potato crust) as well as fancier parties (carmelized fennel and onion pissaladiere or lamb and apricot phyllo cups). I plan on trying quite a few over the coming months. 


The book itself is about 200 pages, soft cover and just the right size - it won't take up too much space on your cookbook shelf but I am guessing it will be well used! 


The first recipe I tried was Sausage and Red Pepper Polenta Cobbler. It sounded like a hearty meal with  a healthy dose of veggies! I also love one pot meals that can be brought to the table straight from the oven! 


The instructions were easy to follow and the recipe had enough leeway to customize it a bit (e.g. adding garlic and paprika, switching cheddar for the parmesan, buttermilk for the cream etc) without affecting the end result. The polenta cobbler was outstanding and the sausage and veggies combined deliciously to keep you going back bite after bite until it was all gone! The recipe says it serves 4 but I think it could easily serve 6.


Ulysses Press has given permission to reprint the original recipe below. And if you like savory pies go and buy this book!

Sausage and Red Pepper Polenta Cobbler

Savory Pies by Greg Henry. Ulysses Press, 2012. ISBN  978-1-61243-106-2


Makes 4 servings

1 tablespoon olive oil
4 or 5 spicy Italian sausages (about 1 pound), removed from their casings
Kosher salt and freshly cracked black pepper
1 medium onion, halved lengthwise and thinly sliced
2 red bell peppers, halved and sliced lengthwise into ¼-inch strips
1¾ cups all-purpose flour, divided
2 cups chicken broth
2 tablespoons tomato paste
3 cups loosely packed baby spinach (about 3 ounces)
½ cup quick-cooking polenta mix or yellow cornmeal
1 teaspoon baking powder
1 teaspoon baking soda
1 cup grated Parmesan cheese
6 tablespoons (¾ stick) chilled, unsalted butter, cut into ½-inch dice
1¼ cups heavy cream, plus 1 tablespoon for brushing

Heat the olive oil in a 12-inch cast-iron or other ovenproof skillet over medium-high heat. Add the sausage and season with a pinch each of salt and pepper. Cook until browned, breaking up with a wooden spoon, about 10 minutes. Using a slotted spoon, remove the sausage from the skillet. Pour off all but about 2 tablespoons fat.

Add the onion to the skillet and cook, stirring occasionally, until somewhat softened, about 5 minutes. Add the pepper strips and cook 5 more minutes, stirring occasionally. Season to taste with salt and pepper.

Meanwhile, in a medium bowl whisk together ¼ cup flour and the tomato paste. Slowly whisk in the chicken broth until well combined; add to the skillet. Stir in the spinach and sausage and cook about 2 minutes, until slightly thickened. Remove from the heat and adjust the seasoning, if needed. (The filling may be prepared several hours ahead to this point; let come to room temperature, then cover and refrigerate.)

Place an oven rack in the center position. Preheat the oven to 375°F.

In a medium bowl, whisk together the remaining 1½ cups flour, polenta, baking powder, baking soda, and ½ teaspoon salt. Using a pastry blender, 2 butter knives, or your fingers, cut or rub in the butter until the mixture resembles coarse crumbs with various-size chunks of butter visible throughout. Add the Parmesan, cutting or rubbing to lightly mix. Stir in 1¼ cups cream until a rough dough forms.

Drop 6 or 8 large mounds of polenta mixture over the sausage mixture, 1 inch apart. Brush the remaining 1 tablespoon cream on top. Bake until the filling is bubbly and the polenta topping is golden brown, about 25 minutes; a knife inserted in the center should come out clean. Bring the skillet to the table and serve warm.

Thursday, January 17, 2013

Corn Tortilla Casserole

Layers of deliciousness!

I love this casserole dish. It works with well with chicken or pork and you can use whatever veggies and cheeses you have on hand. I love using little dollops of cream cheese in the layers as it adds a great creamy texture. Of course depending on your spice tolerance level you can add or remove the jalapeños. 

If possible, I think this recipe tastes best if you can use home-made corn tortillas. They are infinitely better than store bought (at least the ones in shops near me!) and their texture stands up better if freezing or making ahead!

Adapted from a recipe by Cookin' Canuck.

Ingredients

2 large onion, diced
1 red bell peppers, diced
1 head of garlic, minced
2 tsp ground cumin
1 tbsp garam masala
2 tsp smoked paprika
1/4 tsp salt
2 cups enchilada sauce
12 corn tortillas
2 cups cooked chicken meat or pulled pork, shredded or chopped
1/2 cup sliced black olives
1-2 jalapenos, finely diced
1 can (14 oz) black beans, drained and rinsed
4 oz. cream cheese
2 cups shredded cheese

Instructions

  1. Preheat oven to 375 degrees F.
  2. Using a non-stick pan, add cumin, paprika, garam masala, and salt.
  3. Mix together and cook for 1 minute to release aromas.
  4. Add onion, garlic and bell pepper and sauté for 5 minutes (until translucent). Stir often so garlic does not burn.
  5. Add cooked chicken, olives and beans and combine well.
  6. Coat a 9- by 13-inch baking dish with cooking spray. Spread 1/2 cup of the enchilada sauce in the bottom of the dish.
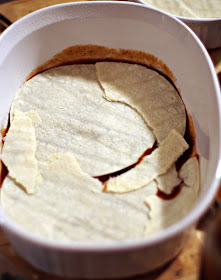
  7. Cover the bottom with 4 tortillas, tearing the tortillas as necessary to make them fit properly.
  8. Spread 1/2 chicken mixture over the tortillas.
  9. Sprinkle 1/3 of shredded cheese and dollop 1/3 of cream cheese over mixture
  10. Top with 1/2 of the remaining enchilada sauce.
  11. Add another layer of tortillas, chicken mixture and cheese.
  12. Top with tortillas again and remaining sauce
  13. Add remaining cheeses
  14. Bake until sauce is bubbling around the sides of the dish about 40 to 45 minutes.
  15. If cheese browns too quickly cover with foil
  16. Remove from oven and cool for 10-15 minutes before serving.


Sauté your veggies, spices and meat.


Tear your tortillas to make them fit without a lot of overlapping.


You can make big family style portions or individual ones.


Thursday, January 10, 2013

Grilled Corn Chowder


This chowder is thick! It is filling and a true comfort food. My mom  often made us corn chowder when we were kids. We loved it! My version uses roasted or grilled corn to bring out corn's sweetness and add another depth of flavour but at its core it is similar and still a favorite on a cold winter's night.


Ingredients

4 ears corn, husked
1 can niblets
1 can creamed corn
1 cup white wine
2 lbs fingerling potatoes, sliced
1 medium yam
1 large onion, diced
1 head garlic, minced
1 tbsp curry powder
1 tsp freshly ground pepper
1 lb bacon
1/2 cup milk
water if needed
2 cups stock


Instructions

Turn oven to broil and preheat. Lightly brush corn with a little vegetable oil. Place under broiler and watch constantly. As corn begins to broil and niblets start to turn brown turn the cobs until they are nicely coloured. Remove from oven and cool slightly so you can handle them. Carefully cut off niblets. Set aside.

Saute bacon on medium-high heat  in a large heavy pot until crisp. Add potatoes, yam and onions. Saute for 5 minutes. Add wine by the 1/4 cup. Stir often and saute. Scrape up the brown bits on the bottom of pot as you stir. The wine will absorb into the potatoes. Add another 1/4 cup and repeat until all is absorbed.  Add garlic, curry and pepper and cook for 2 minutes while stirring. Add all corn, and stock. If the chowder is too thick for your tastes add milk and/or water until desired consistency is reached. Let gently simmer for 20 minutes before serving.


Friday, January 4, 2013

Healthy and Easy Ginger - Garlic Green Beans


I love green beans.... as long as they are cooked properly. Overcooked they turn to dull, tasteless and limp mush but cooked until just tender crisp green beans are bright, delicious and an easy way to increase your veggie intake.

This recipe is so simple and so full of flavour! Ginger and garlic are perfect flavour partners and you need just a splash of oil - if you have a non-stick pan you can probably even use less. If you want a more Asian inspired dish just sub in a teaspoon or two of sesame oil and a splash of soy sauce instead of salt.


Healthy and Easy Ginger and Garlic Green Beans

Ingredients

1/4 cup grated ginger
6 cloves garlic, minced or grated
2 tbsp oil
2 lbs green beans, ends cut off
Salt to taste

Instructions

Boil large pot of water. Add beans and cook for 3 minutes. The beans should still be crunchy.  Drain immediately and plunge beans into large bowl of ice water to stop cooking and ensure the beans retain their color. Drain. If needed, the beans can be refrigerated at this point for up to a day before proceeding (keep a damp paper towel over them).

Heat oil in large pan over medium heat. Add garlic, ginger and beans. Stir to coat and heat through. Salt, if desired.

Serves 6-8.