Pages

Wednesday, May 30, 2012

Rhubarb-Strawberry Cobbler


Looking back, growing up in Nova Scotia meant we took for granted many things like some of the best seafood in the world, neighbours who were like family, beautiful beaches and the smell of the ocean. But now I realize we also took for granted blueberry bushes that we found everywhere- we had one in our driveway and another the end of block. And rhubarb. Rhubarb grew in lots of places around the neighbourhood. I don't remember my mom baking with it much but i do remember some wicked rhubarb whipping fights with friends! 


Now I'm on the opposite coast and while we have amazing friends and still have access to some great seafood, the beach sand is rough and gritty and the ocean smell doesn't waft through our open windows. I was tempted to buy a blueberry bush the other day as I have never run into one in my neighborhood. And I have yet to see wild rhubarb here let alone have a good rhubarb fight! So when I saw rhubarb at our local vegetable store I decided to grab a few stalks and bake with them for the first time! 


I have a cookbook called Nova Scotia Cooking that my mom gave to me 10 years ago. I have to be honest and say I had not made a single recipe from it...until now! Of course I modified a few things to my tastes. I also added orange blossom water...although optional I absolutely loved the orange flavor it added to the fruit base! It turned out even better than I had expected! 


Cobbler has a batter topping that is spooned on top and bakes into an almost cake/muffin like consistency. This differs from crisp or crumble which has an oat, flour and butter topping without the added milk. I sprinkled turbinado sugar on top for a sweet and crunchy texture but that is totally optional too. 


Ingredients 
2 c sliced strawberries 
3 c rhubarb, chopped 
Juice of one lemon 
2/3 c white sugar 
1 c whole wheat flour 
1/2 c rolled oats 
2 tsp baking powder 
3 tbsp brown sugar
2 tsp cinnamon 
1/3 c butter 
1 c milk 
1 tsp orange blossom water (optional) 


What to do 
Preheat oven to 400 degrees F. 
In a 9 inch square baking dish or deep dish pie pan, combine berries,rhubarb, lemon juice, orange flavour and white sugar. In a medium mixing bowl whisk together flour, oats, baking powder, brown sugar and cinnamon. Cut in butter with pastry blender or fork until small crumb like mixture results. Stir in milk until just combined. Drop by the spoonful on top of fruit mixture. Bake for 35 to 40 minutes until golden. Makes 6 to 8 servings. 


Great with a dollop of whopped cream or ice cream.

Sunday, May 27, 2012

Challah back, y'all - Challah bread - Daring Bakers Challenge

Honey white challah in a rather sad looking 6-strand braid
and a whole wheat version with sesame seeds and a much easier 3-strand braid!
May’s Daring Bakers’ Challenge was pretty twisted – Ruth from The Crafts of Mommyhood challenged us to make challah! Using recipes from all over, and tips from "A Taste of Challah," by Tamar Ansh, she encouraged us to bake beautifully braided breads.
Very rich tasting and easy to make!

The great recipes can be found here.

Until recently, I have not been much of a bread maker. I remember my mom baking bread a lot when I was a kid... and really, is there a better smell than baking bread or a better taste than fresh, warm bread and butter with jam??? I don't think so.

So this Challah challenge was quite exciting to take part in. The recipes that I followed (whole wheat and honey white) were easy and straight forward. I was a bit too ambitious with my braiding though - a 6-strand braid was waaay to complicated for me. I should have started with the regular 3-strand version! Regardless, the bread was fantastic. My favorite is the honey white! It has a rich taste and I found that one slice was very filling.


I froze a couple of loaves for future bread puddings, croutons, bread crumbs, french toast ideas. I will definitely be making this bread again!


Here is the honey white recipe.


(from Tammy’s Recipes)
Servings: 2 loaves

Ingredients
1 ½ cups (360 ml) warm water, separated
1 Tbsp. (15 ml) (15 gm/½ oz sugar
2 Tbsp. (2-2/3 packets) (30 ml) (18 gm) (2/3 oz) dry active yeast
½ cup (120 ml) honey
1 Tbsp. (15 ml) oil (light colored vegetable oil, or olive oil if you prefer)
4 large eggs
1 ½ tsp. 7½ ml) (9 gm) (1/3 oz) salt
5 cups (1200 ml) (700 gm/25 oz) all-purpose (plain) flour, plus more as needed (up to 8 or 9 cups total)
1 egg beaten with 1 tsp. water

What to do
  • In mixer bowl/large mixing bowl combine ½ cup warm water, 1 Tbsp. sugar and 2 Tbsp. yeast. Allow to proof approximately 5 minutes until foamy.
  • To the yeast mixture add the remaining water, honey, oil, eggs, salt and 5 cups of flour. Knead (by hand or with your mixer’s dough hook) until smooth, adding flour as needed. Knead for approximately 10 minutes.
  • Transfer dough to a clean, oiled bowl, turn to coat or add a bit more oil on top. Cover bowl with a kitchen/tea towel. Leave to rise in a warm place until doubled, about 1 ½ hours.
  • Punch down the dough, divide it into two sections. Use one half to make each loaf (shaped or braided as desired).
  • Place loaves on parchment lined or greased baking sheets, cover with a towel, allow to rise 30 minutes.
  • Preheat oven to 325 degrees.
  • Brush tops loaves with egg wash. (Sprinkle with seeds or toppings here if wanted.)
  • Bake loaves 30-40 minutes until done.
  • Cool on wire racks.

Friday, May 25, 2012

Mango-Avocado Chicken Salad with Maple Citrus Vinaigrette


Spring has finally sprung in Vancouver! The sun has finally banished the grey clouds, rain and cold temperatures that have been enveloping us for months. Vancouverites have finally shed their layers of long sleeves, coats, rain boots and frowns for flip flops, shorts, sunglasses and smiles! This salad is my ode to spring and offering to the sun gods in the hope this weather sticks around for a few months! Nothing says spring like fresh, bright fruits including mangos and berries. Combining them with creamy avocado and a bright dressing completes this delicious salad. Happy spring! Serves 2.


Ingredients
Salad
1 medium mango
1 avocado
1 full chicken breast, cooked and sliced
1/2c sliced strawberries
1/4c roasted, unsalted pistachios
5 c baby spinach leaves, washed and dried


Dressing
1/2 c maple syrup
1/2 c orange champagne vinegar (or sherry vinegar +2 tbsp orange juice)
1 c extra virgin olive oil
1 heaping tbsp of dijon mustard
pinch of salt
1/2 tsp ground pepper
1 tsp fresh time, chopped (optional)

What to do
Pour all of the dressing ingredients into a large mixing bowl or container that has a lid. Whisk or shake the dressing until it is well combined! This makes about 2 cups of delicious dressing. The dressing will keep for a few weeks in your fridge. Besides this salad I love it on cole slaw too.

Cut the 'cheeks' off each side of the mango and score it in a crisscross pattern. Turn it "inside out" and cut off the chunks. Look here for detailed instructions on mango cutting.

Halve the avocado, remove the pit and peel the skin off of each half. Chop in similar size pieces to the mango. If desired, spoon over some lime juice to prevent discolouration.

I'm a drizzler, not a tosser when it comes to salad so from here I divide the ingredients into two halves. Using large shallow bowls. I arrange the spinach leaves on the bottom, scatter the mangos, strawberries and avocados on top of the leaves and then arrange the chicken on top. The pistachios get sprinkled on top of everything. Then I drizzle a tbsp or two of dressing on top. But if you are a tosser then by all means throw everything in a big bowl and add 4 or 5 tbsp of dressing and toss away. Divide between two plates. Either way - enjoy!

Monday, May 21, 2012

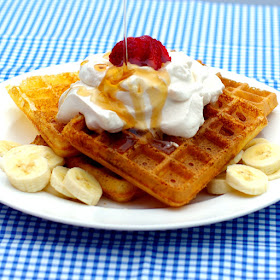
Overnight Yeast Waffles


I have a secret to share...I can't make pancakes. Seriously, every pancake I have ever made has either been burnt, tough, in multiple pieces thanks to terrible flipping or just tastes bland!! Somehow that bowl of batter gets into my head and I crumble into a pile of cooking dust. 


Thank god for waffles and crepes - those I can do! Waffles are my favourite. I love pouring the batter into the waffle iron, hearing the initial sizzle of batter against metal, watching the cloud of hot steam rise, and the aroma of buttery batter fill the room.


Usually, I make a classic buttermilk version but I cam across this raised waffle recipe in The Cake Bible  Rose Levy Beranbaum. After a little look-see on the internet I found this recipe or a version of it is all over the web.The original was created by Marion Cunningham (no not that Marion Cunningham). 


I love the recipe. The yeast batter is unique. When you wake up and walk into your kitchen the yeast will fill your senses. When you cook your waffles, you will see a waffle that is so crispy and thin that when you hold it up to the sun, light will stream through. Your first bite is crunchy, buttery and yes a little yeasty - heaven! We add warmed maple syrup and a little whip cream for a totally decadent treat. Try these. You will love them!


Ingredients
Makes enough for about 8 waffles.
1/2 cup warm water, 110 degrees F
1 package active dry yeast or 2-1/4 tsp, not rapid rise!
2 cups milk, slightly warmed
1/2 cup butter, melted (let cool a bit so, again, you don’t kill the yeast)
3/4 teaspoon salt
1 teaspoon sugar
2 cups all-purpose flour
2 large eggs
1/4 teaspoon baking soda


What to do 
1. In a very large mixing bowl, stir together warm water, sugar and yeast. Let stand for 20 minutes...it should be very bubbly otherwise yeast us dead and you should start again with new yeast. 


2. Add butter, milk, salt, flour and whisk until no lumps remain. 


3. Cover with the bowl with plastic wrap and let stand on your counter overnight at room temperature. If you watch it, the mixture will expand by 3x it's volume ... But it will collapse back on to itself. 


4. In the morning, preheat your waffle maker. 


5. Remove plastic wrap and beat in your eggs. 


6. Add the baking soda and stir to combine. The batter will be very thin!


7. Depending on the size of your waffle maker, add 1/3 to 1/2 c of batter onto the centre of your waffle maker. Cook as directed by your manufacturer. 


Mine take about 4 minutes or so to cook to perfection. Makes about 8 or so waffles that are 9 inches sq.


Notes:

  1. Batter can be kept for 3 days in fridge or even frozen for up to two months! (Thaw frozen batter in fridge).
  2. Cooked waffles can also be frozen and reheated toasted on low.

Thursday, May 10, 2012

Chocolate Chip Cookie Cup Bites with Buttercream


Sweet little bites!

I love cake but sometimes the the chewy yet crispy nature of a great chocolate chip cookie can't be beat. And to be honest regardless of the cake, more times than not, I am more interested in the icing! And that's how this came cookie cup with buttercream icing came to life. Of course, you could make any chocolate chip cookie and just slather icing on it but this time I wanted a cute little presentation that would look fancy enough for showers, lunches, teas etc. What do you think?


Except for some added vanilla this cookie recipe is off the back of the bag. I also zap the chips in my food processor first. This, I think, infuses the chocolate taste into the dough better and because this recipe uses extra mini muffins tins, the chips as is would be too big.


The buttercream goes back to my childhood - simple and delicious. I added some pink colouring gel to it but the possibilities are endless.


I found the cookies needed a little coaxing to come out of the pan so maybe a little spray of oil would have helped. The pan I used was a little smaller than a classic mini muffin tin and had fluted edges (maybe 1-1/2 inches wide) but I'm sure the regular mini pans will work but might take an extra minute to bake.


Finally, if you don't need to make 5 dozen cookies. Feel free to make a dozen or two and freeze the rest. You can also freeze the icing!


Ingredients
2/3 cup melted butter
2 cups lightly packed brown sugar
2 eggs
2 tablespoons hot water
2 tsp vanilla
2 2/3 cups all-purpose flour
1 teaspoon baking powder
1 teaspoon baking soda
1/4 teaspoon salt
1 package (270 g) CHIPITS® Milk Chocolate Chips

What to do
  • Heat oven to 375°F (190°C).
  • In large bowl, beat melted butter, brown sugar, eggs, vanilla and hot water until smooth- about 3 minutes.
  • In medium bowl, mix together flour, baking powder, baking soda and salt. Stir into butter mixture until blended.
  • Pulse chocolate chips in a food processor until sand-like.
  • Stir in the chips. Take about a teaspoon of dough and press into the muffin tin that you have on hand. If you put too thick of a layer of dough in it will rise up and not leave you with much of a "cup".
  • Bake 10 minutes until golden (this may change depending on size of tin you use).
  • Let cool at least ten minutes. Try to remove from tin. If it crumbles cool longer until you can remove the cookie cups.
  • Makes about 5 dozen cookies.

Buttercream Icing

Ingredients
4 cups powdered sugar
1 cup butter, unsalted and at room temperature
2 tsp vanilla
1/2 c milk

What to do
  • Sift sugar into large bowl.
  • Cut butter into smaller pieces.
  • Turn mixer on low and slowly add the butter one piece at a time.
  • Add vanilla.
  • Slowly add milk.
  • Turn to medium speed and beat for 4 minutes.
  • If desired, add food coloring and beat until consistent color is reached.

Preparing Cookie Cups

  • Using either an icing bag or a plastic sandwich bag with a small part of one tip cut away, fill the bag with a cup or so of icing.
  • Neatly fill your cookie cups with a swirl of icing.
  • Enjoy!

Wednesday, May 2, 2012

Honey Cookies


This recipe is adapted from an old Purity cookbook that was given to me by my Mom many years ago.  I still use many of the recipes including this one for simple honey cookies. The original recipe added a tablespoon of orange rind to the dough - too much work for me :) but you may want to add it to yours. These cookies also hold up well should you want to sandwich them with your favorite buttercream!

Honey Cookies

Makes about 3 dozen cookies.

Ingredients
2 c flour
½ tsp baking powder
¼ tsp baking soda
¼ tsp salt
¾ c butter, unsalted, at room temperature
1/3 c sugar
½ c honey
1 egg

Chocolate decorations (if desired)
1/2 c melted white chocolate chips
1/2 c melted milk chocolate chips

What to do

  1. Preheat oven to 350 degrees F.
  2. Line cookie sheet with parchment or silpat.
  3. Sift together flour baking powder, baking soda and salt.
  4. In another bowl, cream together the butter, sugar and honey until light and fluffy – about 4 minutes.
  5. Mix in the egg and beat for an additional 30 seconds or so.
  6. Gently mix in dry ingredients.
  7. Refrigerate dough for 2 hours.
  8. Once chilled, lightly flour your work surface and roll out dough until it is ¼ inch thick.
  9. Cut into desired shapes with your favorite cookie cutter(s).
  10. Bake for 10 to 12 minutes. If your cookies are less than 2 ½ inches in diameter start checking for doneness at 8 minutes.
  11. Cool completely. If desired drizzle with chocolate.